


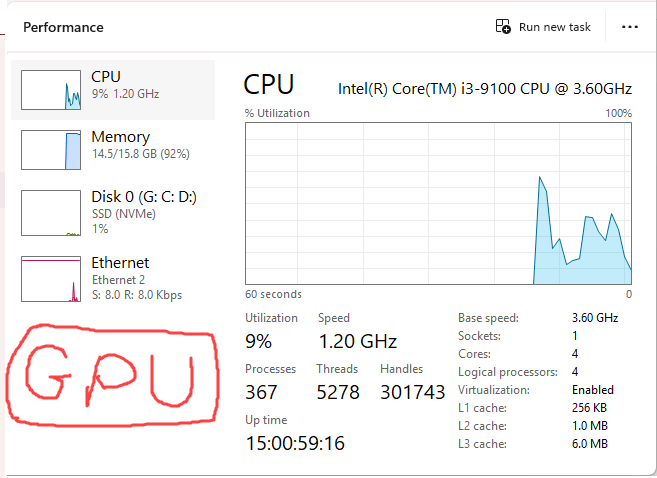
Wondering why your GPU isn’t showing up in Task Manager? You’re not alone. Many users open the Performance tab expecting to see their graphics card listed, only to find it missing entirely.
But don’t worry. In this guide, we’ll show you 7 proven fixes to get your GPU back in Task Manager. Read on…
Fix 1: Update your GPU driver
A missing or outdated GPU driver is the most frequent cause of your graphics card not appearing in Task Manager. The driver acts as the essential communication bridge between Windows and your GPU hardware. If this bridge is broken, be it outdated, corrupted, or incompatible, Windows will fail to recognize the GPU properly. As a result, Task Manager won’t display your GPU in the Performance tab, even if your card is physically working. To fix this, you should update your GPU driver.
You can update your GPU driver manually by visiting your GPU manufacturer’s website, searching for your specific model, downloading the latest driver, and installing it yourself. However, this process can be time-consuming and risky: choosing the wrong driver version or incorrect installation steps may introduce further performance issues or lead to instabilities. If you’d rather avoid the hassle — and the risks that may come with it, you can do it automatically with Driver Easy.
Driver Easy is a trusted driver update tool that automatically detects your hardware, matches it with the latest manufacturer-recommended driver, and lets you install it in just a few clicks. With Driver easy, you don’t need to worry about compatibility issues or missing steps. Driver Easy takes care of it all.
All it takes is just a few clicks:
- Download and install Driver Easy.
- Run Driver Easy and click the Scan Now button. Driver Easy will then scan your computer and detect any problem drivers.
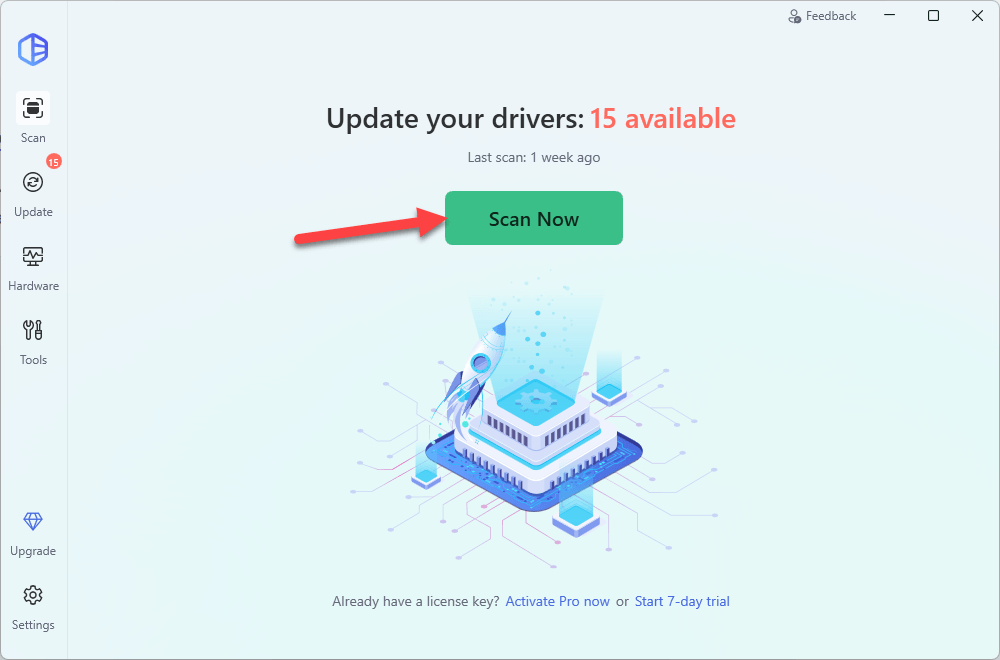
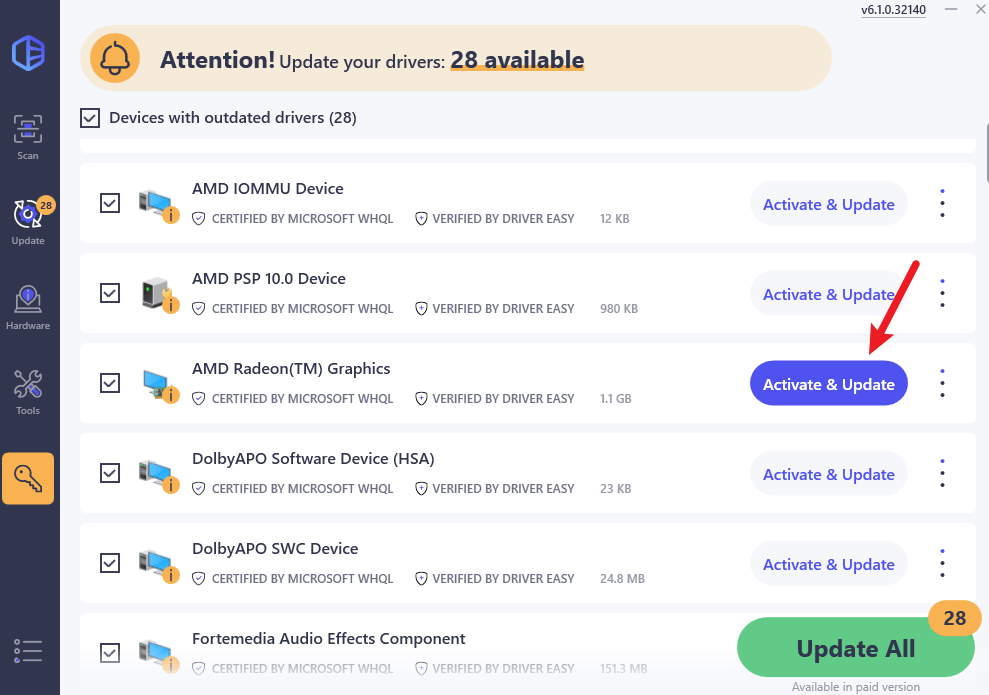
- Check if your graphics driver appears flagged in the scan results. If so, click Activate & Update to start a 7-day free trial or upgrade to the Pro version. Either way, Driver Easy will download and install the latest drivers for you.
- Restart your computer for the changes to take effect.
- Open Task Manager and go to the Performance tab. If your GPU is now detected and shows activity, congratulations — the issue is resolved! If it’s still missing, don’t worry. Please proceed to Fix 2.
Fix 2: Check Device Manager
If your GPU doesn’t appear in Task Manager, it may be because Windows isn’t detecting it properly. This often happens when the GPU is disabled, missing, or has driver errors in Device Manager, which prevents proper communication between the hardware and the system.
To check if Devie Manager recognizes your GPU:
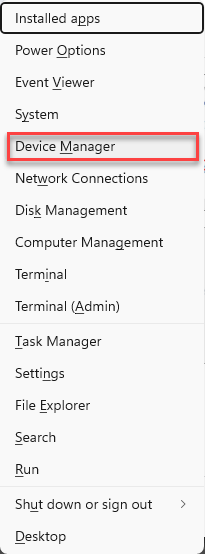
- On your keyboard, press the Windows logo key and X simultaneously and select Device Manager from the menu.
- In Device Manager, expand the Display adapters category.
- Look for your GPU in the list:
- If your GPU is listed without any warning icons, it is detected properly. In this case, jump to Fix 3.
- If it’s missing or has a yellow exclamation mark or other warning symbols, there’s an issue. In this case, right-click the GPU, select Properties, and check the error details for troubleshooting.
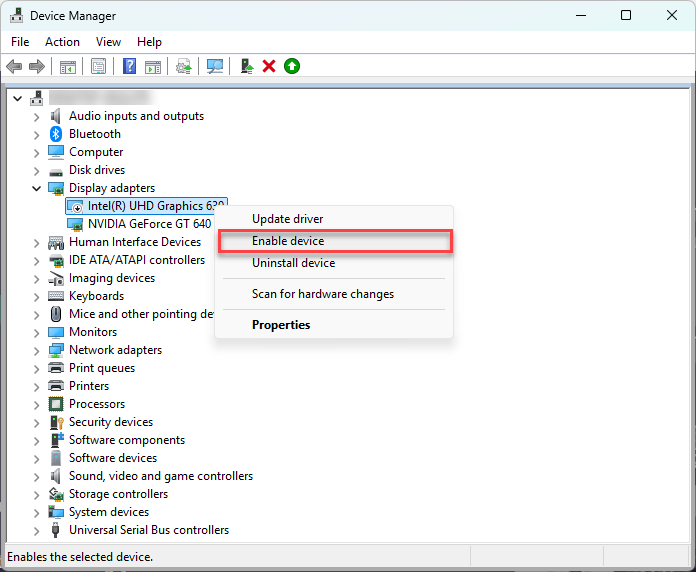
- If the GPU is disabled, right-click it and select Enable device.
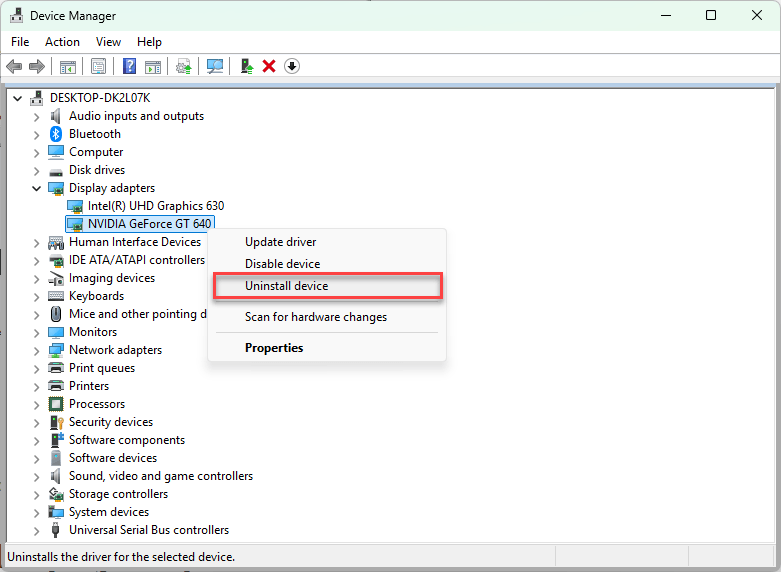
- To reinstall the driver, right-click the GPU and choose Uninstall device, then restart your PC and use Driver Easy to reinstall the driver.
Fix 3: Rebuild performance counters
If your GPU is listed in Device Manager but does not show in Task Manager, the problem may lie with Windows’ performance monitoring system. In particular, the performance counters that Task Manager uses to report hardware statistics might be corrupted or misconfigured, which can prevent the GPU from being displayed.
Fortunately, you can rebuild these performance counters with a simple command-line fix:
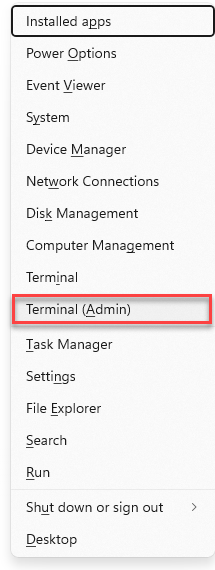
- On your keyboard, press the Windows logo key and X at the same time, then select Terminal (Admin).
- Enter lodctr /R and press Enter.
- In case you encounter error “Unable to rebuild performance counter,” run each of the following commands individually: type a command, press Enter, then proceed to the next.
cd C:\Windows\SysWOW64lodctr /Rcd C:\Windows\System32lodctr /R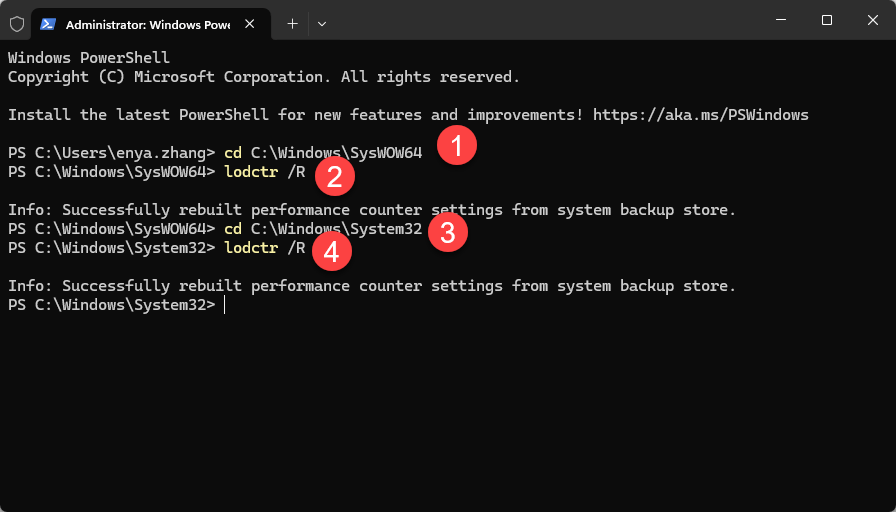
Once successful, restart your computer. Check if you can now see the GPU in Task Manager. If yes, you’re all set. If it’s still missing, please move on to Fix 4, below.
Fix 4: Check power settings
On laptops with both integrated and dedicated graphics, certain power settings can prevent the dedicated GPU from being used. Some power plans prioritize energy savings, which may lock the system to the integrated GPU and keep the dedicated one inactive, hence the GPU disappearing from Task Manager issue.
How to check and adjust power settings
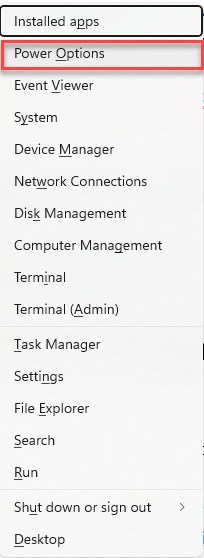
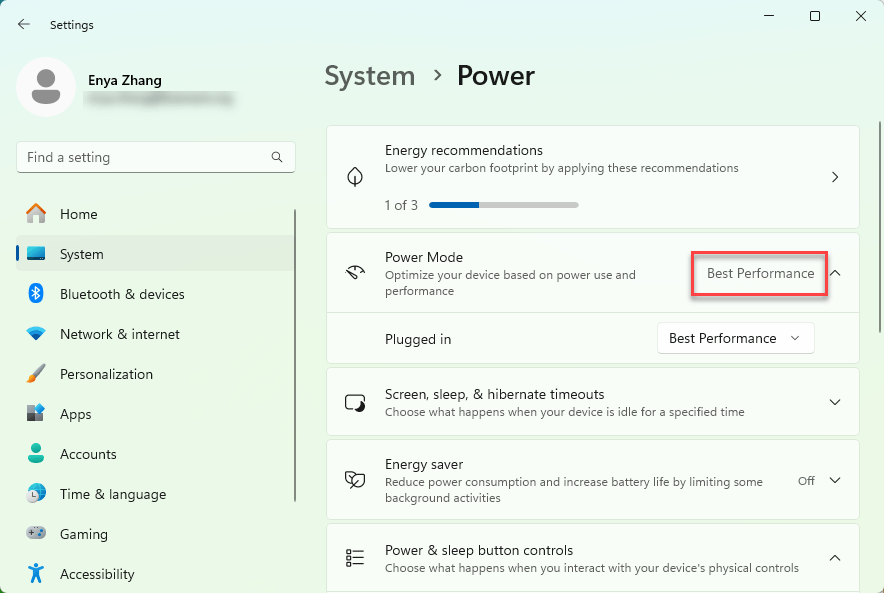
- On your keyboard, press the Windows logo key and X simultaneously, and select Power Options.
- Set Power Mode to Best Performance.
- Optionally, search for Graphics Settings in the Start menu:
- Under Graphics performance preference, select the apps or games you want and set them to High performance to force the use of the dedicated GPU.
- Restart your computer.
- Check if you can see the dedicated GPU in Task Manager. If yes, you’ve solved the issue. If not, please try Fix 5, below.
Fix 5: Enable GPU in BIOS
In some systems, especially desktops and customizable laptops, the BIOS controls which graphics processor is active by default. If the BIOS is set to prioritize the integrated GPU or has the PCIe slot disabled, the dedicated GPU may not initialize during boot, meaning Windows won’t detect it at all.
This can happen if:
- The system is configured to default to integrated graphics for power savings or compatibility.
- The BIOS was reset or updated.
- Graphics settings were changed manually.
In this case, you can check the BIOS settings and re-enable the PCIe or dedicated GPU option to ensure the hardware initializes properly at startup.
⚠️ Caution:
Accessing and changing BIOS settings can impact your system’s stability. Be careful not to modify other settings besides those related to graphics. If unsure, consult your device manual or seek expert help before proceeding.
- Restart your PC and repeatedly press the BIOS/UEFI access key during startup.
Common keys include Del, F2, F10, or Esc. - In the BIOS menu, look for graphics-related settings such as:
- Primary Display
- Initial Display Output
- PCIe/PEG (PCI Express Graphics)
- Integrated Graphics Configuration
- Set the configuration to:
- PCIe or PEG to prioritize the dedicated GPU.
- Or Auto, which lets the system detect the dedicated GPU first.
- Save the changes and exit the BIOS.
- After rebooting, check if your GPU is now visible on Task Manager. If yes, then great! If it’s still no joy, please continue with Fix 6, below.
Note: BIOS interfaces vary by manufacturer. Refer to your motherboard or laptop manual for precise instructions.
Fix 6: Switch display output ports
On desktop PCs with both integrated graphics and a dedicated GPU, connecting your monitor to the wrong port can prevent the dedicated graphics card from being used.
If the monitor is plugged into the motherboard’s video output, the system may rely solely on the integrated GPU. In that case, the dedicated graphics card (like NVIDIA or AMD) won’t be engaged, and Task Manager won’t display it.
How to check and fix:
- Shut down your PC.
- Look at the back of the case:
- Top ports, near the motherboard: Integrated graphics.
- Lower ports, on expansion slots: Dedicated GPU.
- If your monitor is connected to a motherboard port, unplug it and reconnect the cable to one of the dedicated GPU’s ports (HDMI, DisplayPort, or DVI).
- Turn the PC back on and open Task Manager.
- If the GPU shows up: The issue was due to using the integrated graphics connection.
- If not: Just head over to the Fix 7, below.
Fix 7: Reseat the GPU (For desktops)
Sometimes, a graphics card that’s not properly seated in its PCI Express slot can cause Windows to fail to detect it. This can happen due to physical movement, dust buildup, or improper installation. To rule out this as a possible cause of GPU missing from Task Manager, you should reseat your GPU.
How is how to do it:
Note: If you’re uncomfortable handling internal PC components, consider seeking professional help to avoid damage.
- Turn off your PC and unplug it from the power source.
- Open your computer case to access the internal components.
- Locate the graphics card inserted into the PCIe slot.
- Release any retention clips or screws securing the card.
- Carefully pull the GPU straight out of the slot.
- Inspect the card and slot for dust or debris; clean gently if needed.
- Firmly reinsert the GPU back into the PCIe slot until it clicks or locks in place.
- Secure the card with screws or clips.
- Close the case, reconnect the power, and turn on your PC.
- Check to see if the GPU is properly detected and displayed.
If your GPU isn’t showing up in Task Manager, it can stem from a range of issues, from driver problems and system settings to hardware connections and BIOS configurations. And so, we’ve gathered some of the most effective fixes to help you get your GPU back where it belongs. If you have any questions along the way, don’t hesitate to reach out. We’re here to help!