


Even though Windows 11 doesn’t have a built-in tool to check the CPU temperature (you can check the GPU temp in Task Manager though), there are still some light and handy third-party tools that are easy to access and use, and more importantly, ad-free. In this post, we’ll introduce 3 handy tools for you to check your CPU temperature on Windows 11 easily.
In this post, you’ll see:
Apart from the handy tools to check your CPU temperature, we’re also including two sections that you may be interested in if you want to know a bit more about CPU. Click to jump to the sections you’d like to view.
- When to check your CPU temp on Windows 11
- Check CPU temp with Core Temp
- Check CPU temp with HWMonitor
- Check CPU temp with AIDA64 Extreme
- What is a good temperature for a CPU?
- How do I reduce my CPU temperature?
When to check your CPU temp on Windows 11
If you have one of the following computer problems on your Windows 11, you may need to check the CPU temperature to make sure that it’s not overheating:
- Your computer keeps crashing or freezing when you’re running heavy-loaded programs like games;
- Your computer is rather slow, to the point where you have to wait for a while for a program to start;
- You can hear the fan runs loud and fast when you use video editing software or play games;
- Your computer shuts itself down without showing any error notification beforehand; or
- Your computer restarts itself when you run resource-hungry programs.
As you can see from the symptoms above, when your computer is having some noticeable computer problems, it’s time for you to check your CPU temperature. Read on to see how you can check your CPU temp on Windows 11.
1. Check CPU temp with Core Temp
Core Temp is a simple yet powerful software program for your CPU temperature, with the temperature fluctuating in real time when you run different programs. It’s fairly easy to use:
- Download Core Temp from the official website.
- Then follow the on-screen instructions to finish the setup.

- When the installation is done, Core Temp will open automatically, and you should see your CPU temperature readings at the bottom.
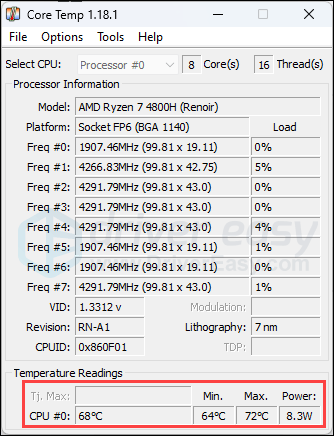
You can leave Core Temp running on the side while use your computer like how you normally would do it, then see if the temperature readings here will spike when certain programs are running. If the current temperature doesn’t go beyond the Max reading here, your CPU is usually not overheating, and you should look somewhere else for the culprit to the computer stability problems.
2. Check CPU temp with HWMonitor
HWMonitor shows more information for core hardware devices than just your CPU, which is usually more powerful for gamers, as they usually need to monitor the CPU and GPU temperatures and the power usage situations.
HWMonitor is also very easy to use: just download and install it from the official website, then open it and you’ll see the real-time data for your CPU temp on Windows 11:
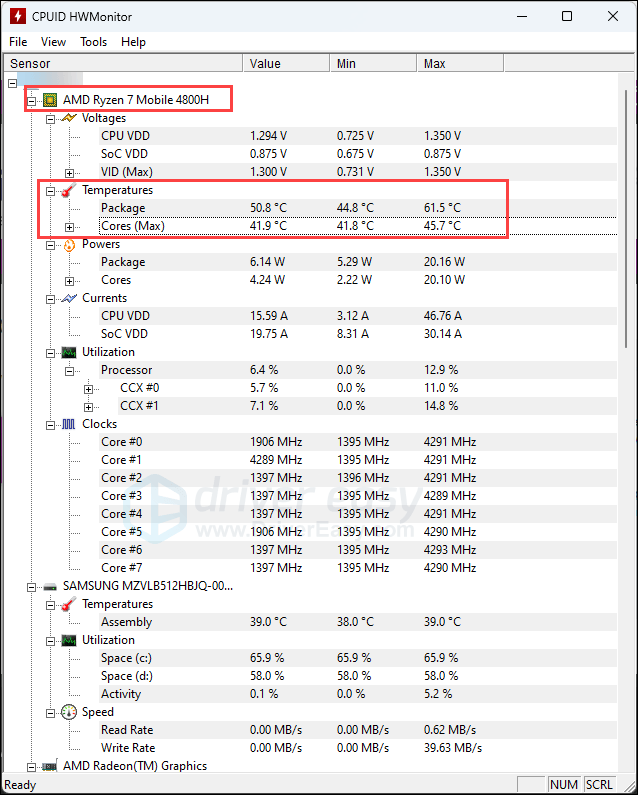
You can also leave HWMonitor on while use your computer to see if the CPU (and maybe GPU) temperature spikes at certain points. If you can find the pattern for the temperature spike, like if the spike is caused by a certain software or service, then it’s very likely the culprit for your computer problems.
3. Check CPU temp with AIDA64 Extreme
AIDA64 Extreme is a more powerful tool than Core Temp and HWMonitor: you can even stress test your CPU, GPU, and PSU (power supply unit) with it. But we’re focusing on the CPU temperature readings here. To use AIDA64 Extreme to check the CPU temp:
- Download and install AIDA64 Extremem from the official website.
- When AIDA64 runs automatically after the installation, click to expand Computer > Sensor, then you should see your CPU temperature in the entry named CPU Diode.
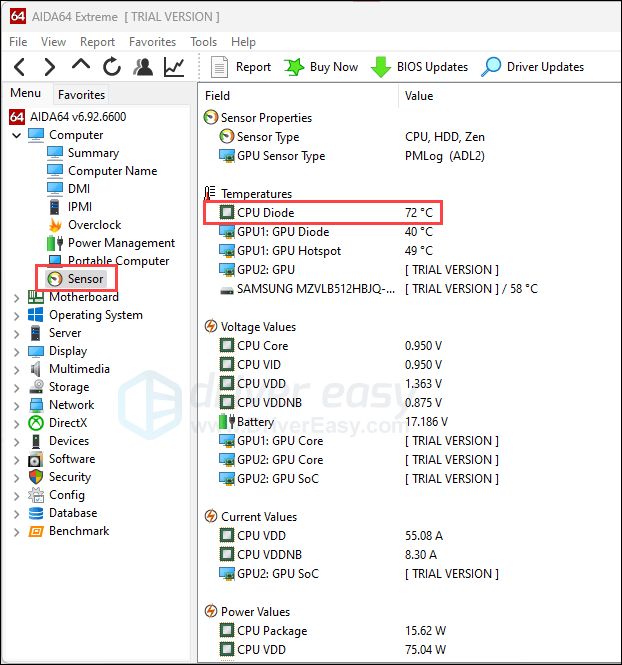
It’s normal that the entries shown on your computer are different from mine, as we have different hardware devices.
What is a good temperature for a CPU?
In a nutshell, your CPU’s temperature differs with the type of processor you have. But generally, when you have no resource-intensive applications running (aka idle stage), the expected CPU temp is around 40°C (about 100°F).
When you use your computer for light tasks, such as web browsing, and word processing, the normal temperature readings should be about 40-65 °C (about 104-149 °F).
For heavy gaming and other CPU-intensive tasks like video editing, the CPU temperature will usually go up to about 55-65 °C (131-149°F).
If the CPU temperatures go over 70-90 °C (160-195 °F), you may need to find ways to cool your computer down. This is because your processor is usually designed to shut itself down to protect itself when reaches a certain temperature (like 100°C). When the CPU temperature gets closer to this number, your computer will run into problems like freezes or stutters, and therefore affect the normal usage.
How do I reduce my CPU temperature?
Ways to reduce the CPU temperature range from free to costy: you can simply clean the dust on the inside of your computer case, or replace your current cooling system with a more powerful and advanced one, like water cooling.
Here’s an old post for your reference if you’re interested in knowing more: How to Know Your CPU Overheating and How to Fix It
Thanks for reading this post. If there’s more you’d like to know about CPU temperature on Windows 11, please feel free to leave a comment below.