


Changing a website from HTTP to HTTPS is highly recommended. HTTPS will protect the data by encrypting it and ensure the contents between the user and the site cannot be read or forged by any third-party. Nginx is a powerful web server that you can use to convert HTTP to HTTPS. If you have no idea how to setup HTTPS in Nginx, follow instructions below.
Firstly, Install Nginx package from Nginx’s own repository. If you have installed it, skip this step.
1.
Setup the yum repository for RHEL/Centby creating a file “nginx.repo” in /etc/yum.repos.d, for example, using vi.
vi /etc/yum.repos.d/nginx.repo
Paste the line below to the file then save it.[nginx]
name=nginx repo
baseurl=http://nginx.org/packages/mainline/centos/7/$basearch/
gpgcheck=0
enabled=1
2. Install Nginx with yum package manager (-y allows automatic full installation.)
# yum install nginx -y
3. Start Nginx# systemctl start nginx
4. Run the following command to check if Nginx starts successfully# netstat -tulnp | grep 80
If it starts successfully, you will see the 80 address as follows.

It is recommended that you set Nginx to start automatically when you start the computer:
# systemctl enable nginx
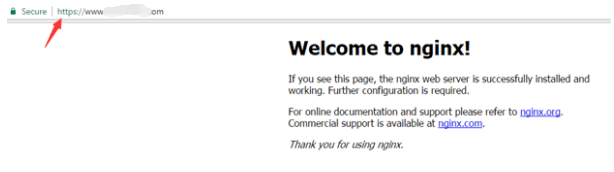
5. Visit your website and see if the Nginx is installed successfully. You will see the following message if it is installed successfully.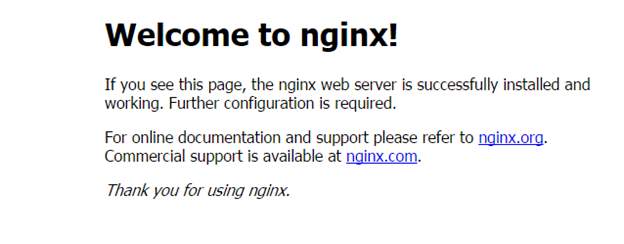
Secondly, obtain a SSL certificate and the private key
If you want, you can purchase a SSL certificate from a CA (Certifiicate Authority) like GoDaddy for your website.
If not, follow steps below to generate a free certificate.
1. Install cerbot (-y allows automatic full installation)
Running the following two commands:
# yum install epel-release certbot -y
# yum install certbot -y
2. Obtain the certificate
Run the following command:
# certbot certonly
Enter the following information:
Select the appropriate number: Type number “2” here.
Enter email address: Enter your email address here. (In my case, I entered support@drivereasy.com.)
(A) gree/(C)ancel: Type “A” here to agree the terms of service.
(Y)es/(N)o: Type “Y” here to accept the request.
Please enter in your domain name: Enter the domain name of your website here. (In my case, I entered www.howtofixes.com.)
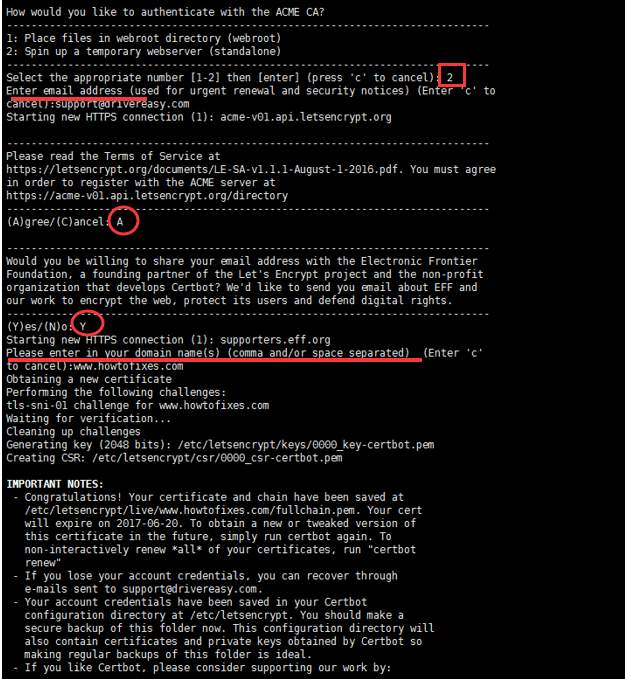
After entering all required information, hit Enter. After that, you will see Congratulations under IMPORTANT NOTES.
3. Run the following command to check if the certificate and the key are generated successfully.
# ls /etc/letsencrypt/live/www.howtofixes.com
Thirdly, change the configuration
1. Nginx default configuration locates file “default.conf”. Run the following command to open the file then change the configuration.
# vi /etc/nginx/conf.d/default.conf
2. Copy and paste the following codes to the file. Note you need to replace the underline information with your information. Then save the file.
Replace “www.howfixes.com 149.56.97.243” with your website domain name and IP address.
Replace “/etc/letsencrypt/live/www.howtofixes.com/fullchain.pem” with the certificate you get.
Replace “/etc/letsencrypt/live/www.howtofixes.com/privkey.pem” with the private key you get.
server {
listen       80;
server_name  www.howtofixes.com 149.56.97.243;
return 301 https://$server_name$request_uri;
#charset koi8-r;

#access_log  logs/host.access.log  main;

location / {
        root   /usr/share/nginx/html;
        index  index.html index.htm;
}
#error_page  404              /404.html;

    # redirect server error pages to the static page /50x.html
    #
    error_page   500 502 503 504  /50x.html;
    location = /50x.html {
        root   /usr/share/nginx/html;
    }
}
server {
    listen       443 ssl;
    server_name  localhost;
    ssl_certificate      /etc/letsencrypt/live/www.howtofixes.com/fullchain.pem;
    ssl_certificate_key /etc/letsencrypt/live/www.howtofixes.com/privkey.pem;

    ssl_session_cache    shared:SSL:1m;
    ssl_session_timeout  5m;

    ssl_ciphers  HIGH:!aNULL:!MD5;
    ssl_prefer_server_ciphers  on;

    location / {
        root   /usr/share/nginx/html;
        index  index.html index.htm;
    }
}
All http requests have been set to redirect to https (see return 301 https://$server_name$request_uri).
3. Run the following command to check if the configuration is changed correctly.
# nginx -t
If the configuration is changed correctly, you will get the following notes.
![]()
Fourthly, restart Nginx
# systemctl restart nginx
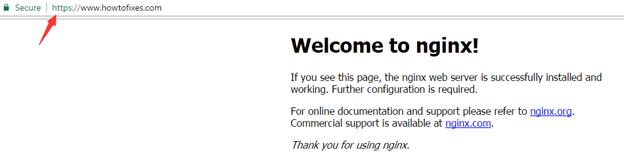
Then the last thing you need to do is visit your website to check if the address is changed to a https address.
Hope you can change your website from http to https successfully with the guide here.