


Want to convert your images to GIF and didn’t know what to do? You’ve come to the right place! This post shows you how to make GIF from images quickly and easily.
GIF (Graphics Interchange Format) is a bitmap image format that has been widely used, especially in our social media lives. And making GIFs from images is as easy as pie. Check it out!
How to convert images to GIF
Here are some methods for you to convert images to GIFs, and you can pick up the method depending on your needs.
- How to convert images to GIF in your computer
- How to convert images to GIF in your mobile phone
- How to convert images to GIF online
Method 1: How to convert images to GIF in your computer
To make GIFs from images, you’ll need to do that with a video editing software. You can search for the video editor with good reviews and reasonable price, which may take some time and patience. If you don’t have the time or patience, you can try Camtasia.
Camtasia is an all-in-one video editor with powerful features. You can capture a screenshot or videos, you can edit your capture, you can share your videos to FTP, YouTube, Dropbox, etc.
To make your video to GIF, follow these steps:
If you’re using Windows:
1) Download and install Camtasia in your computer.
2) Launch Camtasia and run. You’ll need to register for the first time to sign in.
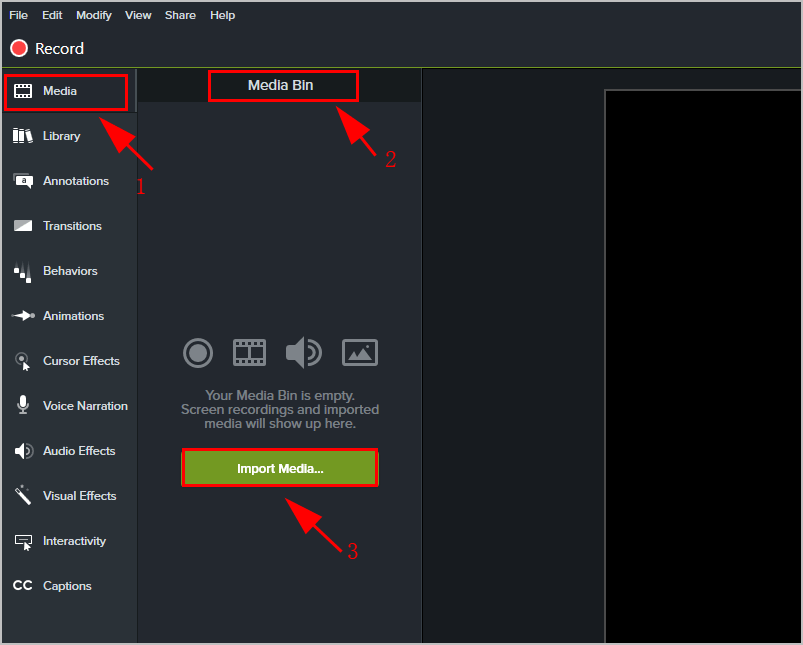
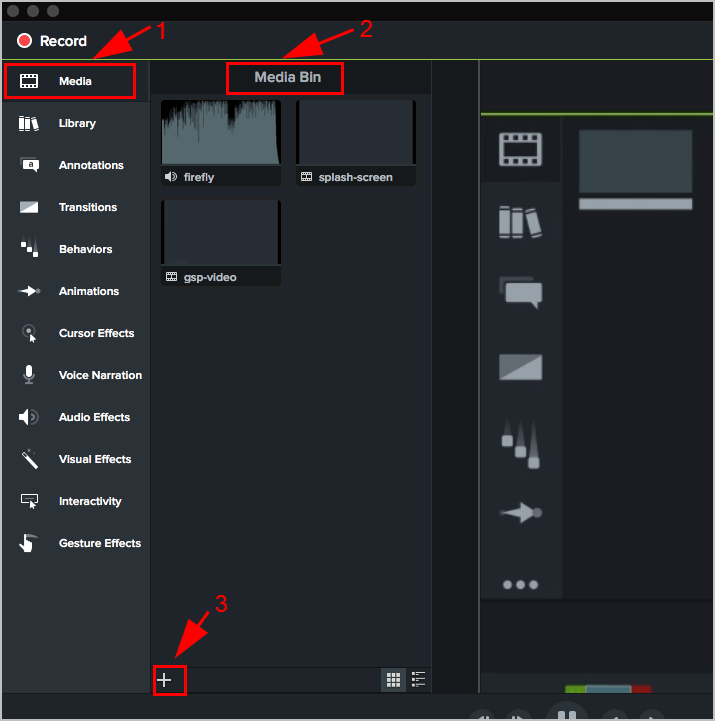
3) Click Media > Media Bin > Import Media to upload your images.
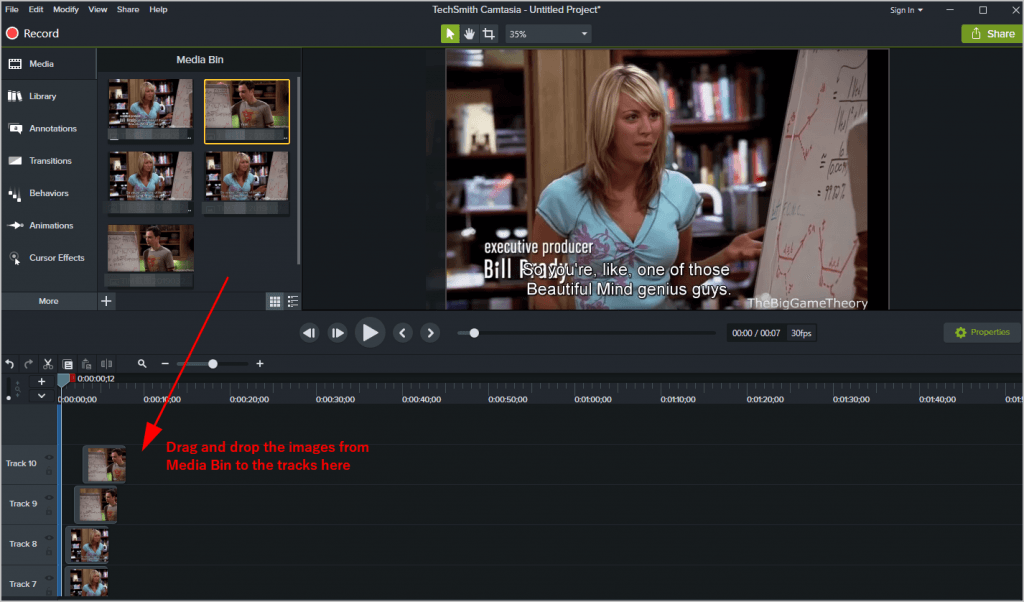
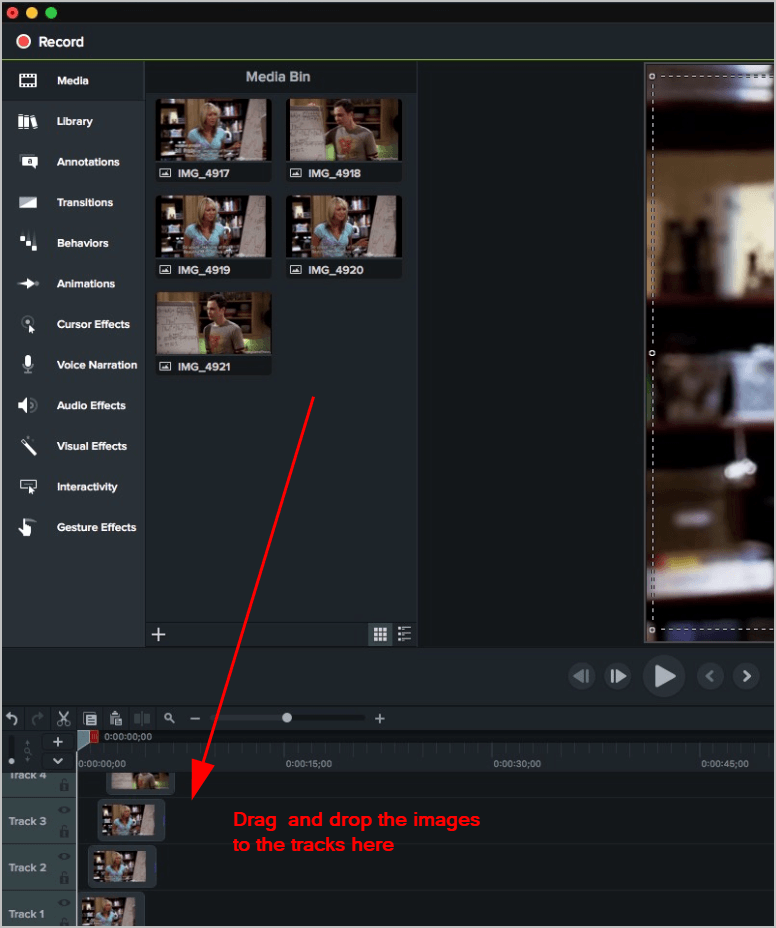
4) Drag and drop your images from the Media Bin to the tracks at the bottom. Make sure to drag and drop images in the order you need them to play.
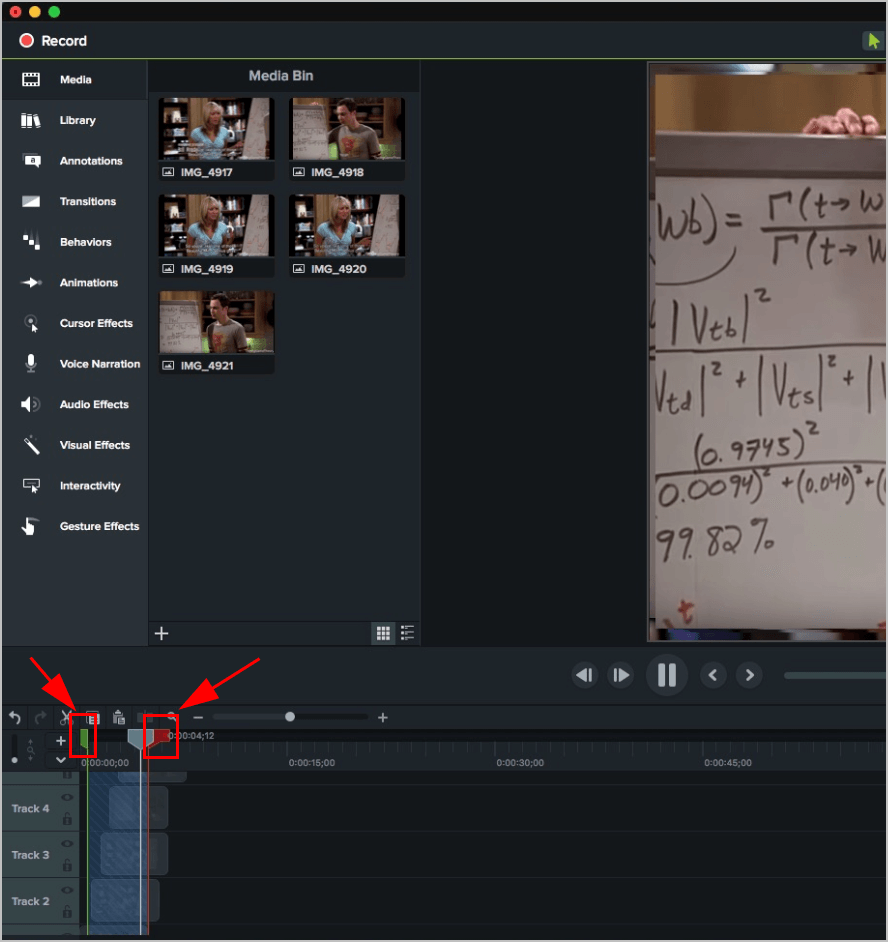
5) Click and drag the red and green playhead handles to select the portion of the timeline if you need.
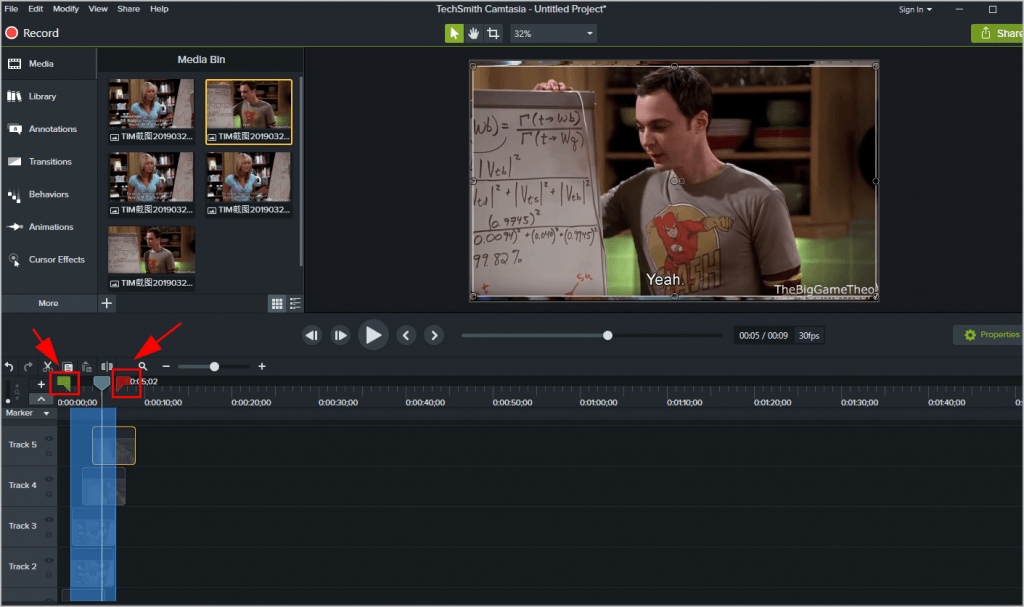
6) You can move each image horizontally in each track to the timeline you need.
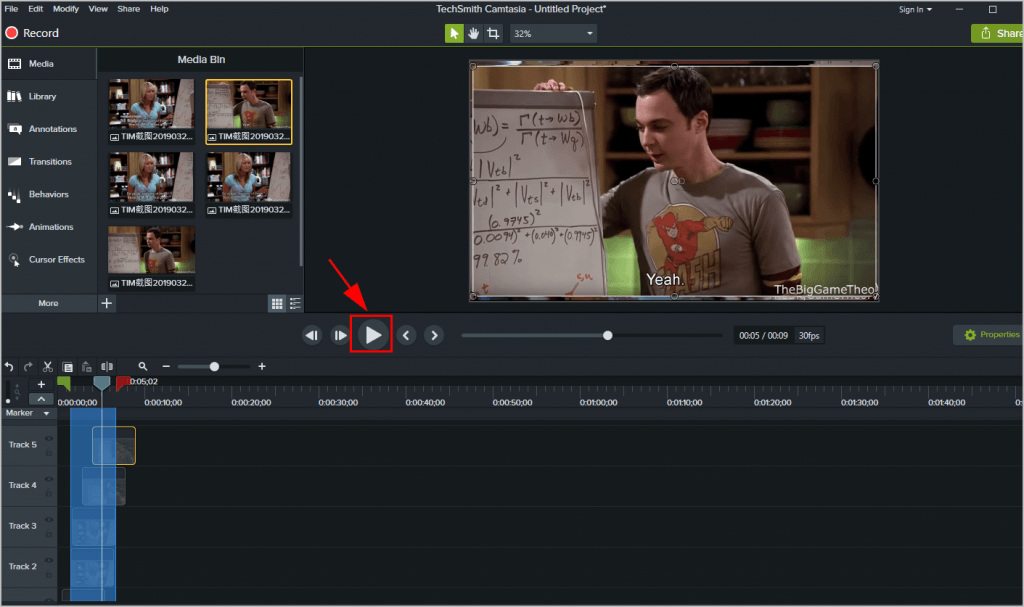
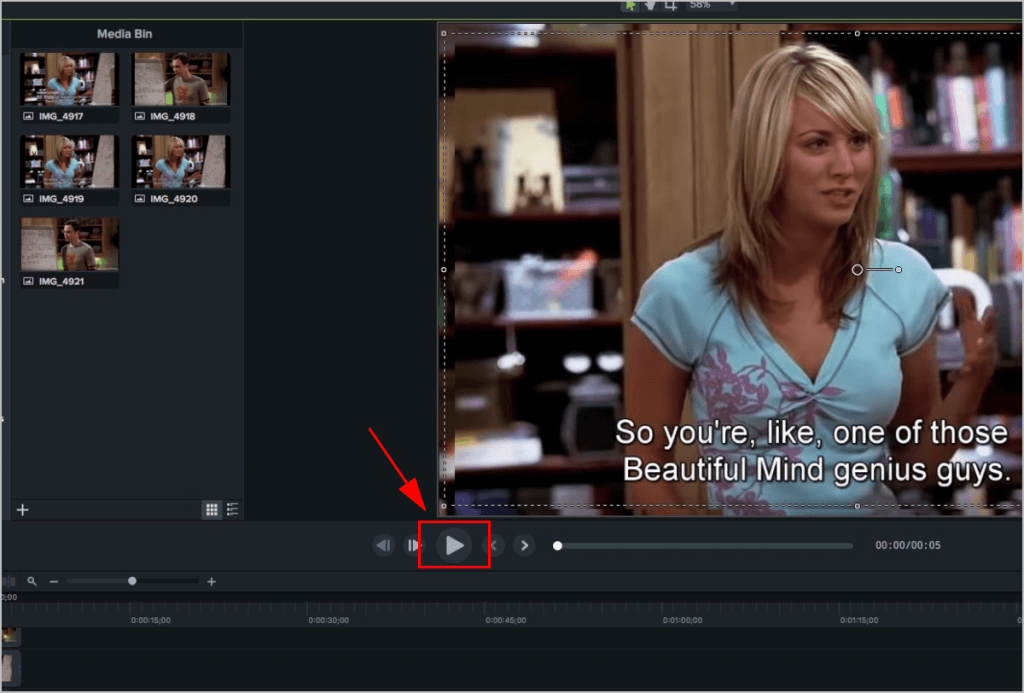
7) Click the Play button to preview your GIF and see if it plays the way you want.
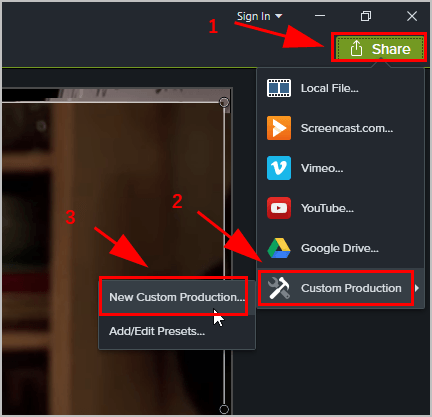
8) Once edited, click the Share button, and select Custom production > New Custom Production.
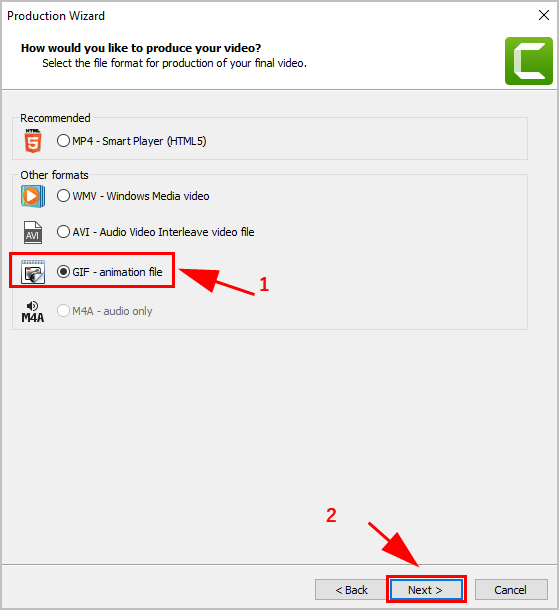
9) Choose GIF -animation file and click Next.
10) Check the encoding options (you can leave it as default), then click Next. You can click Preview to view your GIF.

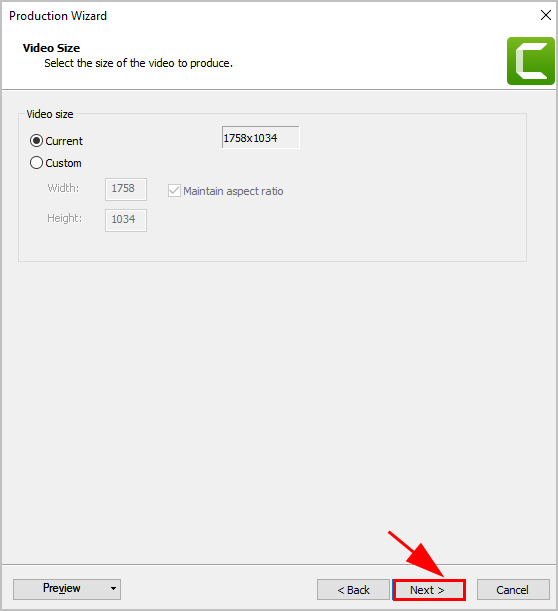
11) Choose your File Size. You can leave it to select Current. Then click Next.
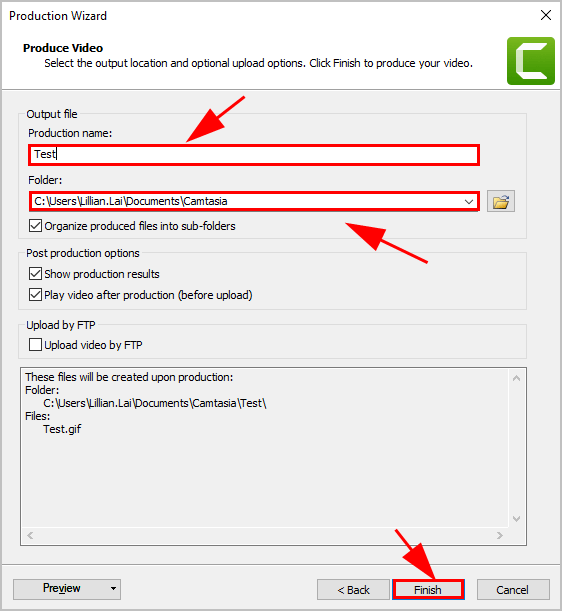
12) Click Next twice. On the Product Video page, enter a name for your GIF file, and you choose where you want to save your GIF. Then click Finish.
13) Camtasia will create the GIF for you.
Open the file location where you saved your GIF and view.
If you’re using Mac:
If you’re using Mac, the interface in the application is a little bit different from that on Windows. Here’s what to do:
1) Download and install Camtasia in your computer.
2) Launch Camtasia and run. You’ll need to register for the first time to sign in.
3) Click Media> Media Bin, and click the + button or Import Media to upload your images.
4) Drag and drop your images from the Media Bin to the tracks at the bottom. Make sure to drag and drop images in the order you need them to play.
5) Click and drag the red and green playhead handles to select the portion of the timeline if you need.
6) You can move each image horizontally in each track to the timeline you need.
7) Click the Play button to preview your GIF and see if it plays the way you want.
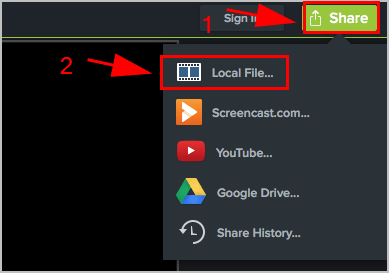
8) Once edited, click the Share button, and select Local File….
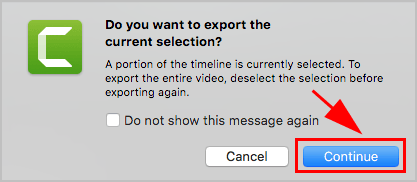
9) Click Continue if you see “Do you want to export the current selection?“.
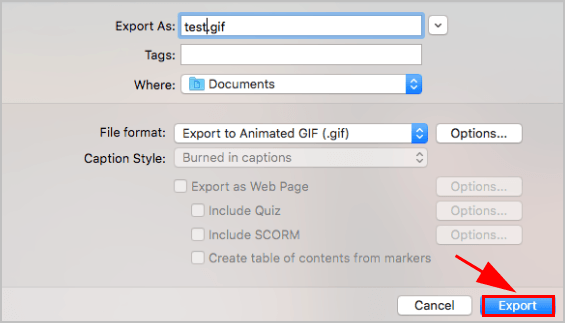
10) Rename the file name next to Export As, choose where you want to save the file to. For File format, select Export to Animated GIF (.gif) in the drop-down menu.

11) You can also click Options to edit Frame rate and Dimensions.

12) Click Export.
Camtasia will create the GIF for you. Then open the file location to view and share your GIF.
Method 2: How to convert images to GIF in your mobile phone
If you want to make GIFs from images or videos in your mobile devices, there are various GIF makers for mobile devices. If you’re not sure which one to use, try GIPHY Cam.
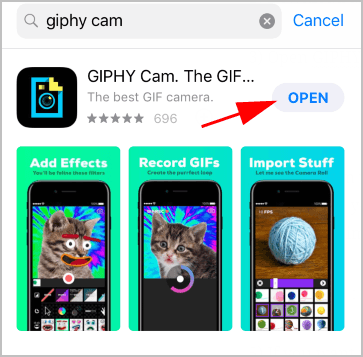
1) Open the application store in your mobile phone, and search for GIPHY Cam.
2) Download and install GIPHY Cam for your device.
3) Open GIPHY in your device, and grant permissions to it.
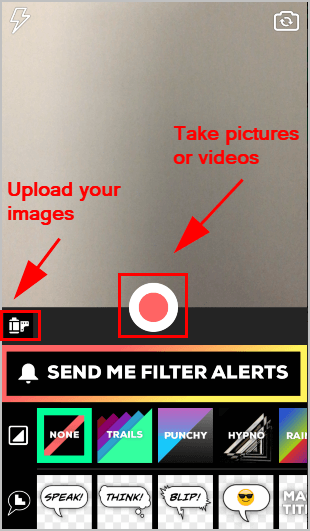
4) GIPHY Cam will open your camera, you can choose to take pictures to make GIF, or you can tap the pictures icon to open your camera roll and upload your images.
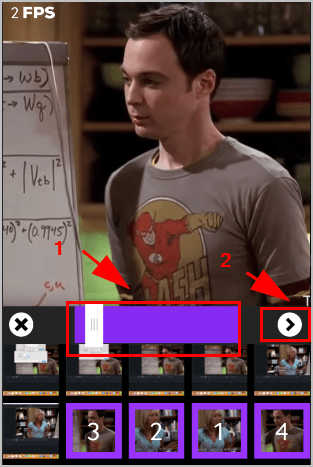
5) If you want to upload more than one images, long press one of the images, and choose the order for each image.
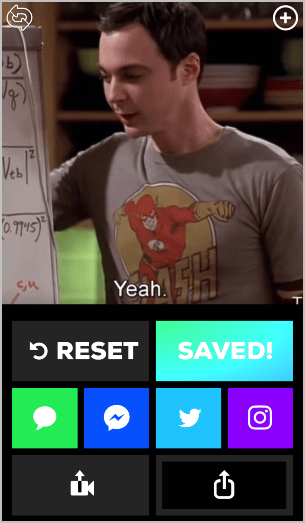
6) After selecting, tap the slider in the middle to choose how you want to play the GIF. Then tap the Next icon to continue.
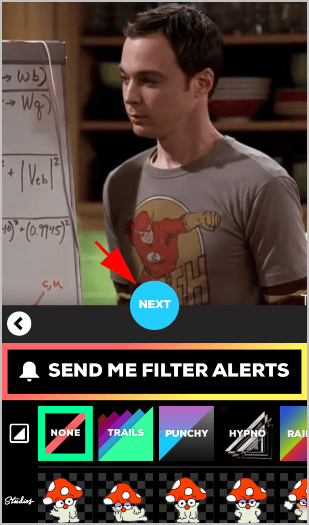
7) Then you can edit your GIF by adding stickers and other effects. Then tap Next.
8) Tap Save GIF to save your GIF.
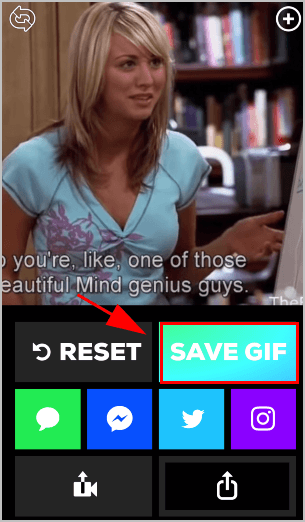
10) You’ll see Saved after saving. Then tap the share button or other application button (such as Facebook Messenger or Twitter) to share your GIF.
This is easy, isn’t it?!
Method 3: How to convert images to GIF online
If you don’t want to download and install the video editing application in your computer or mobile phone, and you can still convert your images to GIFs online, which doesn’t require installing the app or even registering an account.
Here’s how to do it:
1) Go to https://giphy.com in your web browser.
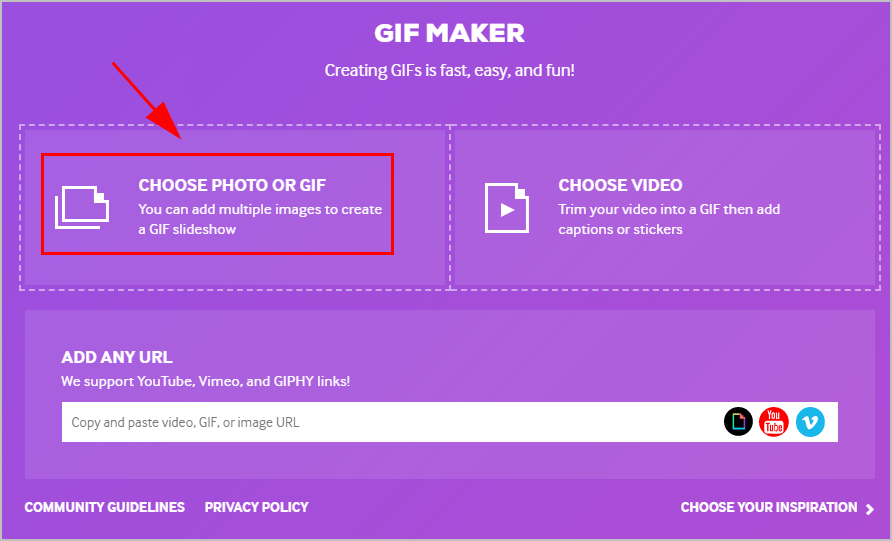
2) Click Create on the top.

3) Click Choose Photo or GIF, then select the images to upload.
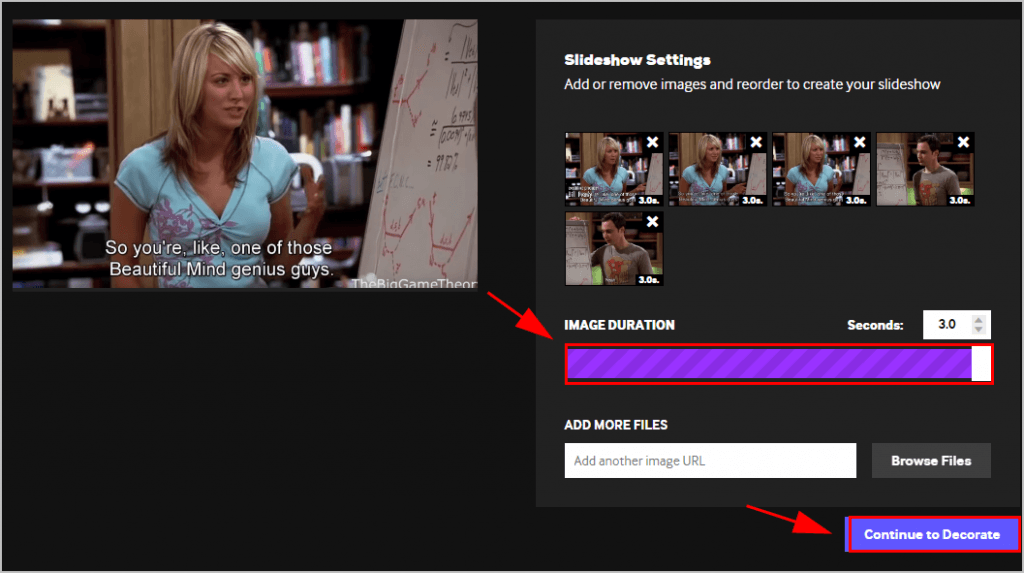
4) Use the slider to select your video duration, and click Continue to Decorate.
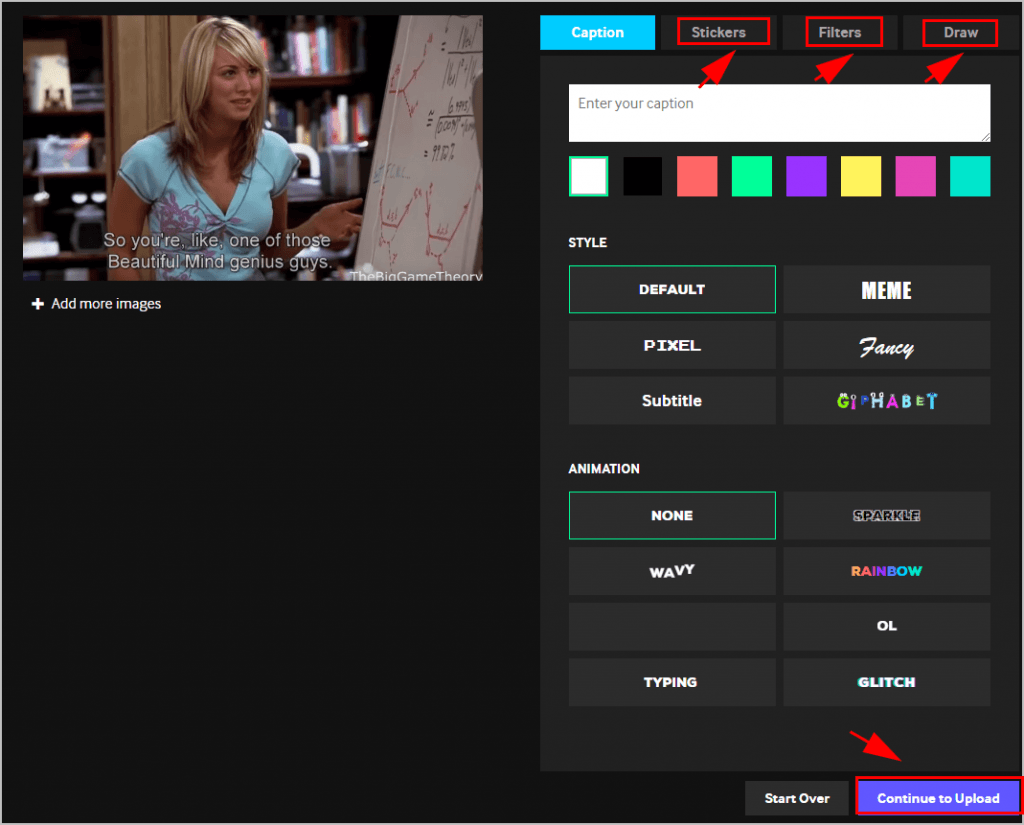
5) Under the Caption tab, you can enter the text for the GIF caption, and select Style and Animation for the caption.
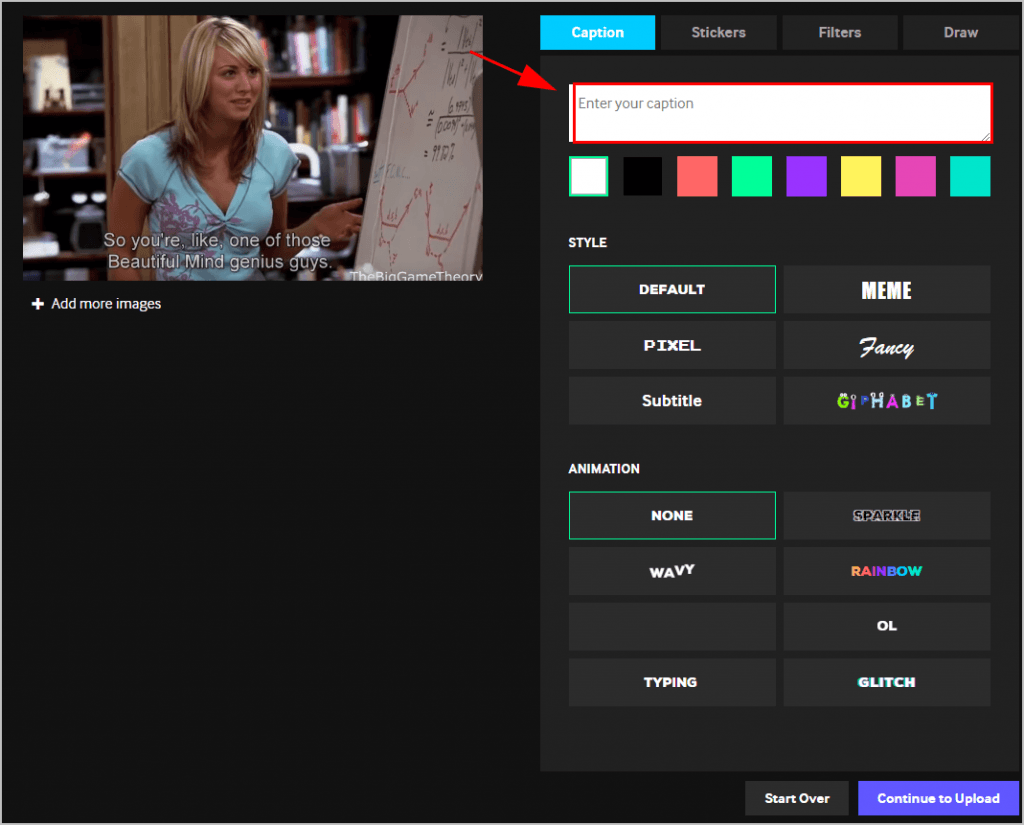
And you can click the Stickers tab, Filters tab and Draw tab to customize your GIF. Then click Continue to Upload.
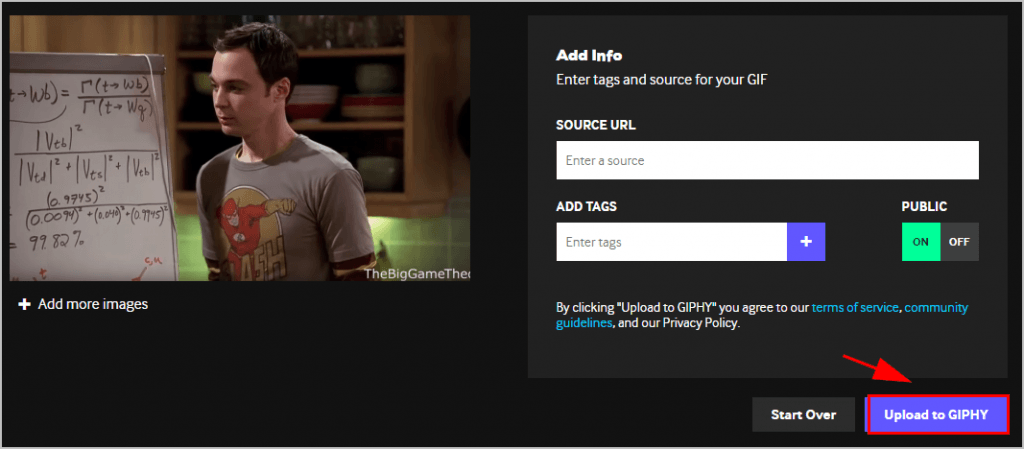
6) You can then add source URL and tags to your GIF, then click Upload to GIPHY.
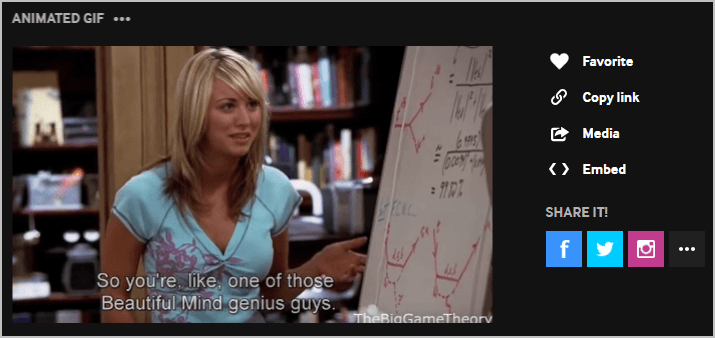
7) GIPHY will create the GIF for you. You can copy the GIF link to save it, or share it to Facebook and Twitter.
So there you have it – Three easy methods to convert images to GIFs. If you have any questions or need further help, feel free to leave us a comment below.