


Your Asus laptop can’t connect to your WiFi network? Don’t worry. Although this is incredibly annoying, you’re definitely not the only person to experience it. More importantly, you can solve the problem with the following fixes…
Try these fixes
Before getting started, please check if other devices can connect to the same WiFi network. If other devices can connect to WiFi, there might be something wrong with your laptop. You should be able to solve it with the fixes below.
- Check if WiFi is enabled
- Change your DNS server address
- Make sure WLAN AutoConfig Service is running
- Reset your network settings
- Update your WiFi adapter driver
- Adjust power management
- Repair your system files
Fix 1: Check if WiFi is enabled
Asus lets you save power by turning off the WiFi adapter when it is not needed, or you may have disabled it accidentally. To check if this is your problem, you can press the hotkey Fn + F2 at the same time to enable WiFi.
If the hotkey doesn’t work for you, you can re-check the WiFi in Network and Sharing Center:
1) Type network connections in the Search box and select View Internet Connections.
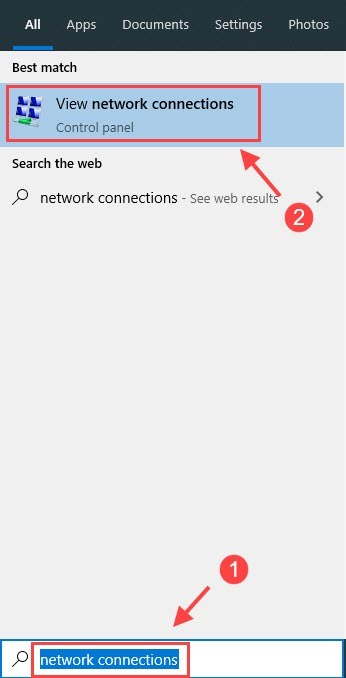
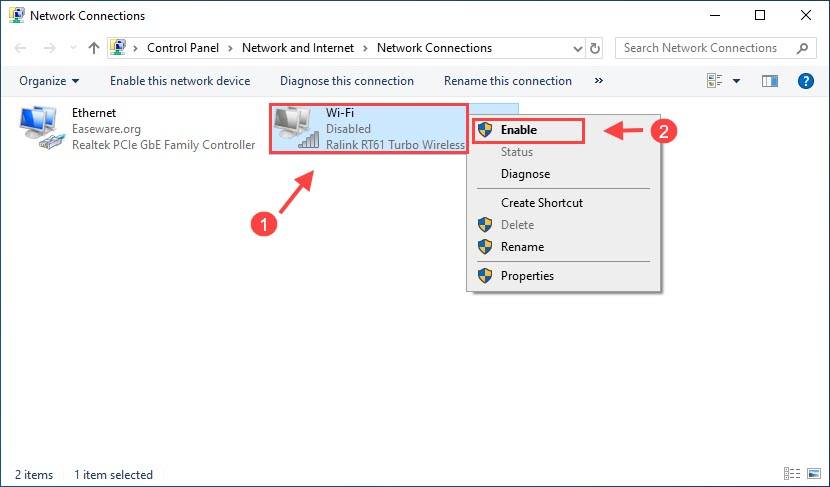
2) Right click on your WiFi connection (with a name of Wi-Fi or Wireless Network Connection) and select Enable.
If the connection is already enabled, you can disable and re-enable the WiFi network.
See if your WiFi works after it. If not, you can try the next fix, below.
Fix 2: Change your DNS server address
No internet issues may occur if the DNS server address is set in the wrong way. So you should make sure you have the right DNS server settings to see if it fixes the issue.
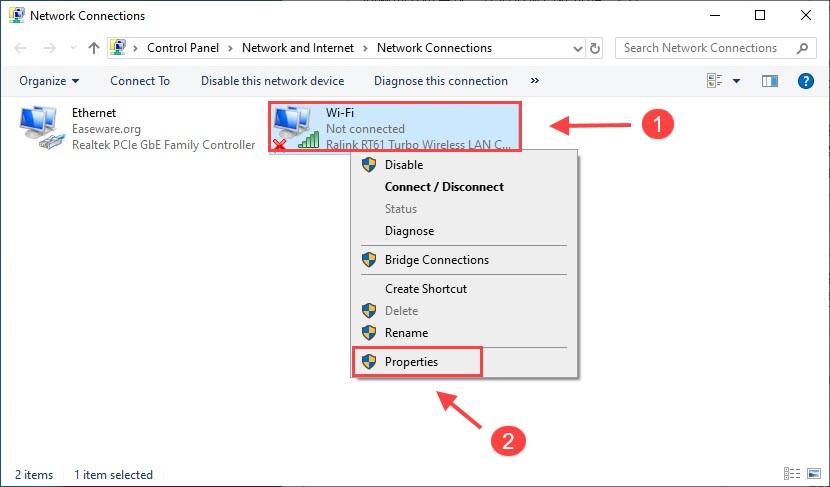
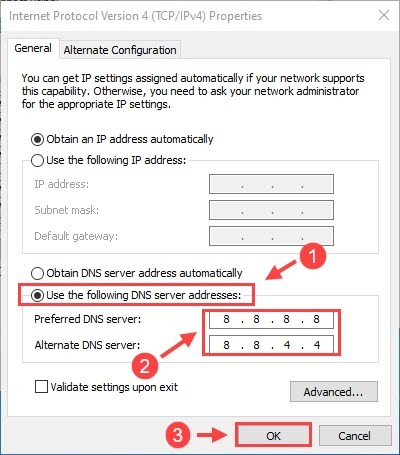
1) If the Network Connections window remains to be open, you can simply right-click your Wi-Fi and select Properties.
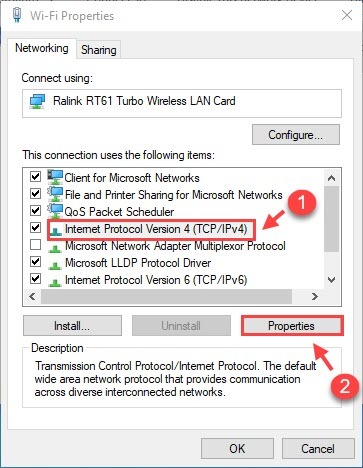
4) Click Internet Protocol Version 4 (TCP/IPv4) and then click Properties.
5) Under the General tab, click Use the following DNS server addresses.
- for Preferred DNS server, enter 8.8.8.8
- for Alternate DNS server, enter 8.8.4.4.
Then click OK to apply.
See if this helps you solve your WiFi problem. If so, then congrats. If not, you can move on to the next fix.
Fix 3: Make sure WLAN AutoConfig Service is running
Your laptop may fail to connect to WiFi if your WLAN AutoConfig Service is not running. So you need to make sure this service is working properly. Here is how to do it.
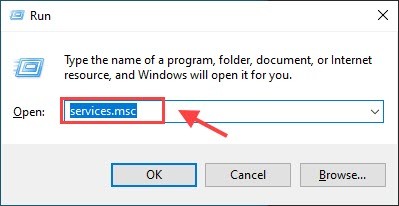
1) On your keyboard, press the Windows logo key and R at the same time to invoke the Run box. Then type services.msc and press Enter.
2) Scroll down to the bottom and double click WLAN AutoConfig.
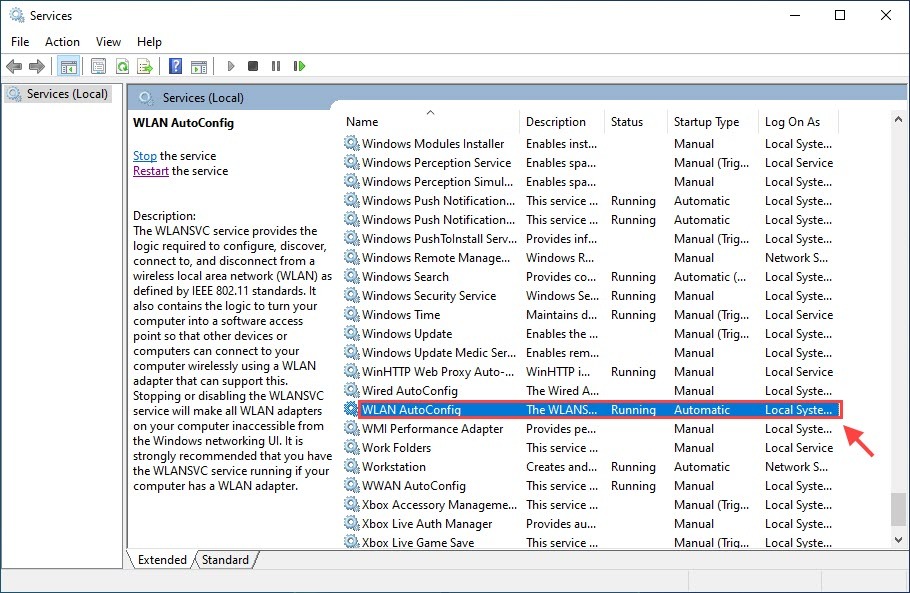
3) Set the Startup type to Automatic and click Start. Then click Apply > OK.
See if the WiFi not working problem is resolved. If the issue still persists, you can try the next fix.
Fix 4: Reset your network settings
According to users, you can fix WiFi connection problems by resetting your network settings with Command Prompt. Here is how:
1) Type command prompt in the search box. Then select Run as administrator.

2) After entering each command line below, press Enter.
netsh winsock reset

netsh int ip reset

ipconfig /release

ipconfig /renew

ipconfig /flushdns
3) After running all the commands, you need to restart your laptop for the changes to take effect.
Check if your WiFi connection is working properly again. If not, go on and try the next fix below.
Fix 5: Update your WiFi adapter driver
The WiFi connection issues may occur if you’re using the wrong wireless network adapter driver or it’s out of date. You should try updating the driver and see if this works for you.
There are two ways to update your network adapter driver: manually and automatically.
Manually update the driver:
You can go to the website of your network adapter, search for the latest version of your adapter, then download and install it into your laptop.
Automatically update the driver:
If you don’t have the time, patience, or skills to update your wireless adapter driver manually, you can do it automatically with Driver Easy.
You don’t need to know exactly what system your computer is running, you don’t need to risk downloading and installing the wrong driver, and you don’t need to worry about making a mistake when installing. Driver Easy handles it all.
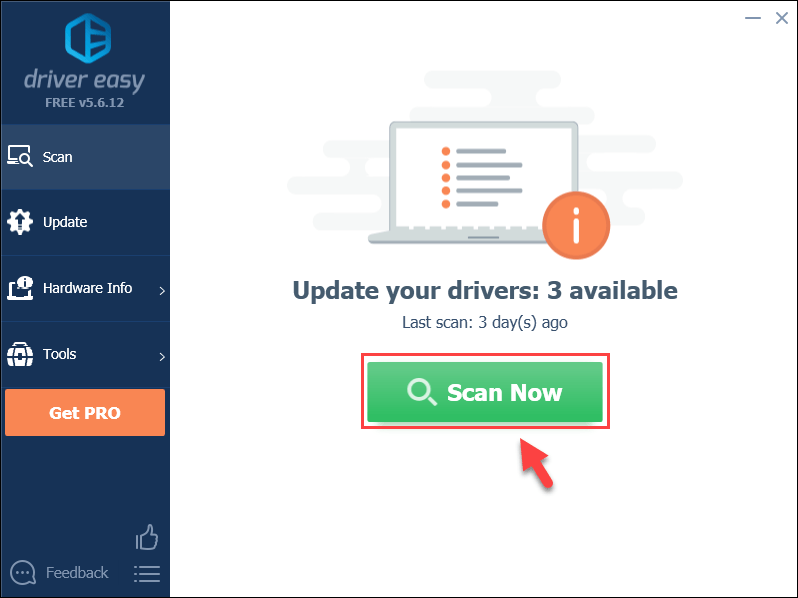
1) Download and install Driver Easy.
2) Run Driver Easy and click the Scan Now button. Driver Easy will then scan your computer and detect any problem drivers. (Or you can try Offline Scan in the Tools.)
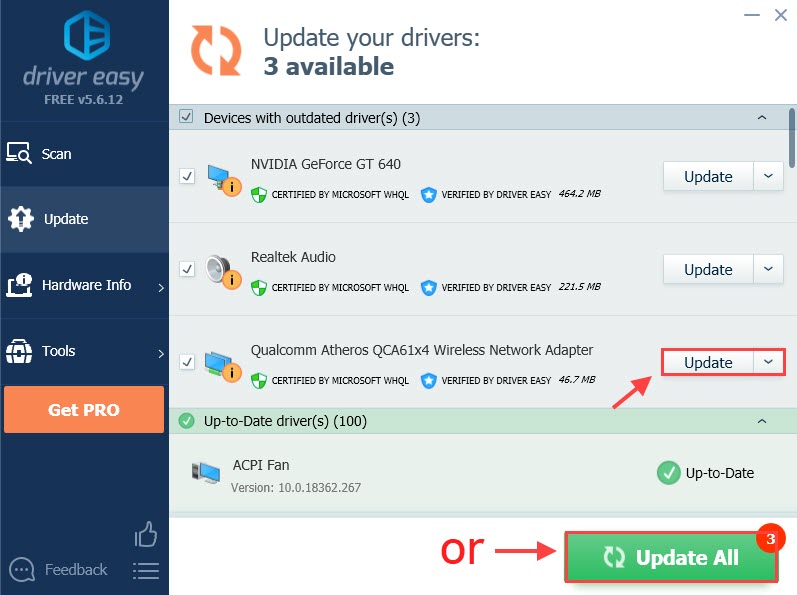
3) Click the Update button next to your wireless adapter to download the correct version of its driver, then you can manually install it.
Or
Click the Update All button at the bottom right to automatically update all the drivers. (This requires the Pro version — you will be prompted to upgrade when you click Update All. You get full support and a 30-day money back guarantee.)
4) Restart your laptop to take effect. See if this solves your WiFi not working issue.
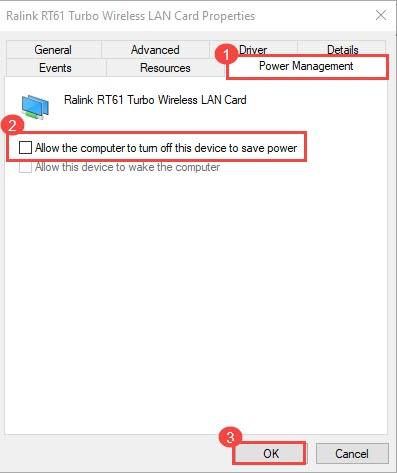
Fix 6: Adjust power management
Your computer might mistakenly turn off your Wireless LAN card to save power, which causes your WiFi not connecting problem. To check if that’s your issue, try these steps below:
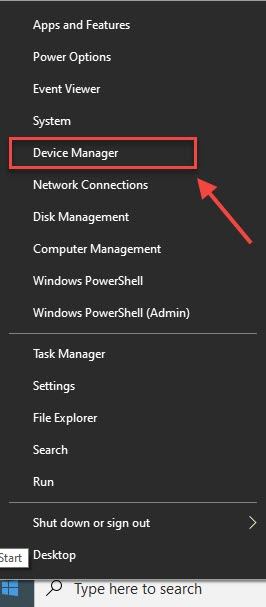
1) Open Device Manager by right-clicking the Start menu (Windows logo).
2) Expand Network adapters and right-click your Wireless LAN Card.
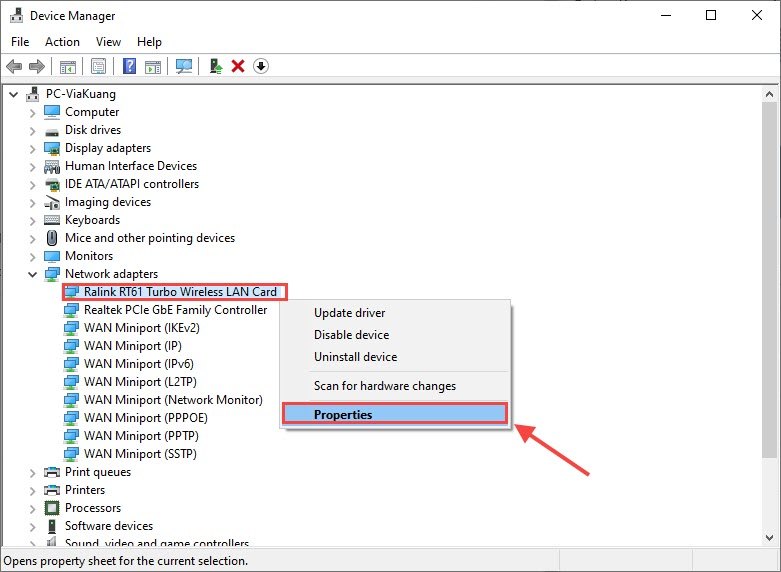
3) Go to the Power Management tab and uncheck the option Allow the computer to turn off this device to save power. Then click OK.
Fix 7: Repair your system files
The internet issues, especially when the fixes above failed, are very likely caused by your internet-related system files. If a specific system file is damaged, corrupted or missing, you can try to repair it manually.
System File Checker is a Windows built-in tool to check for corrupt, damaged system files and manage to restore them if there’re any.
Step 1. Scan corrupt files with System File Checker
1) On your keyboard, press the Windows logo key and R at the same time to open the Run box. Type cmd and press Ctrl+Shift+Enter to run Command Prompt as administrator.
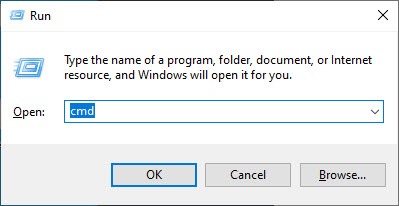
Click Yes when prompted for permission to make changes to your device.
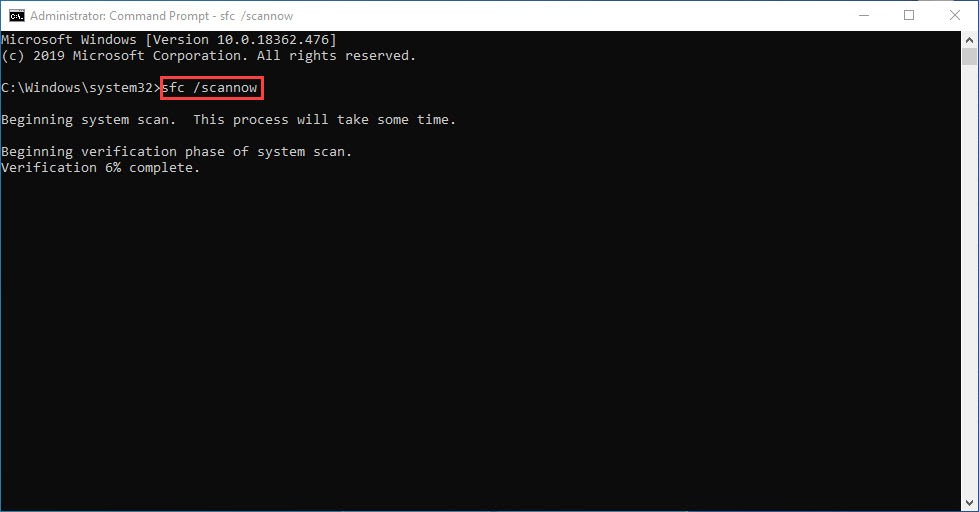
2) In the Command Prompt, type the following command and hit Enter.
sfc /scannow
3) System File Check will begin to scan all system files and repair any corrupted or missing ones it detected. This may take 3-5 minutes.
4) You may receive something like the following messages after the verification.
- no errors
- it fixed some errors
- could not fix all errors
- could not fix errors at all
- ……
No matter what message you receive, you can try running dism.exe (Deployment Image Servicing and Management) to further scan the health of your PC.
Step 2. Run dism.exe
1) Run Command Prompt as admin and enter the following commands.
- This command line will scan the health of your PC:
dism.exe /online /cleanup-image /scanhealth
- This command line will restore the health of your PC:
dism.exe /online /cleanup-image /restorehealth
2) After the restore health process finishes, you may get some error messages.
- If restore heath gave you errors, you can always try this command line. This will take up to 2 hours.
dism /online /cleanup-image /startcomponentcleanup
- If you get Error: 0x800F081F with the restore health scan, reboot your PC and run this command line.
Dism.exe /Online /Cleanup-Image /AnalyzeComponentStore
If the System File Check finds any files corrupted, follow the on-screen instructions to repair them, and then restart your computer for the changes to take full effect.
Feel free to drop us a line if you have any suggestions or questions.