


Outdated Razer Deathadder driver can cause many annoying mouse issues. To make sure your top-level Razer Deathadder works to its best performance, you need to always have the latest Razer Deathadder driver installed.
Try these methods
How to update your Razer Deathadder Driver?
There are two ways for you to get the download and install the latest Razer Deathadder drivers:
Option 1 – Manually – You’ll need some computer skills and patience to update your drivers this way because you need to find exactly the right driver online, download it and install it step by step.
OR
Option 2 – Automatically (Recommended) – This is the quickest and easiest option. It’s all done with just a couple of mouse clicks – easy even if you’re a computer newbie.
Option 1: Update your Razer Deathadder driver manually
To update your Razer Deathadder manually, you can download the latest legacy driver and install it manually, or you can download Razer Synapse 2.0 application to update and manage your Razer Deathadder.
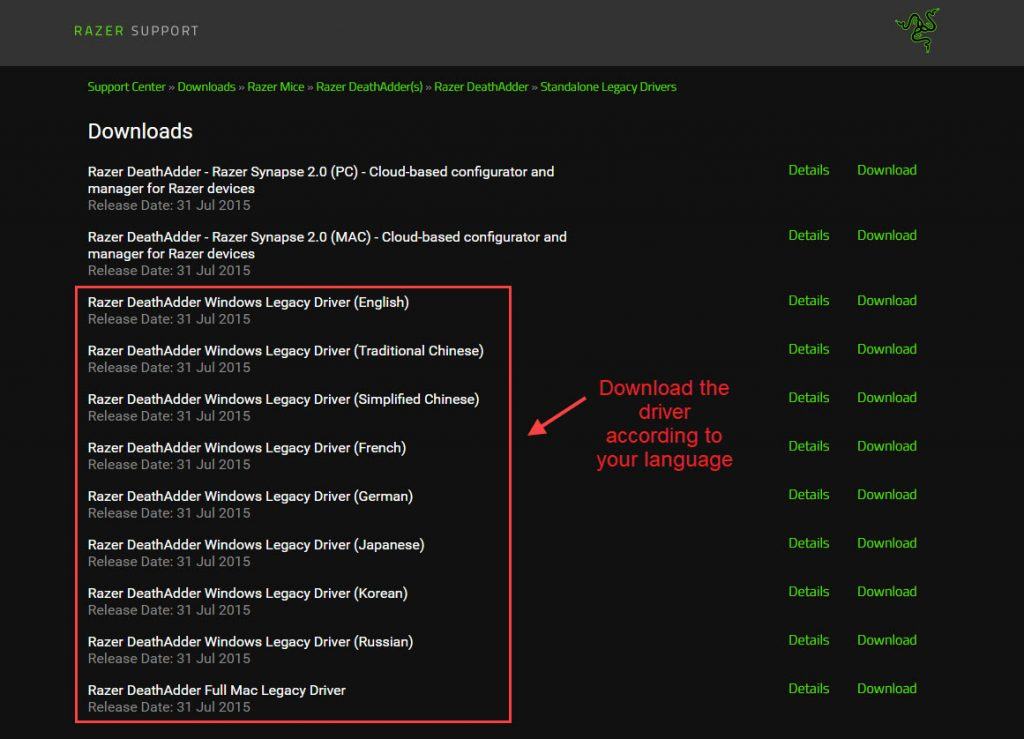
1) Go to Razer Death Support for Driver Download. You can either download the driver directly or download the Razer Synapse software.
2) Double-click the downloaded file and follow the on-screen instructions to finish the install.
3) Restart your computer after finishing the install.
Option 2: Update your Razer Deathadder driver automatically (Recommended)
If you don’t have the time, patience, or computer skills to update the Razer Deathadder driver manually, you can do it automatically with Driver Easy.
Driver Easy will automatically recognize your system and find the correct drivers for it. You don’t need to know exactly what system your computer is running, you don’t need to risk downloading and installing the wrong driver, and you don’t need to worry about making a mistake when installing. Your Razer or any other mouse driver is no exception.
You can update your drivers automatically with either the FREE or the Pro version of Driver Easy. But with the Pro version it takes just 2 clicks:
1) Download and install Driver Easy.
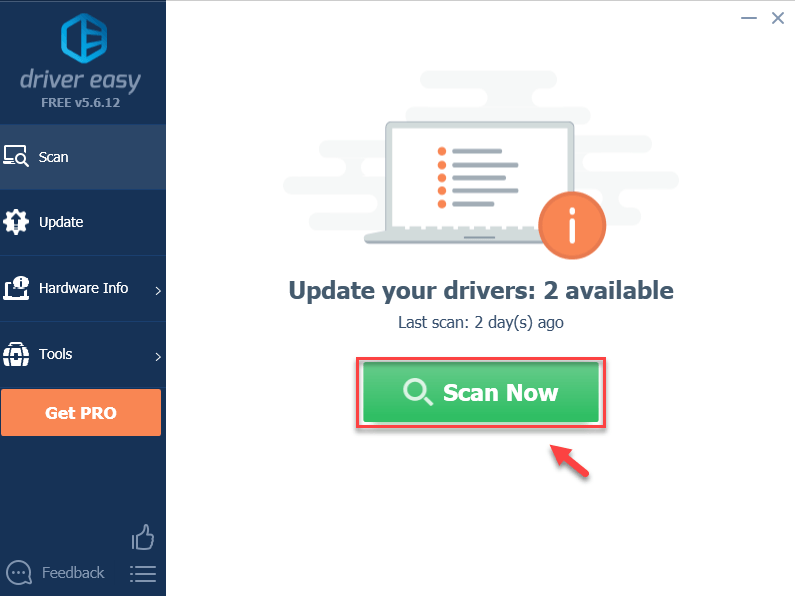
2) Run Driver Easy and click the Scan Now button. Driver Easy will then scan your computer and detect any problem drivers.
3) Click Update All to automatically download and install the correct version of all the drivers that are missing or out of date on your system (this requires the Pro version – you’ll be prompted to upgrade when you click Update All).
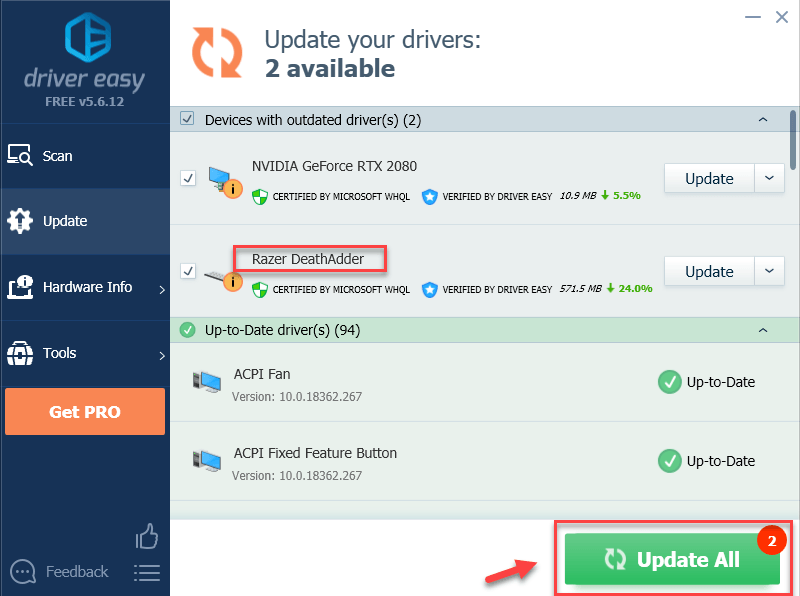
Note: You can do it for free if you like, but it’s partly manual.
4) Restart your computer, then check if your Razer Deathadder mouse problem is resolved.
How to fix general Razer Deathadder issues?
Your Razer Deathadder mouse not working? Probably mouse lagging, freezing, stuttering. Or no lights, no cursor movement, no responding. No nothing. Whenever you bump into Razer Deathadder not working, you can try the following troubleshooting methods to solve the issue.
Mouse not responding at all?
1. Try connecting to another PC
If the mouse works properly on that computer, there should be something wrong with this computer that prevents your Razer Deathadder Mouse to work well. You can try these fixes below to solve the problem.
If the problem persists on another computer, it’s probably your mouse issue. You can check your warranty and contact Razer Support to have your mouse repaired or replaced.
2. Check your USB port and settings
If your Razer Mouse is not responding at all, you can check if the USB is firmly plugged in and try another USB port to see if it works.
If your mouse still doesn’t work, you might need a spare mouse to change USB power management.
Your Razer Deathadder not working can be caused by USB ports. In order to save power, Windows will turn off your USB when they’re idle. Sometimes, they fail to turn them back on. You can fix change the settings by following the steps below:
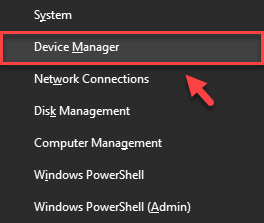
1) On your keyboard, press the Windows logo key and X at the same time, then select Device Manager.
2) In the Device Manager window, double-click on the Universal Serial Bus controllers to expand its drop-down list.
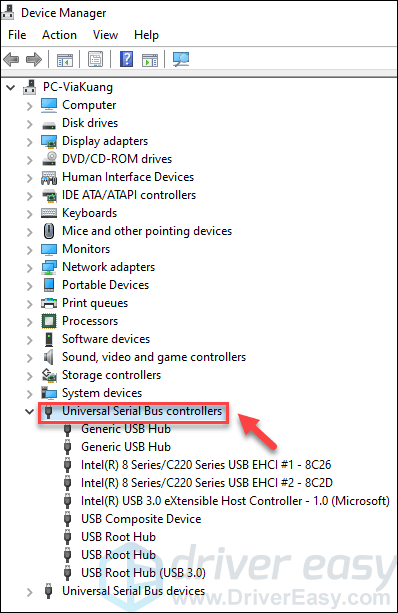
3) Right-click one of the USB Hubs and select Properties.
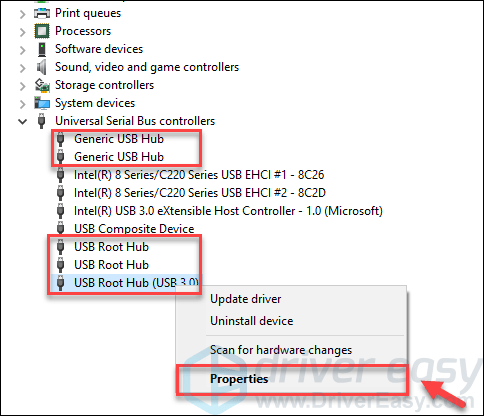
4) In the Properties window, select the Power Management tab, and deselect Allow the computer to turn off this device to save power, then click OK.
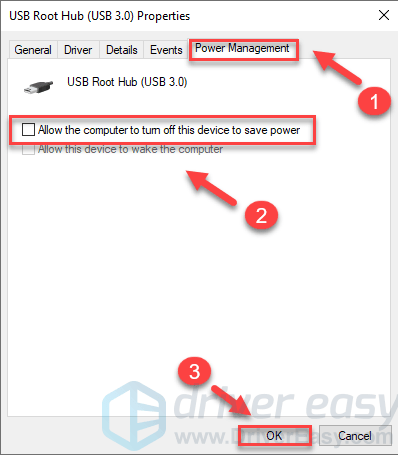
5) If there is more than one USB Hub on your PC, then repeat steps 3 and 4 above to apply the same settings to other USB Hubs.
After completing the steps above, you can check if your Razer Deathadder mouse works.
3. Uninstall your Razer Deathadder driver
You can always uninstall your Razer Deathadder driver if it’s not working. Here is how to do it:
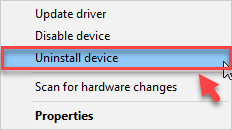
1) Right-click the Start menu (the Windows logo icon) and select Device Manager.

2) Click View and select Show hidden devices. Double click Mouse and other pointing devices to expand the drop-down list.
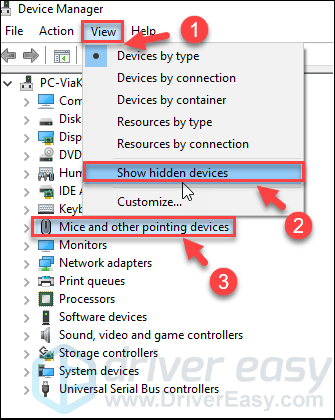
3) Right-click your Razer Deathadder driver and select Uninstall device. Also, uninstall all hidden supporting drivers.
4) You will then be prompted to confirm your choice. Select Uninstall.
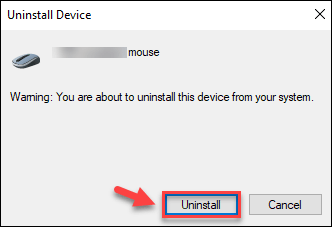
5) After uninstalling, you will not be able to use your mouse. Don’t worry, just unplug your mouse, then re-plug it to see if it works.
Windows will help you reinstall the driver for your mouse.
If your Razer Deathadder mouse still doesn’t work, you’ll need to move on to the next step.
Mouse lagging, not moving?
1. Clean your mouse
If the cursor doesn’t move, it’s probably because your mouse’s sensor might be dirty.
Clean the sensor using a Q-tip lightly coated in rubbing alcohol. Let the sensor dry for 5 minutes before trying the mouse again.
2. Adjust Razer Synapse Settings
If you have installed Razer Synapse, adjusting a few Razer Synapse settings might fix random mouse freezes.
1) Open Razer Synapse.
2) Click the Performance tab, then adjust the Polling Rate set to 500 if required.
3) Click the Calibration tab, then select the Surface Calibration option if it’s not currently on.
5) If you don’t have a Razer mouse pad, select the Others option and your mouse pad. Follow the instructions to calibrate the mouse pad.