


AAA Shooters are all about Ping and FPS. These two metrics determine how smooth your gameplay will be. And in CoD: Warzone, many gamers keep reporting a stuttering and FPS drops issue. If you happen to be on the same boat, here’re some easy fixes you can try.
Before you start:
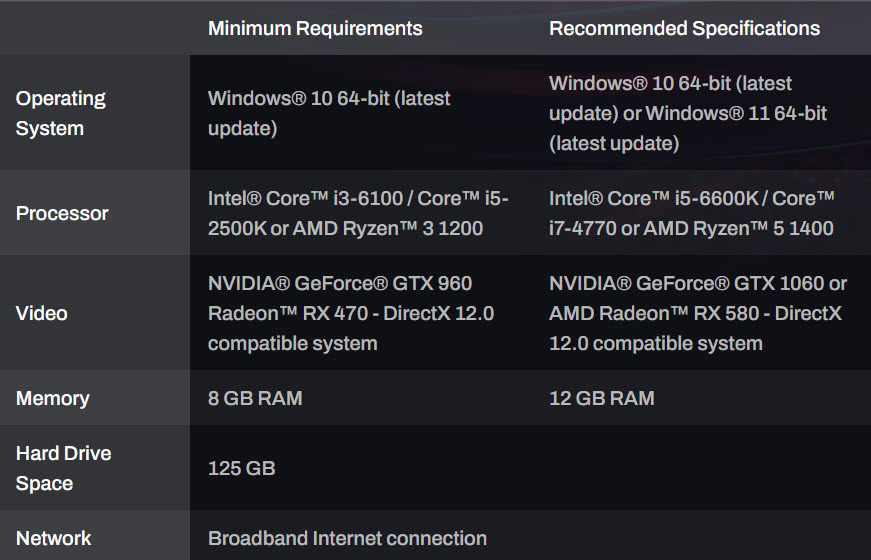
Before you start troubleshooting, check if you computer meets the hardware requirements. While Warzone is now free to play, it is still a graphically demanding title which is not perfectly optimized according to many players. If your rig doesn’t meet the recommended specs, you’re very likely to experience lag especially during intense gameplay. In that case, the best fix is to upgrade your hardware.
Try these fixes:
You might not need to try all the solutions. Simply work down the list until you hit the one that does the trick.
- Change your power plan
- Update your graphics driver
- Install all Windows updates
- Turn on HAGs
- Run Warzone on DirectX 11
- Modify the config file
- Lower in-game graphics settings
- Release Standby Memory
Fix 1: Change your power plan
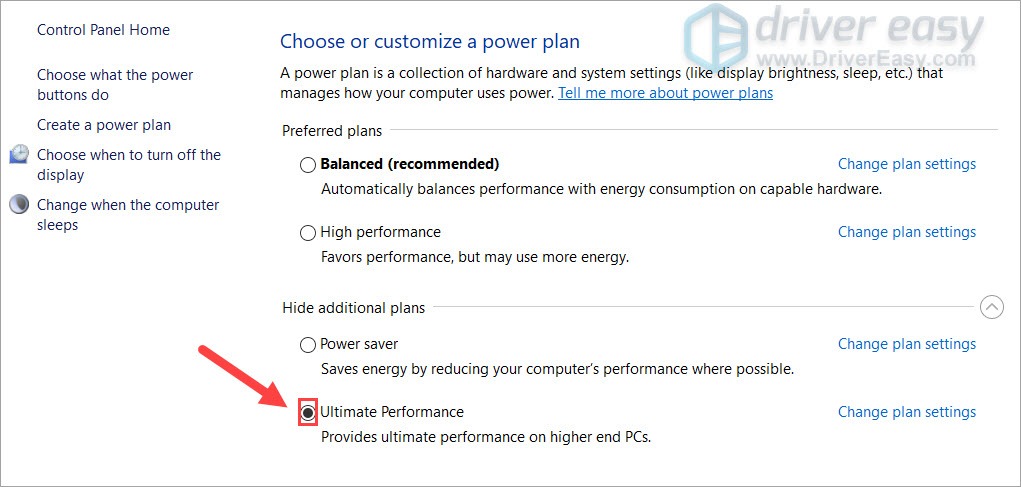
The first quick fix is to change your power plan to Ultimate Performance, a new plan that is not widely known. This plan is designed to make the most out of high end setups.
And here’s how:
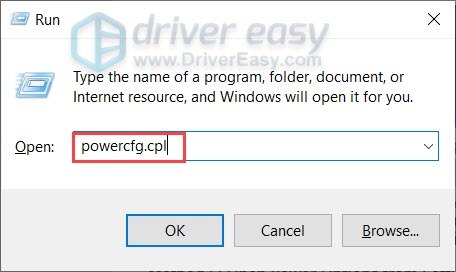
- On your keyboard, press Win+R (the Windows logo key and the r key) at the same time. Type or paste powercfg.cpl and press Enter.
- Select Ultimate Performance. If you don’t see this power plan, simply continue to the next step to unhide it.
- On your keyboard, press Win (the Windows logo key) and type cmd. Select Run as Administrator.
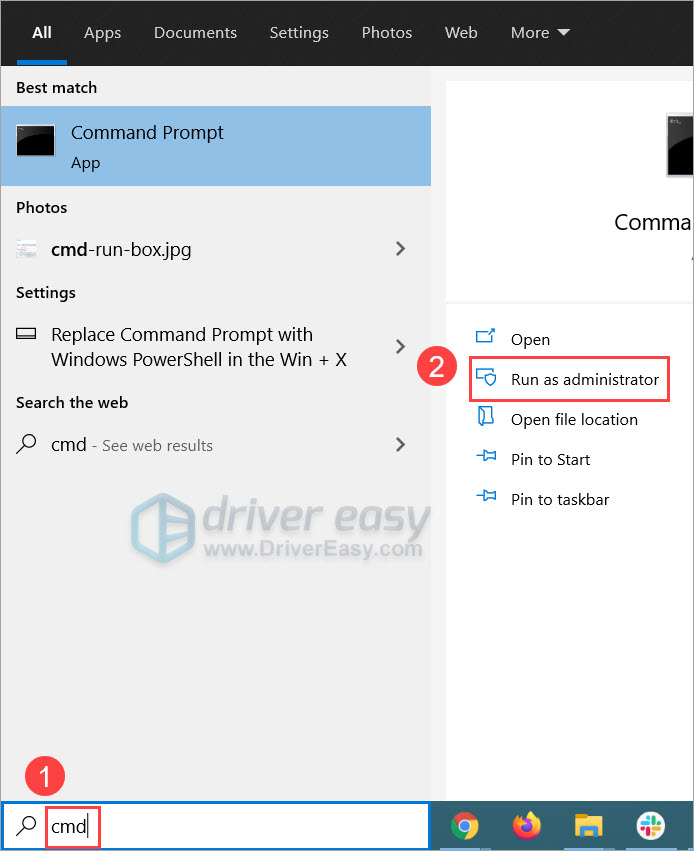
- In the command prompt, type or paste the following command and press Enter.
powercfg -duplicatescheme e9a42b02-d5df-448d-aa00-03f14749eb61
If you see a prompt similar to this, return to step 2 to enable the Ultimate Performance power plan.
After changing the power plan, launch Warzone and join a game to test.
If this fix doesn’t solve your issue, take a look at the next one below.
Fix 2: Update your graphics driver
One of the most common causes of game stuttering is that you’re using a broken or outdated graphics driver. In most cases, AAA titles like Warzone work better with the latest video driver. So if you haven’t claimed this zero-cost benefit, definitely get it now.
One way to do that is updating manually: You can go to the manufacturer’s website (NVIDIA or AMD), then search, download and install the graphics driver step by step. This will take some time and computer knowledge.
If you don’t have the time, patience or computer skills to update the driver manually, you can do it automatically with Driver Easy. It will automatically recognize your system and find the correct drivers for your exact graphics card, and your Windows version, and it will download and install them correctly.
You can update your drivers automatically with either the 7 days free trial or the Pro version of Driver Easy. It takes just 2 clicks, and you get full support and a 30-day money-back guarantee with the Pro version:
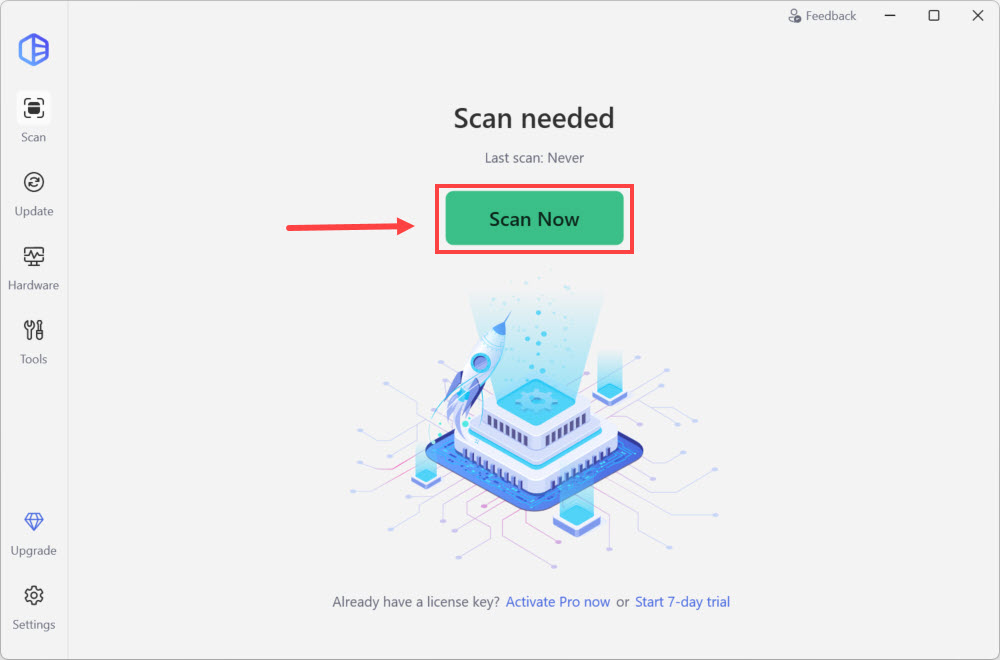
- Download and install Driver Easy.
- Run Driver Easy and click the Scan Now button. Driver Easy will then scan your computer and detect any problem drivers.
- Click the Activate & Update button next to the flagged device to automatically download and install the correct version of this driver.
Or click Update All to automatically download and install the correct version of all the drivers that are missing or out of date on your system (You’ll need the Pro version for this – when you select Update All, you’ll get a prompt to upgrade. If you’re not prepared to purchase the Pro version yet, Driver Easy provides a 7-day trial at no cost, granting access to all Pro features like fast downloads and easy installation. No charges will occur until after your 7-day trial period ends.)
Once you’ve updated your graphics driver, restart your PC and test the gameplay in Warzone.
If the latest GPU driver doesn’t give you luck, you can take a look at the next solution.
Fix 3: Install all Windows updates
Microsoft updates Windows 10 frequently with security patches and new features. The update process normally happens periodically, but you can always check for the latest patches manually so as to keep your PC in tiptop shape.
Here’s how you can check for updates manually:
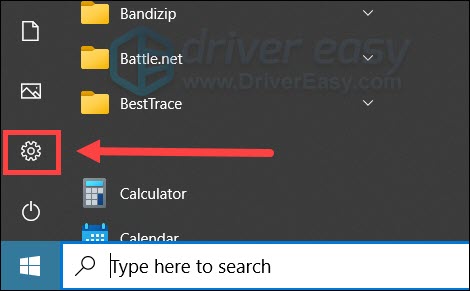
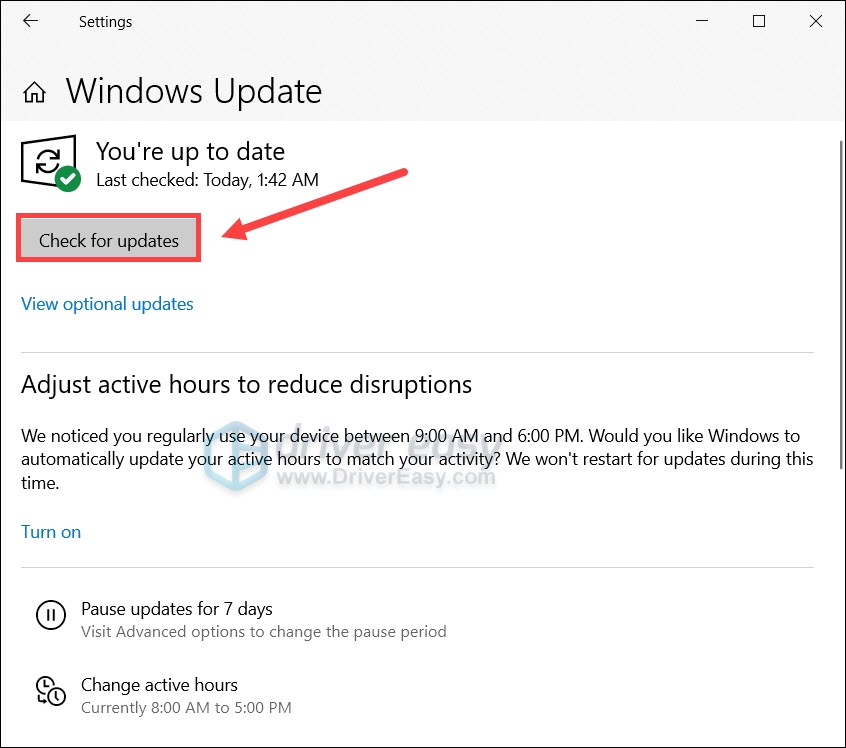
- On your keyboard, press Win (the Windows logo key). At the bottom left corner of your screen, click the gear icon to open Settings.
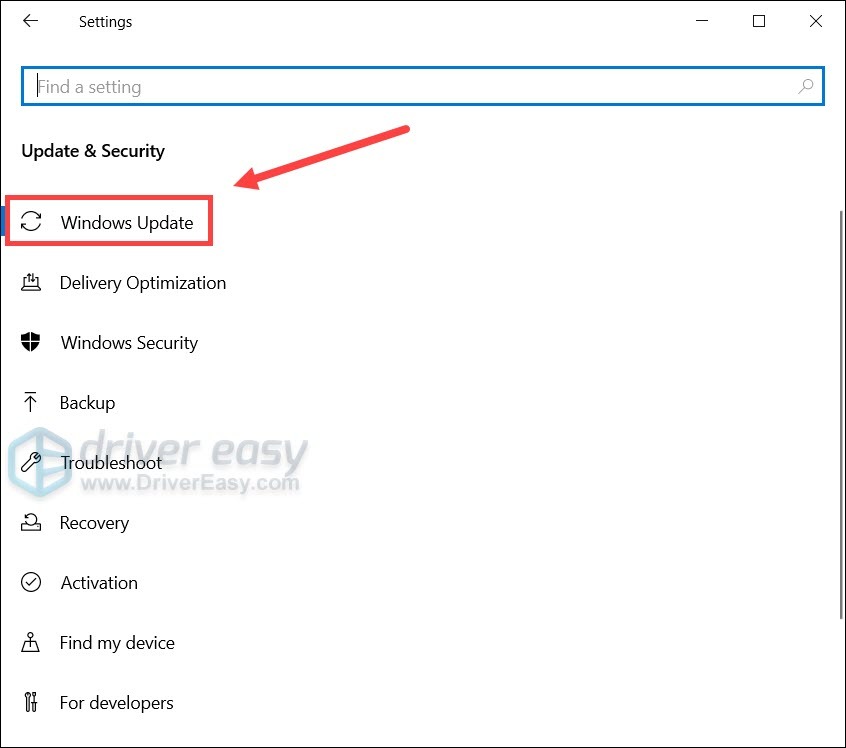
- Scroll down and select Update & Security.

- Click Windows Update.
- Click Check for updates. Then wait for the process to complete. After that, restart your PC.
Once done, restart your computer and check if Warzone stutters again.
If this method doesn’t do the trick, you can try the next one below.
Fix 4: Turn on HAGs
HAGs is short for Hardware Accelerated GPU Scheduling, a new feature that comes with the 2004 build of Windows 10. It’s designed to improve high-end GPU performance, and some gamers reported that HAGs solved the stuttering issue in Warzone. You can try the same and see how things go.
On Windows 11
- On your keyboard, press the Windows key and the I key at the same time to open Settings.
- Select Gaming, and make sure that the toggle for Game Mode is set to On. Then click the Graphics tab.
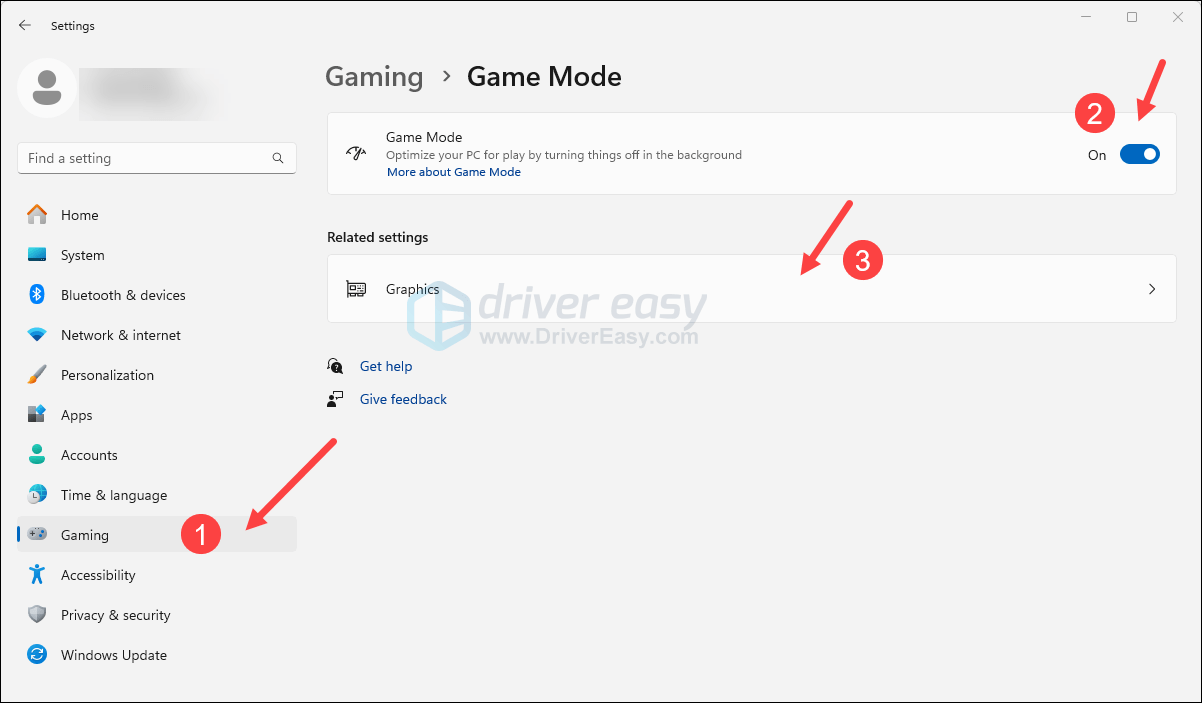
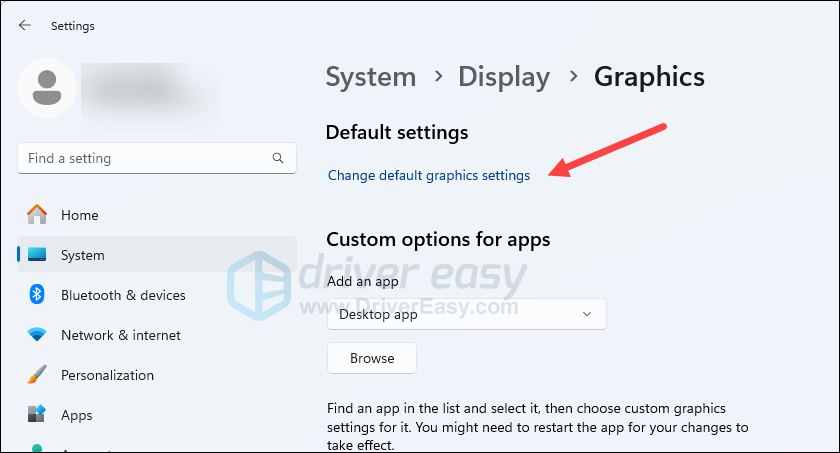
- Click Change default graphics settings.
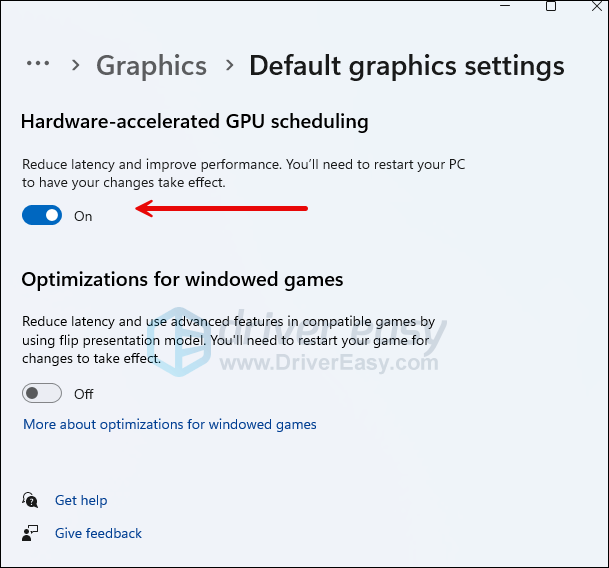
- Make sure that the toggle for Hardware-accelerated GPU scheduling is set to On.
On Windows 10
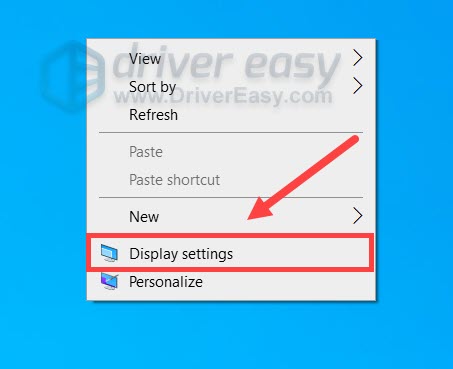
- In the empty area of your desktop, right-click and select Display settings.
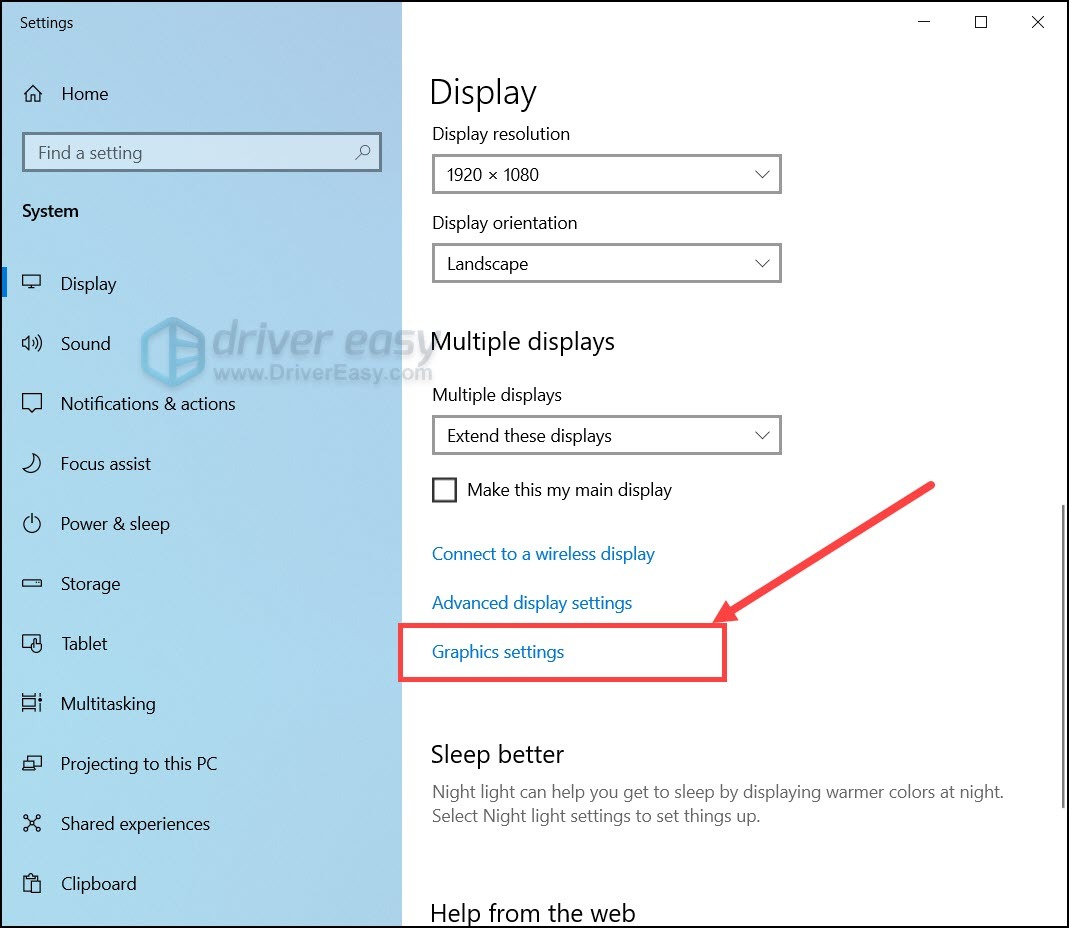
- Under the Multiple displays section, click Graphics settings.
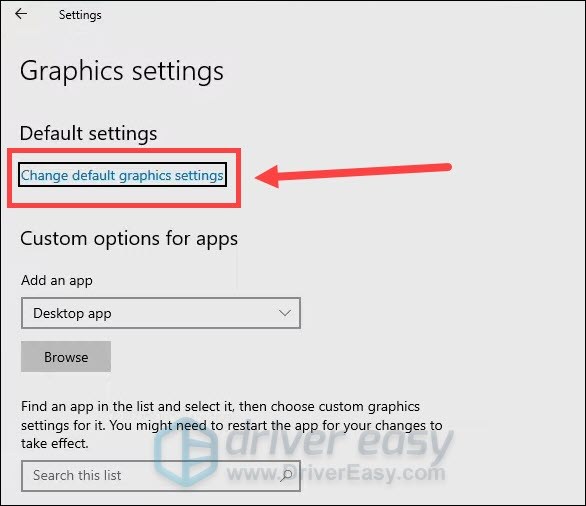
- Under the Default settings section, click Change default graphics settings.
- Turn on Hardware-accelerated GPU scheduling.
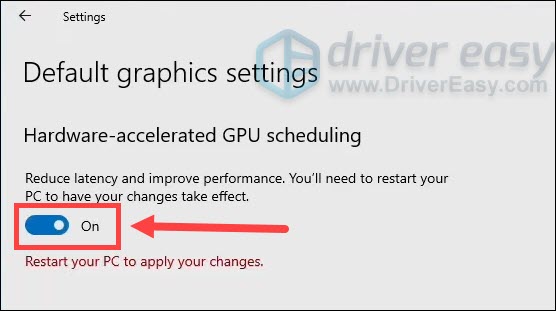
- Reboot your PC and test the gameplay in Warzone.
If your hardware doesn’t support HAGs, or it failed to solve your problem, simply continue to the next fix.
Fix 5: Run Warzone on DirectX 11
The default DirectX 12 might show compatibility issues with Warzone. You can add launch parameters manually to force Warzone to run on DirectX 11 and see if this helps fix the stuttering.
Here’s a quick guide for that:
- Open your Battle.net client.
- From the left menu, select Call of Duty: MW and click Options > Game Settings.
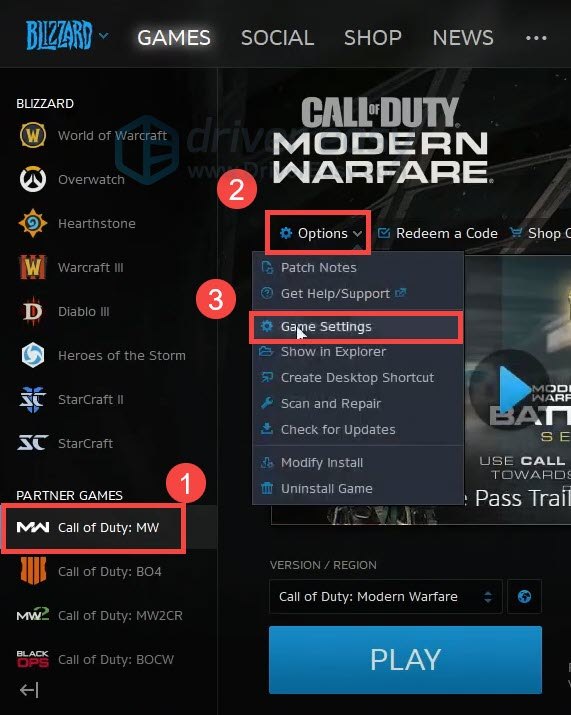
- Select Game Settings. Then check the box next to Additional command line arguments and enter -D3D11 in the text field.
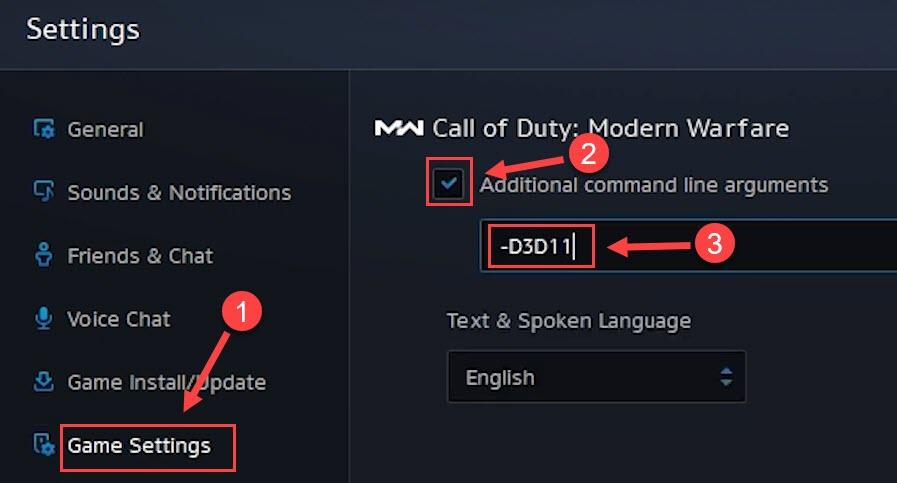
- Now save the changes and check if Warzone runs smoother.
If the stuttering remains under DirectX 11, you can check out the next fix to tune some in-game settings.
Fix 6: Modify the config file
Feedback shares that modifying certain values in the Warzone configuration file shows a drastic boost in performance. It might be a potential fix to your stuttering issue too.
To do so, follow these steps:
- Go to This PC > Documents Call of Duty Modern Warfare > players, then open adv_options.ini with notepad.
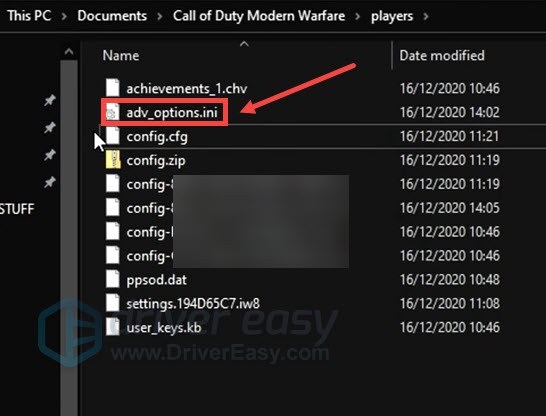
- Change the value of RendererWorkerCount to the number of your CPU’s physical cores. Then press Ctrl+S to save the changes.
Now enter the game and test the improvement.
If this trick doesn’t give you luck, take a look at the next one.
Fix 7: Lower in-game graphics settings
Maybe it’s the game, or maybe your GPU isn’t as powerful as you think. In most cases, you can lower your in-game graphics settings to alleviate the stuttering issue.
And for your reference, we have prepared the recommended settings down below. You can change the settings according to your PC setup.
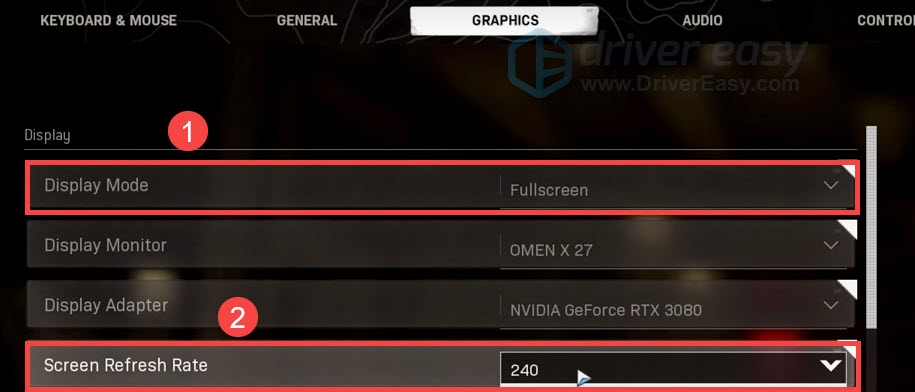
- Open your game and navigate to the GRAPHICS tab. Under the Display section, change the Display Mode to Fullscreen or Windowed. Set Screen Refresh Rate to the highest value.
- Set Sync Every Frame (V-Sync) to Disabled, Custom Framerate Limit to Unlimited.
- Now test the gameplay.
Fix 8: Release Standby Memory
So this trick applies to most of the game stuttering. Many people believe Windows has a long-standing issue with RAM allocation. The system would use some RAM as cache, or “standby memory”. And problems may occur when the standby memory is not released as quickly as needed. Anyways, you can free up the standby memory manually and see how it goes.
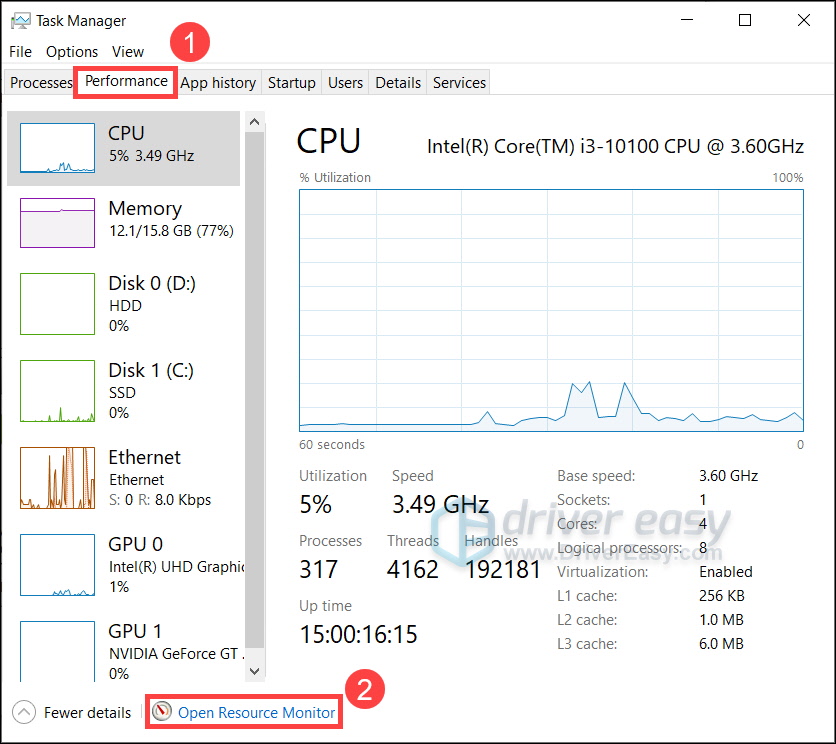
- On your keyboard, press Ctrl+Shift+Esc together to open Task Manager. Navigate to the Performance tab, click Open Resource Monitor.
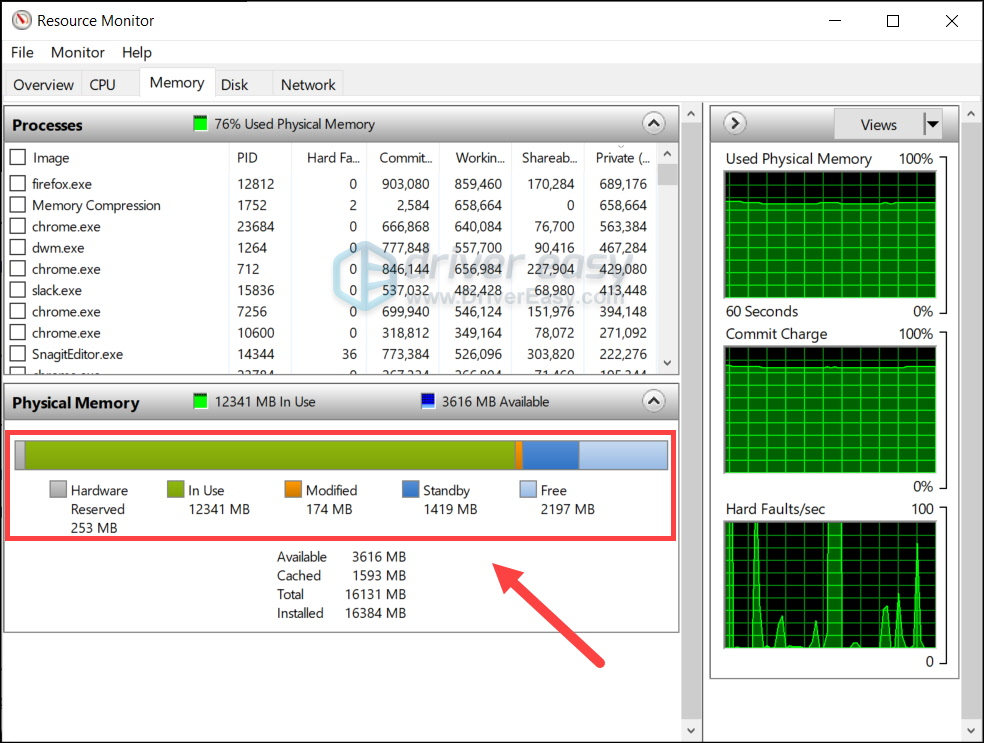
- In Resource Monitor, navigate to the Memory tab. In the Physical Memory section, you’ll see the current memory usage. Check if Standby Memory is taking up too much of your total RAM.
- You can empty the standby memory manually.
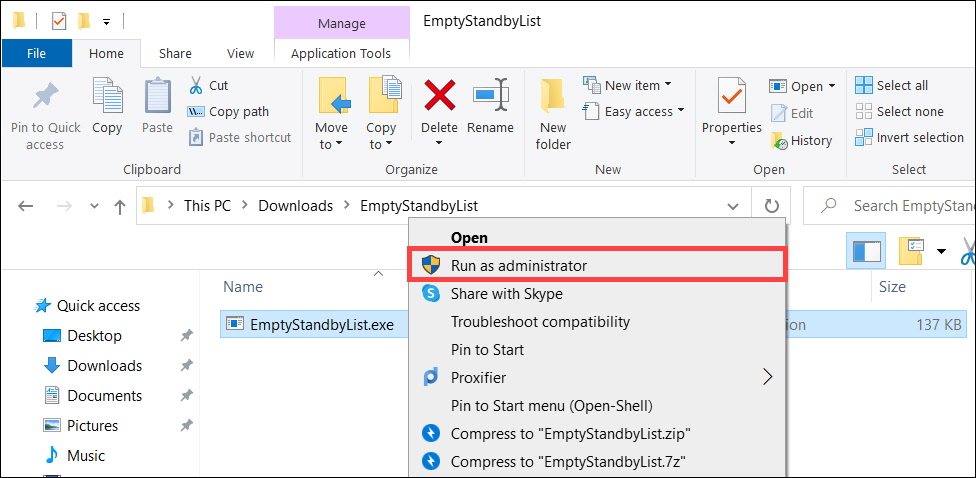
First, download EmptyStandbyList. This is a command line tool that can help you empty standby memory. - Once downloaded, right click the EmptyStandbyList program and select Run as an Administrator.
- Go back to Resource Monitor and check if the standby memory has been cleared. Then you can check if the issue persists.
(Optional) You can also use Task Scheduler to clear the standby memory automatically. Theoretically, you can achieve the same result with a reboot, but it’ll be a different story while you’re in the middle of the game.
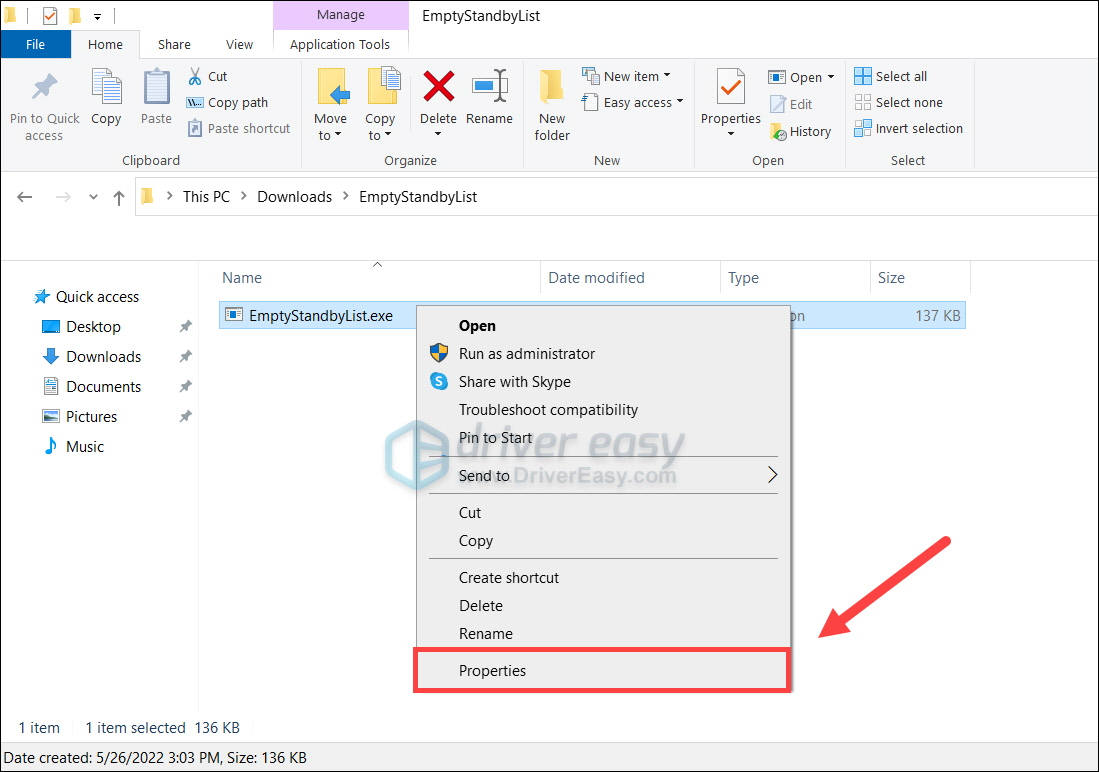
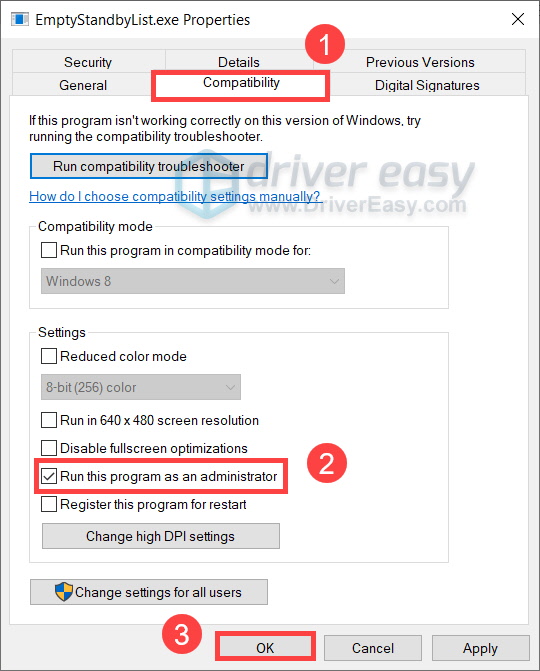
- Right click EmptySandbyList.exe and select Property.
- Navigate to the Compatibility tab, check the box next to Run this program as an administrator. Click OK.
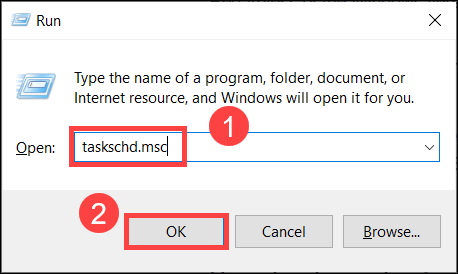
- On your keyboard, press Win+R to invoke the Run box. Type or paste taskchd.msc and click OK.
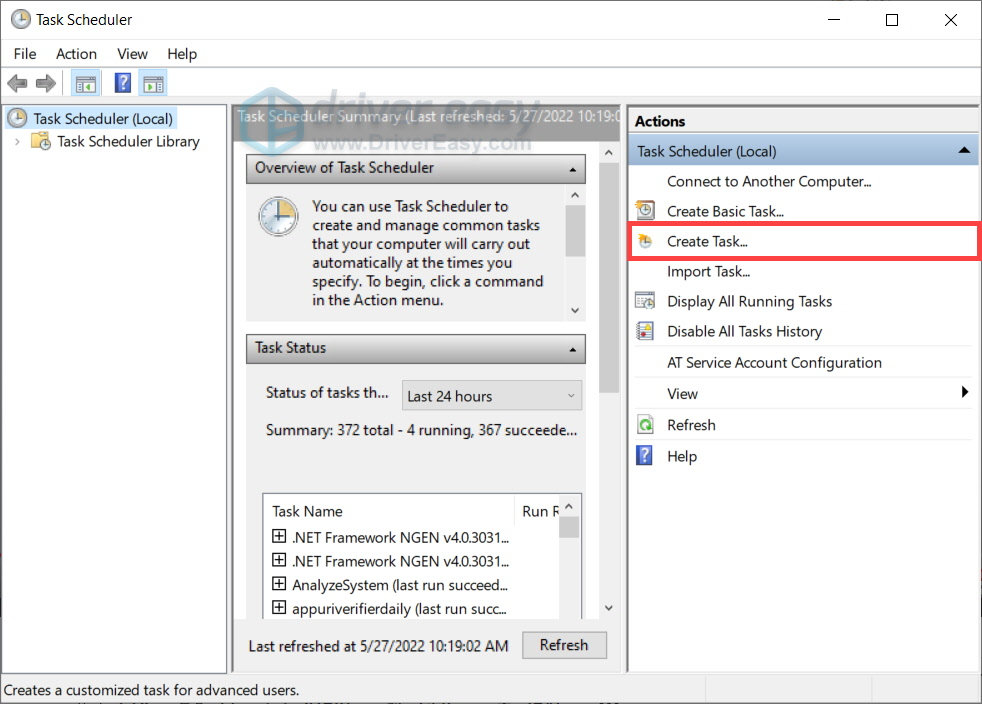
- In the right pane, select Create Task.
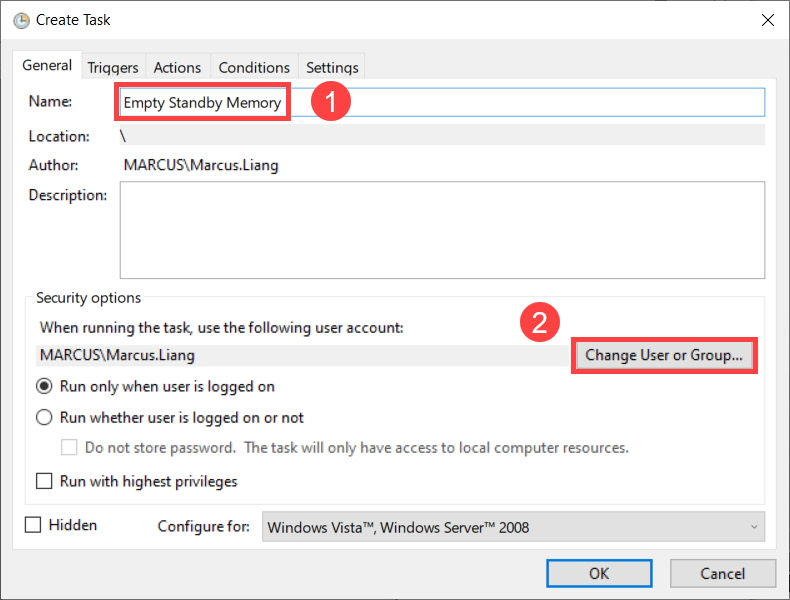
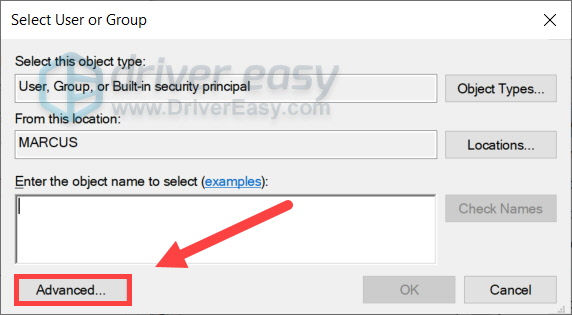
- In the Name section, type or paste Empty Standby Memory. Then click Change User or Group.…
- In the pop-up window, click Advanced….
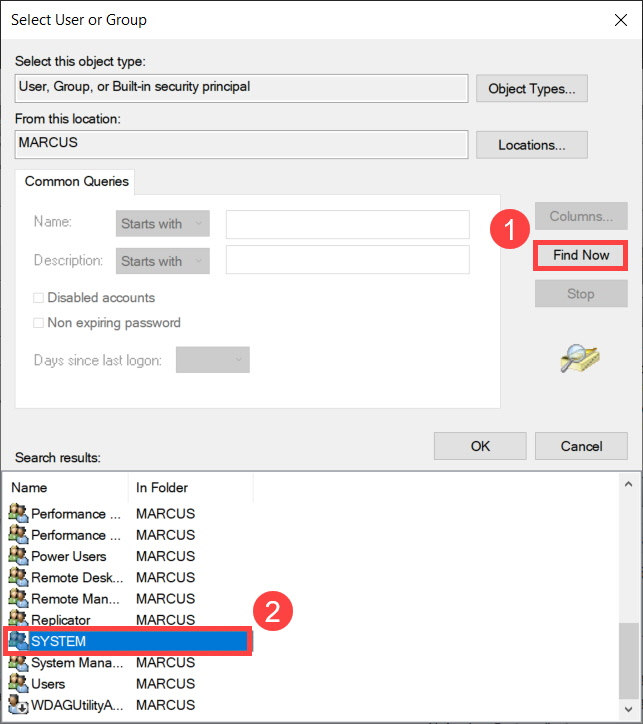
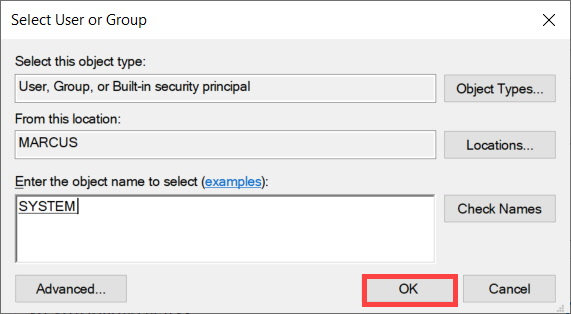
- Click Find Now. In the search results, select SYSTEM. Then click OK.
- Click OK.
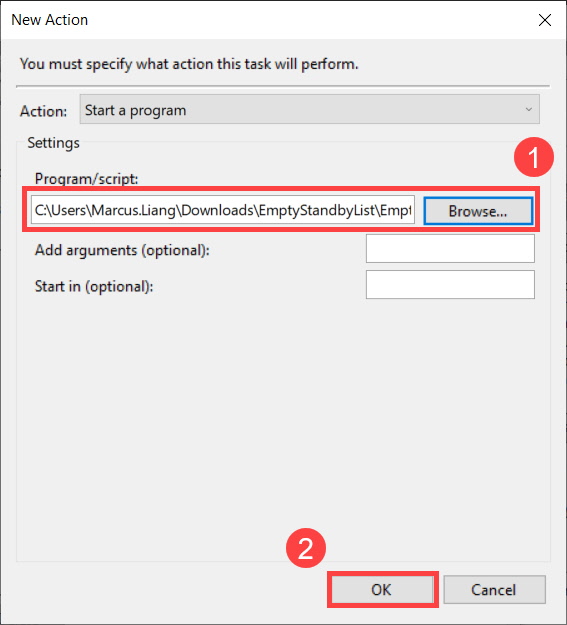
- Navigate to the Actions tab, click New….
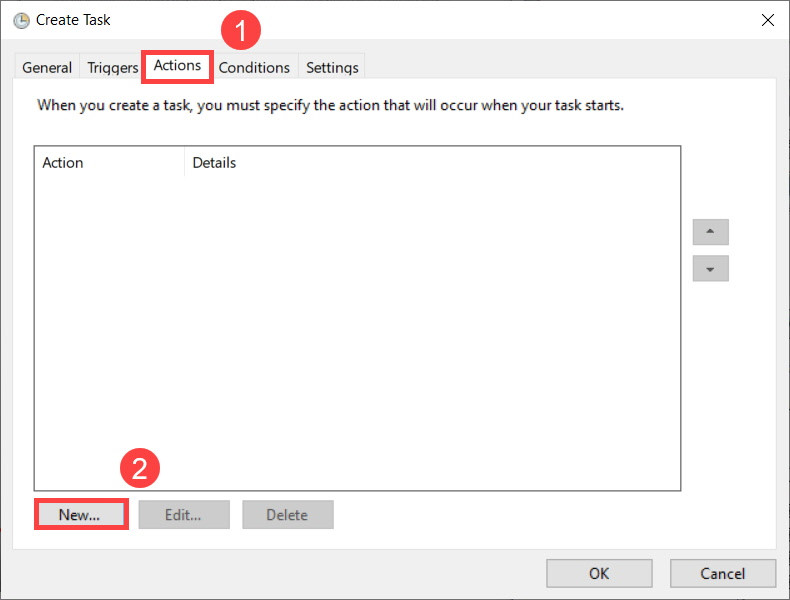
- Browse and select the EmptyStandbyList.exe program. Click OK.
- Then navigate to the Triggers tab, click New....
Under the Advanced settings, set Repeat task to every 10 minutes. Set for a duration of to Indefinitely.
Click OK.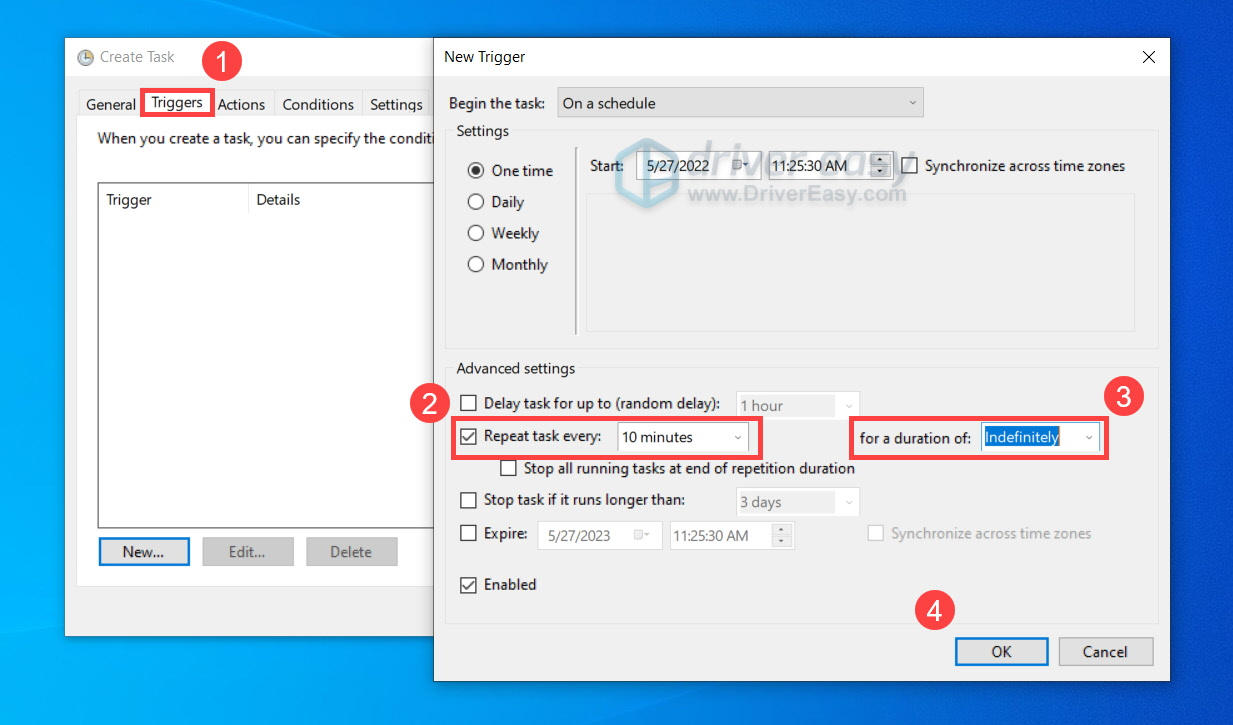
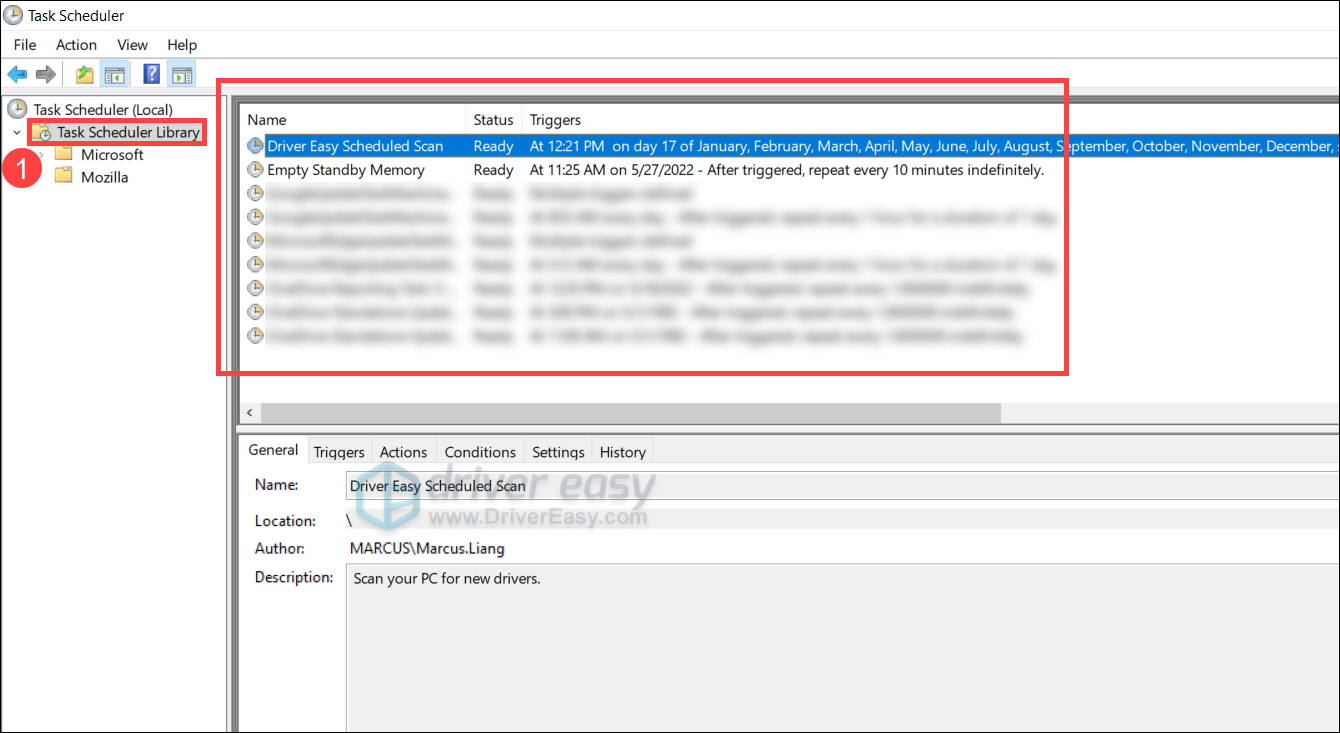
- After finishing the setup, you can select Task Scheduler Library in the left pane to view the pending tasks.
So these are the fixes for your stuttering issue in Warzone. If you have any questions or ideas, feel free to leave a comment down below.