


Wireless network has become more critical in our daily lives, but can you imagine this: one day you connect to your WiFi as usual, but your WiFi is not working anymore, and you loss the access to the Internet. Isn’t it a horrible thing?
The WiFi not working issue includes: WiFi connection failed or WiFi not showing up. Sometimes it’s difficult to locate the cause. However, you can easily fix WiFi not working without paying much time and patience! Try the fixes in this article and solve your problem step by step!
Check your WiFi
If WiFi not working in your Windows PC/laptop
If WiFi not working on your iPhone
Why is my WiFi not working? There are several reasons that cause the WiFi stops working. It can be the problem with your Internet Service Provider (ISP), your WiFi settings or your device. You can try to check your WiFi itself and the device that has the problem to solve it.
First of all, you may need to check if the same WiFi problem occurs in another device. For example, if your WiFi is not working in your Windows, you can try the WiFi on your mobile phone to see if it works, and vice versa.
If your WiFi doesn’t work on both devices, it should be an issue of your WiFi. So you can check your WiFi itself.
If your WiFi works on your iPhone, but doesn’t work on your Windows, maybe it’s a problem of your Windows. So you can check your Windows PC/laptop.
If your WiFi works on your Windows, but doesn’t work on your iPhone, maybe it’s a problem on your iPhone. So you can check your iPhone.
Check your WiFi
If your WiFi is not working on many devices, the cause of the problem may lie in the WiFi itself. There should be something wrong with your WiFi. Follow the steps below to troubleshoot until your problem is solved.
Step 1: Restart your modem and wireless router to fix WiFi not working
This problem can be probably caused by the Internet Service Provider (ISP) issue. Restarting your modem and wireless router can help you reconnect to your WiFi service.
Note: Anyone who is connecting to the network will be disconnected temporarily while you are doing this.
1) Unplug your wireless router and modem from th power source (remove the battery if your modem has a battery backup).
2) Wait for at least 30 seconds.
3) Plug your wireless router and modem back into the power source again (put the battery back to the modem).
4) On your device, reconnect to your WiFi network.
Step 2: Check if the WiFi signal is blocked to fix WiFi not working
As we all know: the weaker your WiFi signal is, the worse your WiFi is working. So please pay attention if there is anything that may prevent your WiFi signal from being connected. You can check the possible conditions below:
1) Put your router as in the center as possible, and make sure to be as closer as possible to the router, in order to get better WiFi signal.
2) Make sure that there are no obstacles covering upon your router, because that may affect the router’s performance, too.
3) Thick walls can also reduce the WiFi signal and prevent you from connecting to the WiFi.
4) Check any device that may interfere with your WiFi signal, such as: your cordless phone, microwave oven and Bluetooth speaker. If these devices use the same 2.4 GHz or 5 GHz frequencies as your WiFi does, your WiFi signal can be interfered by using the same frequency. Try to temporarily turn off those devices and connect to your WiFi again.
If your WiFi restarts to work after getting better signal, the problem is caused by the WiFi signal. Then you can try to move your device closer to your router, or consider buying a WiFi range extender to solve your problem.
Step 3: Change your WiFi frequency and channel to fix WiFi not working
If your WiFi stops working in the crowded apartments when too many people connect on the same WiFi channel at the same time, you can try to change your WiFi frequency and channel to solve this proboem.
Usually WiFi network frequency has 2.4 GHz and 5 GHz. Now many routers are the dual-band model and both support 2.4 GHz and 5 GHz. If your router is dual-band, it will automatically choose to broadcast at 5 GHz when it’s crowded connecting at 2.4 GHz.
How to check if my WiFi uses 2.4 GHz and 5 GHz?
Generally speaking, 802.11a/ac uses the 5 GHz band, 802.11b/g uses the 2.4 GHz band, and 802.11n uses either the 2.4 GHz or 5 GHz band. if they don’t match or include the frequencies of your router, the WiFi network won’t show up on your computer.
For your WiFi frequency: You can know your WiFi frequency by checking the interface of your router, or checking the router’s manual.
For your phone’s WiFi frequency: Now many smart phones support 2.4 GHz and 5 GHz, so you don’t need to worry about that.
For your Windows WiFi frequency:
1) Type cmd in the search box, right click Command Prompt (right click cmd if you are using Windows 7) to click Run as administrator, and click Yes to confirm.
2) Copy the command below and paste it in Command Prompt, then press Enter.
netsh wlan show drivers

3) You can see the frequency shown in the screenshot.
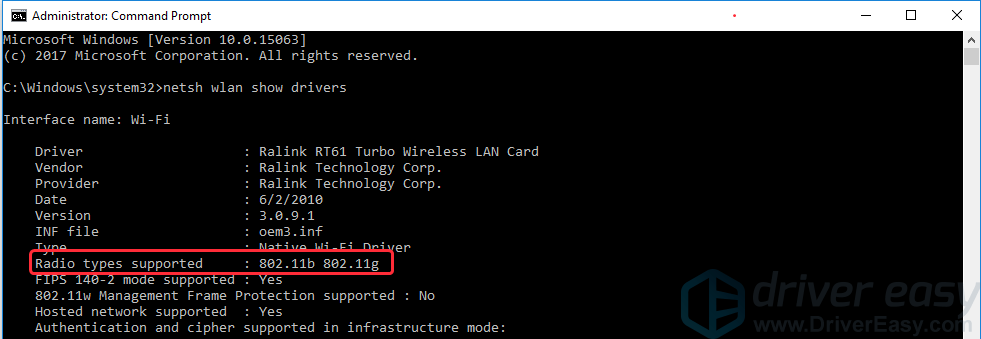
If your devices can only work with 2.4 GHz frequency, you are very likely to have the network congestion issue, so you can change the WiFi channel to solve your problem. And there are only 11 channels available to choose. Among these, only channel 1, 6, 11 are most commonly used.
Follow the instructions to set it up (Here we take a TP-link WiFi router as an example):
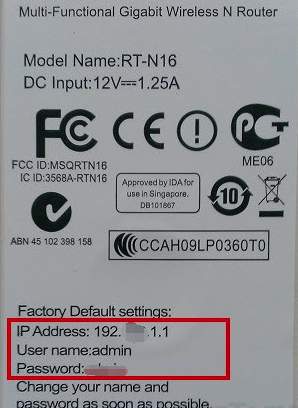
1) Check the IP address, Username and Password on your router.
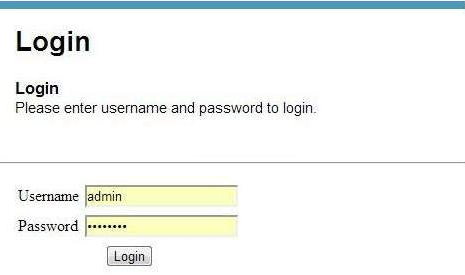
2) Open a browser on your PC or mobile phone, then type the IP address in your browser, and press Enter.
3) Type your Username and Password, and click Login.
4) Go to Wireless and click Wireless 2.4 GHz or Wireless 5 GHz, and change Channel to a less-crowded one.
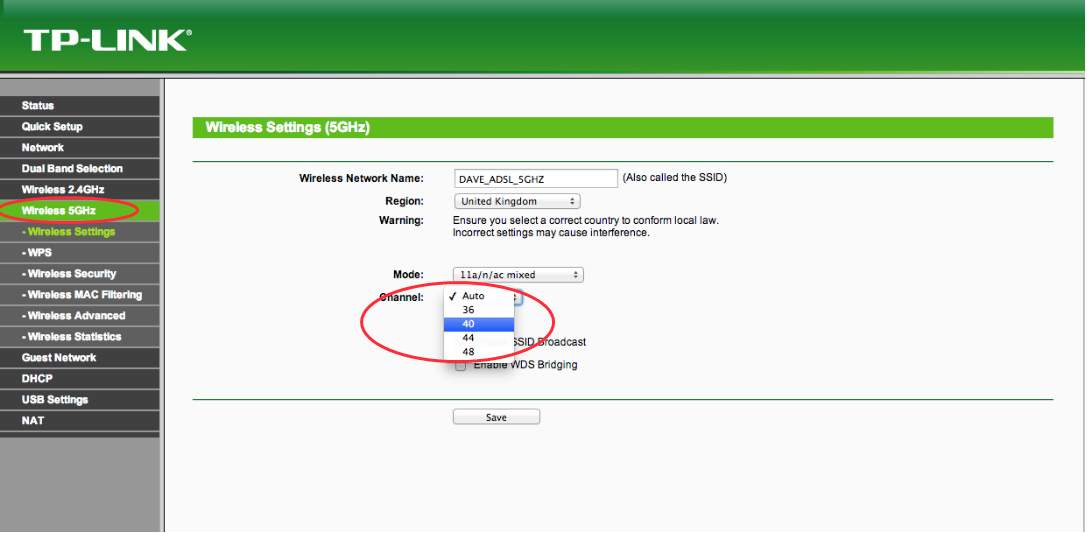
5) Try your WiFi again to see if it works better.
If WiFi not working in your Windows PC/laptop
If your WiFi works on other devices, but not on your Windows, you can try checking these methods below:
Method 1: Enable WiFi service to fix WiFi not working
This problem occurs most likely because your Windows disables the WiFi service. So you can check the WiFi settings on your Windows.
Note: Please make sure you are within the WiFi network range while you are following these steps.
Tips: If your Windows laptop has a switch or a key on your keyboard to turn on/off WiFi (if not, you can skip this), please make sure you don’t disable the WiFi service by pressing the switch or key. If you accidentally turn off WiFi, please turn it on first.
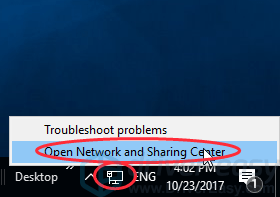
1) Right click the Internet icon, and click Open Network and Sharing Center.
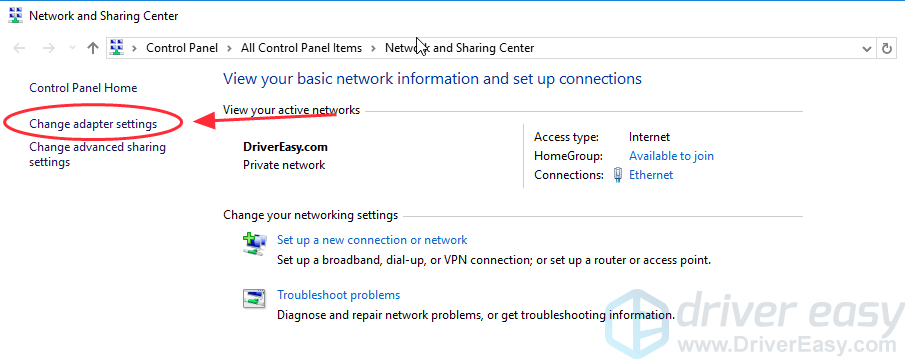
2) Click Change adapter settings.
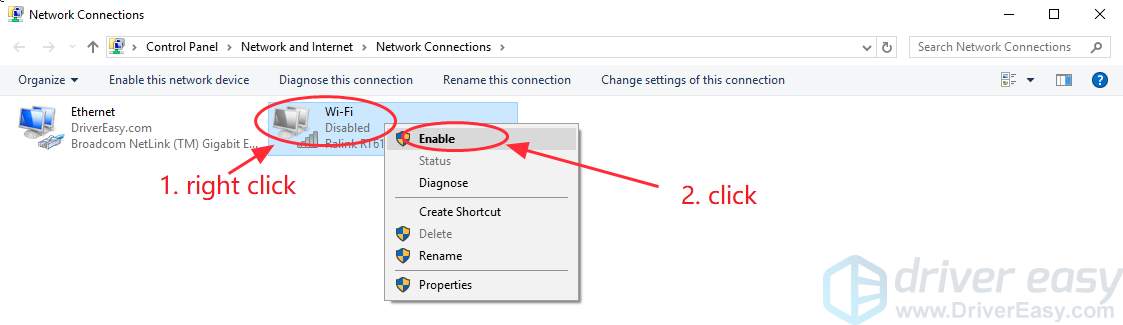
3) Right click WiFi (also referred to Wireless Network Connection in different computers), and click Enable.
Note: If it has enabled, you will see Disable when right click WiFi (also referred to Wireless Network Connection in different computers).
4) Restart your Windows and reconnect to your WiFi again.
Method 2: Turn on WLAN AutoConfig service to fix WiFi not working
The WLAN AutoConfig service (also referred to Wireless Configuration in Windows XP) can configure wireless security and connectivity settings. When enabled, WLAN AutoConfig settings apply to all network adapters installed on your computer. Moreover, when the WiFi becomes available, it will automatically connect to a preferred wireless network. You can follow these steps to enable it:
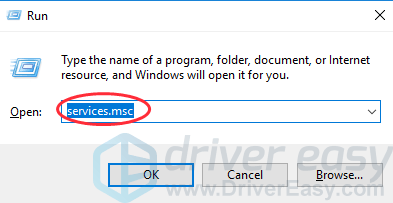
1) On your keyboard, press the Windows logo key + R at the same time to invoke the Run box, and type services.msc, then press Enter.
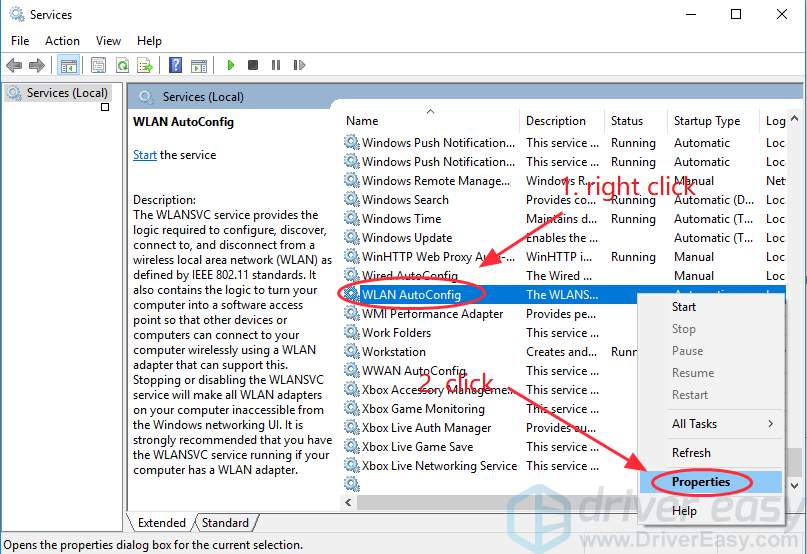
2) Scroll down and right click WLAN AutoConfig (if you are using Windows XP, right click Wireless Configuration), and click Properties.
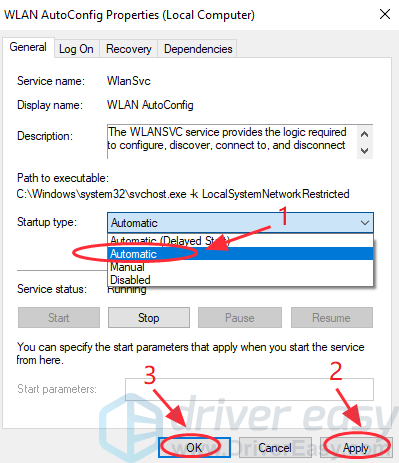
3) Select Automatic in Startup type, then click Apply, and click OK.
4) Restart your PC and reconnect to your WiFi network to see if your WiFi works.
Method 3: Disable the Windows Firewall
Windows Firewall can protect your Windows from network attacks. It’s possible that your Windows Firewall may stop your computer from connecting to your WiFi. You can try to temporarily disable Windows Firewall and see if it helps:
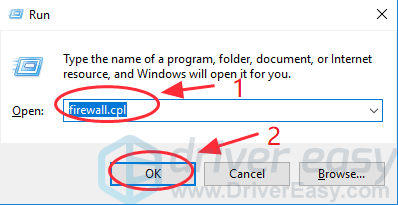
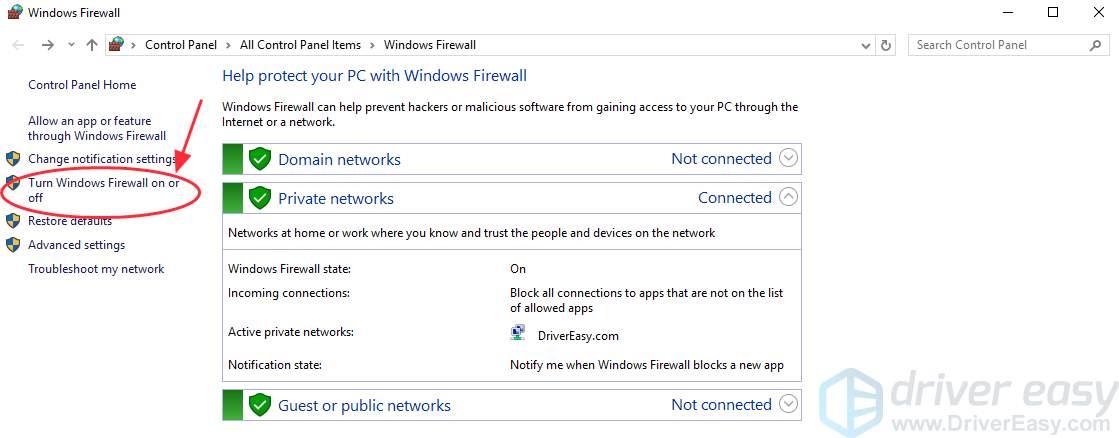
1) On your keyboard, press the Windows logo key + R at the same time, then type firewall.cpl and click OK.
2) Click Turn Windows Firewall on or off on the left pane.
3) Select Turn off Windows Firewall (not recommended) in all three columns, then click OK.
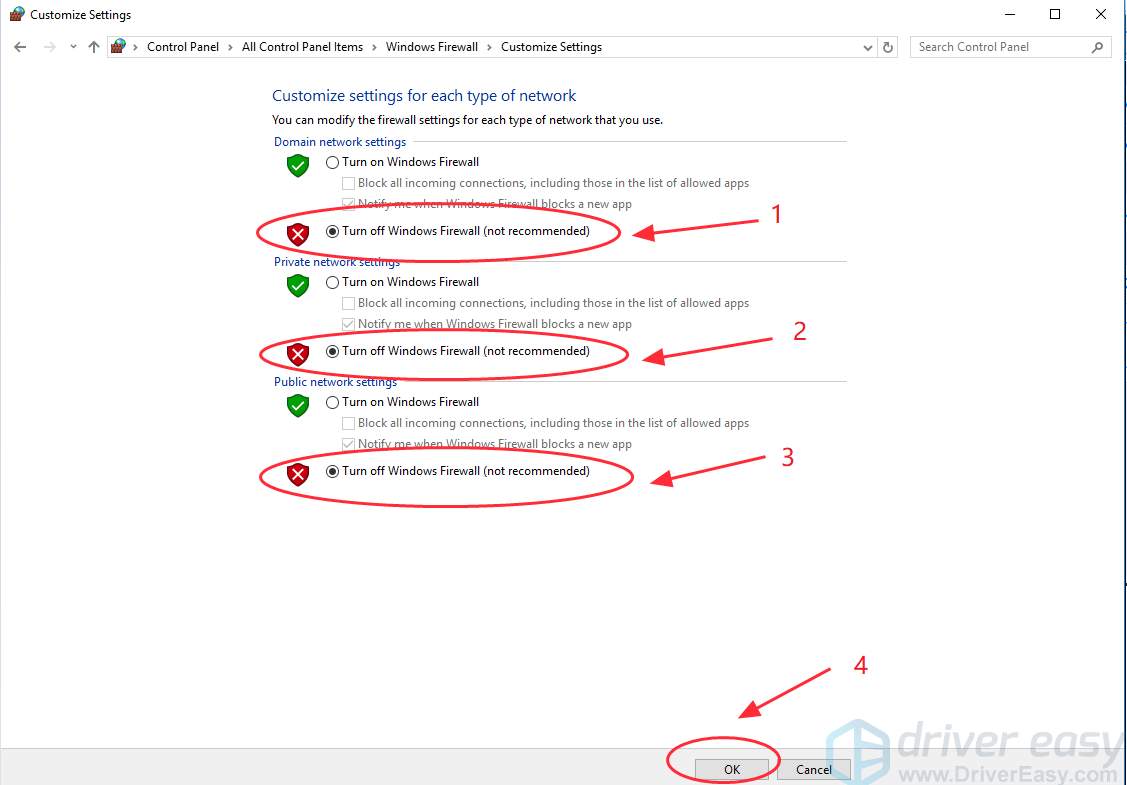
4) Try to connect to your WiFi again.
If the problem still occurs, it may not be a problem of Windows Firewall, and you can turn on Windows Firewall again to protect your computer.
If your problem is solved, it seems to be caused by Windows Firewall. Then you can allow your WiFi through Windows Firewall:
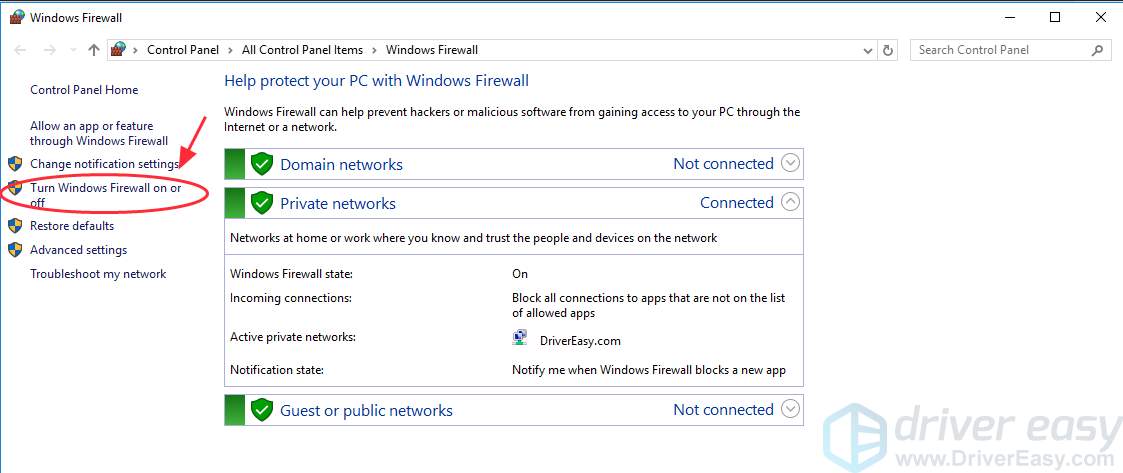
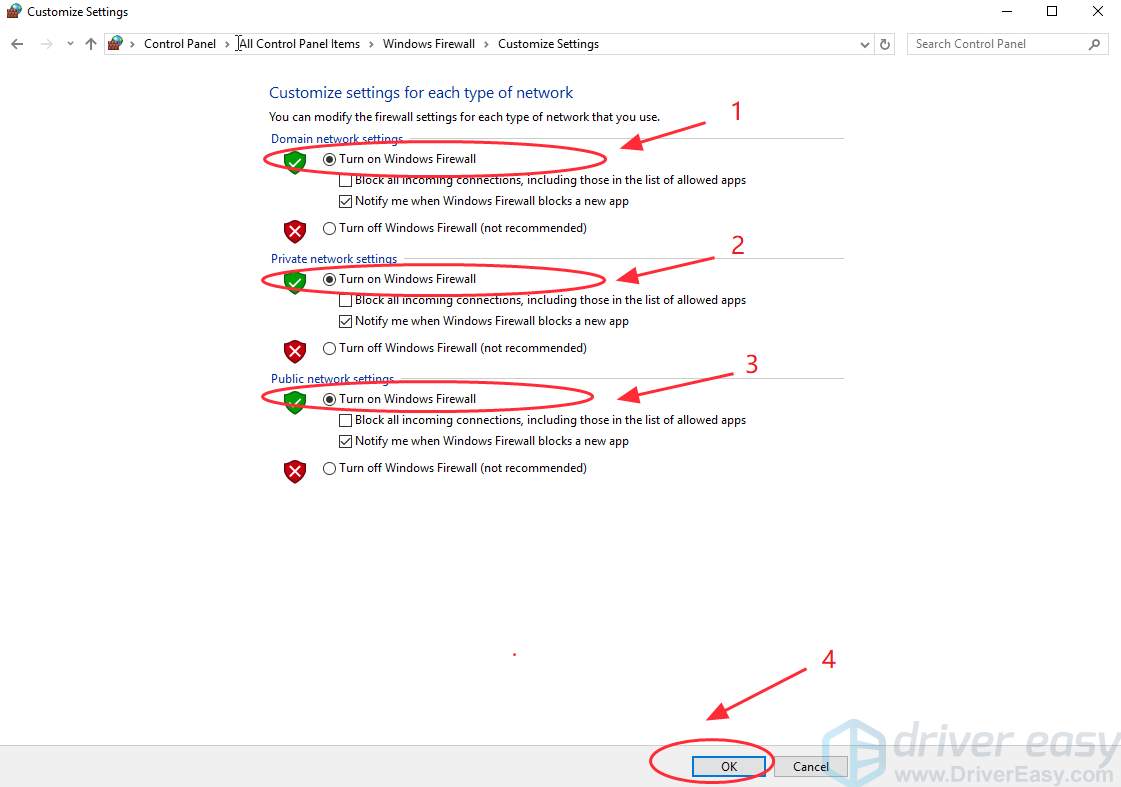
1) Still on the Windows Firewall window, click Turn Windows Firewall on or off on the left pane.
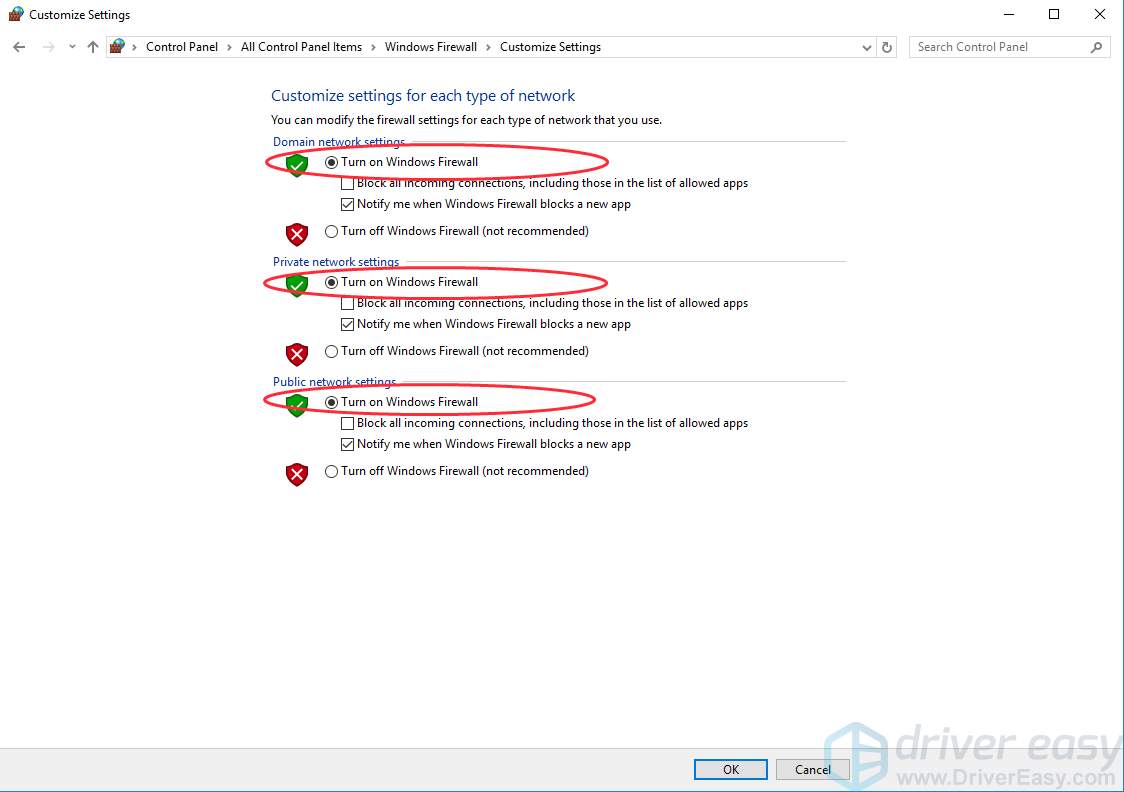
2) Select Turn on Windows Firewall in all three columns, and click OK to save.
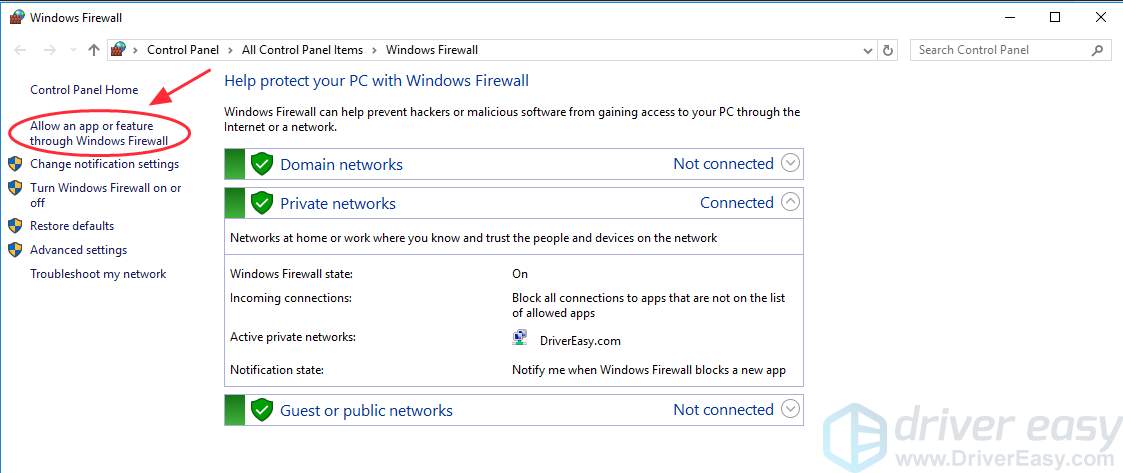
3) Back to the Windows Firewall window, click Allow an app or feature through Windows Firewall.
4) Scroll down and select the feature that runs your WiFi, and check the three boxes under Domain, Private and Public.
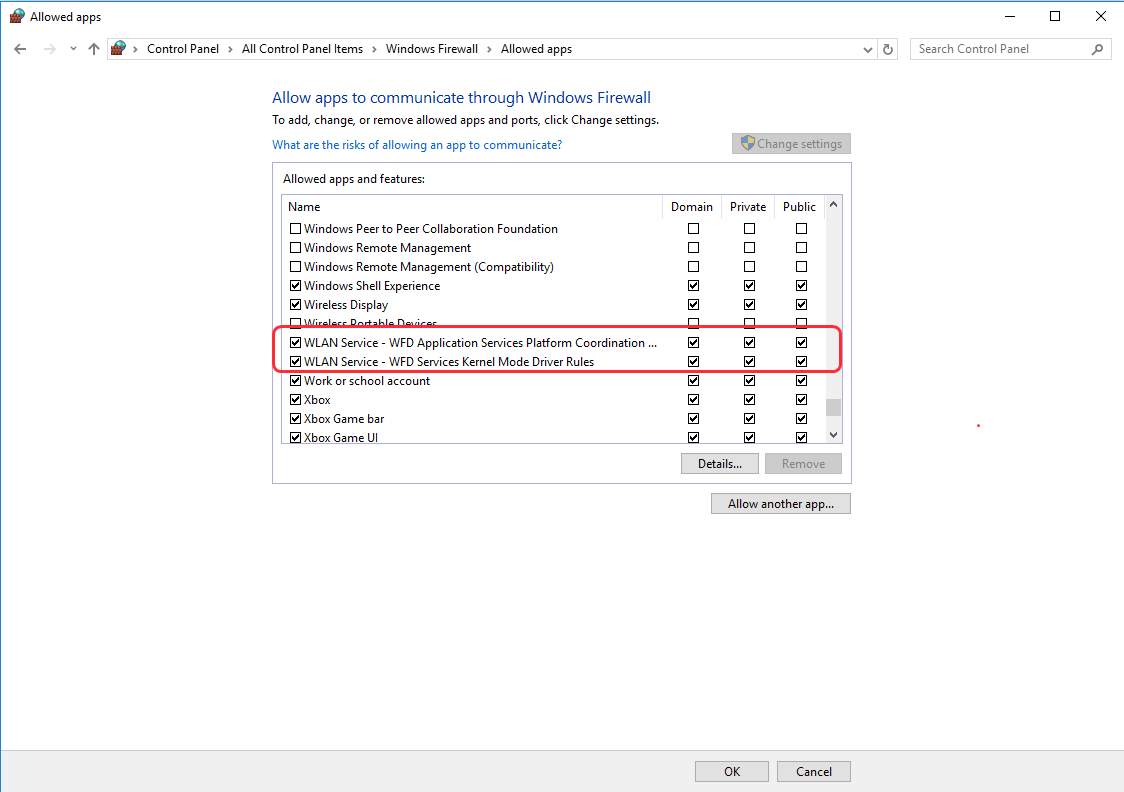
5) Click OK to save the settings, and try to connect to your WiFi again to see if it works.
Method 4: Update your WiFi network driver
WiFi not working can probably be caused by the missing or outdated wireless network driver, so updating your wireless network driver can solve this problem. There are two ways to update the WiFi network driver:
Option 1: Manually update your WiFi network driver
You’ll need some computer skills and patience to manually update your drivers, because you need to find the right driver online, download it and install it step by step.
Option 2: Automatically (recommended) update your WiFi network driver
If you don’t have the time or computer skills to update your wireless network driver manually, you can do it automatically with Driver Easy. Driver Easy will automatically recognize your Windows OS, then find the correct drivers for your computer:
1) Download and install Driver Easy (Download the .exe file to a USB drive from a computer with the Internet access, then install it in the computer with WiFi issue).
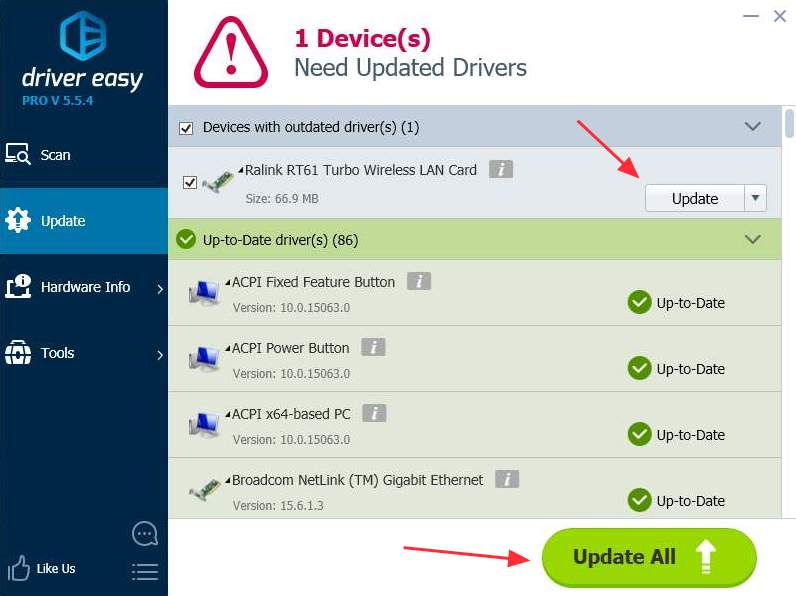
2) Run Driver Easy and click Scan Now. Driver Easy will scan your computer and detect any problem drivers.

3) Click the Update button next to the flagged driver, then download and install the correct version of that driver (you can do this with the FREE version).
Or click Update All to automatically download and install the correct version of all the drivers that are missing or outdated on your system. (This requires the Pro version which comes with full support and a 30-day money back guarantee. You’ll be prompted to upgrade when you click Update All.)
Tips: We recommend using the Offline Scan feature provided by Driver Easy, so that you can download and install the network driver even with no Internet.
4) Restart your computer and connect to your WiFi again to see if it works.
If WiFi not working on your iPhone
If the WiFi works on your computer or other devices, but not on your iPhone, you may check the WiFi settings on your iPhone.
Note:
1. Please make sure that you have turned on your WiFi and turned off the Airplane mode on your iPhone, and you are within the WiFi range when troubleshooting.
2. The screenshots below are shown on iOS 10, but the fixes apply to other iOS versions.
Method 1: Force a reboot on your iPhone
It’s never harmful to force a reboot on your iPhone, as many technical issues can be solved by restarting your device.
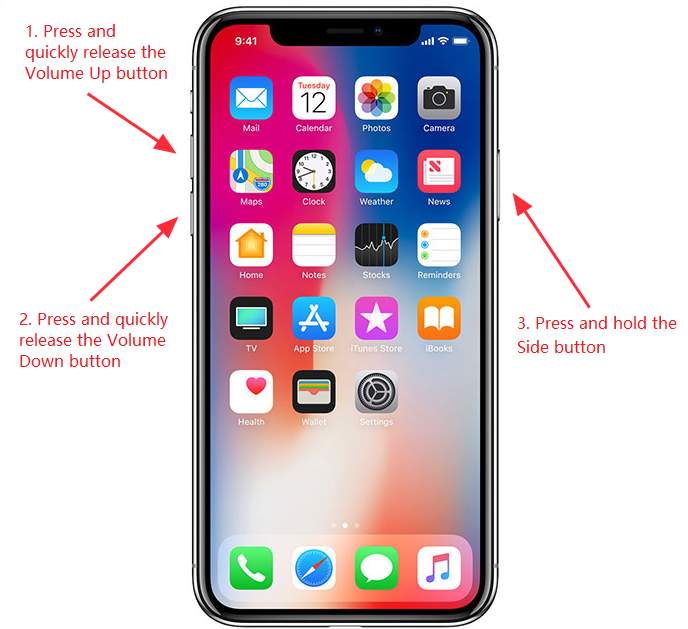
If you are using iPhone X, iPhone 8, or iPhone 8 Plus: Press and quickly release the Volume Up button. Press and quickly release the Volume Down button. Then, press and hold the Side button until you see the Apple logo.
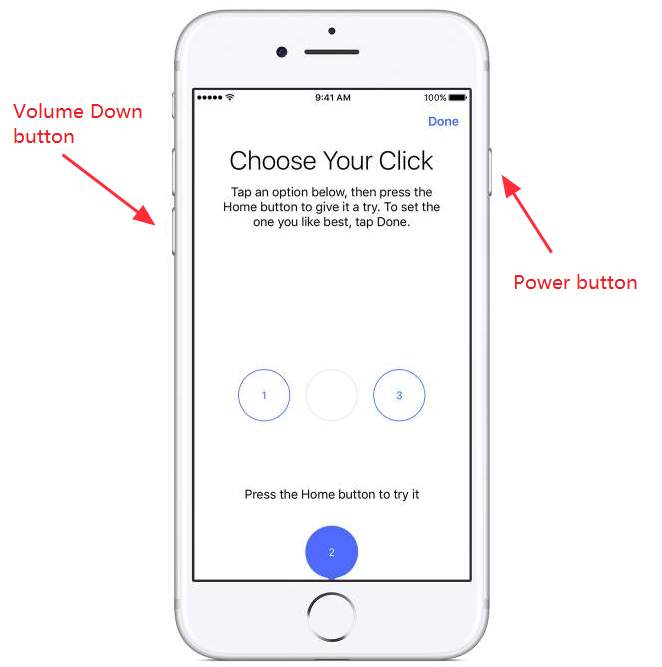
If you are using iPhone 7 and iPhone 7 plus: Press and hold both the Power button and Volume Down button for at least ten seconds, sometimes up to 20 seconds, until you see the Apple logo.
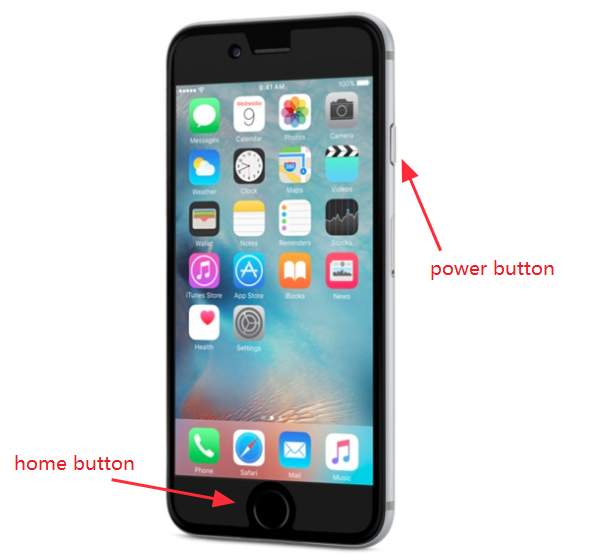
If you are using iPhone 6s and the earlier: Press and hold both the Power button and Home button for at least ten seconds, sometimes up to 20 seconds, until you see the Apple logo.
After restart your iPhone, try to connect to your WiFi to see if it works.
Method 2: Forget WiFi network and connect again
If you can connect to your WiFi, but the speed is slow or you don’t have Internet connection, forgetting your WiFi network will help you get a new connection to your WiFi.
Note: Please make sure that you know the password of your WiFi. You will need to enter the password again.
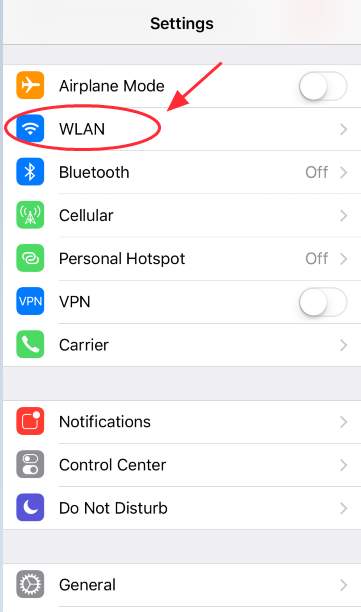
1) Go to Settings > WLAN.
2) Tap your WiFi name, and tap Forget this network. Then confirm it by taping Forget.
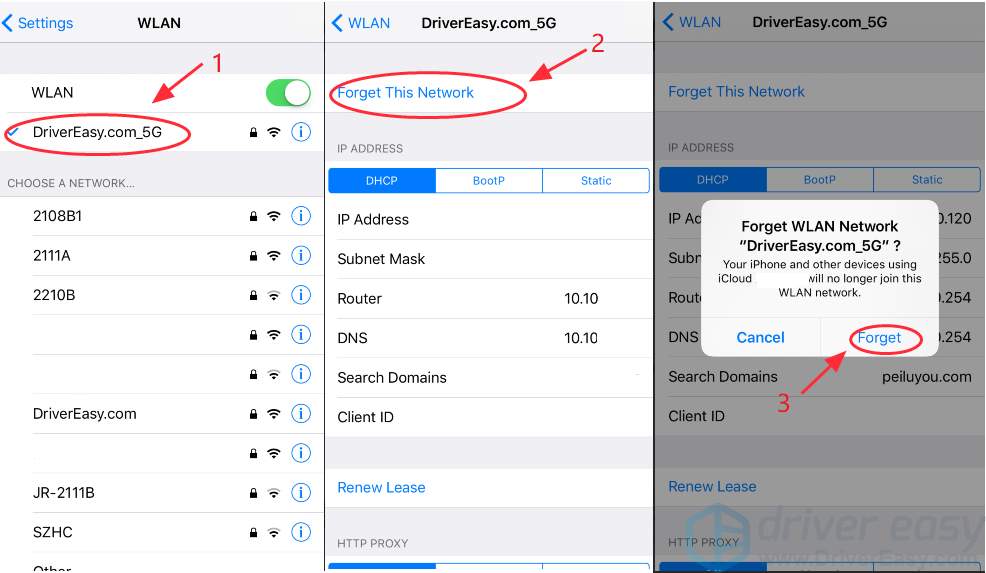
3) Wait for a few seconds.
4) Go back to Settings > WLAN, select your WiFi network, and enter the password to join the network again to see if it works.
Method 3: Reset WiFi network settings
It’s a helpful solution to reset network settings if your WiFi is not working on your iPhone. Follow these steps:
Note: This will remove all the saved network settings on your device, so please make sure that you know the password of your WiFi.
1) Go to Settings > General > Reset.
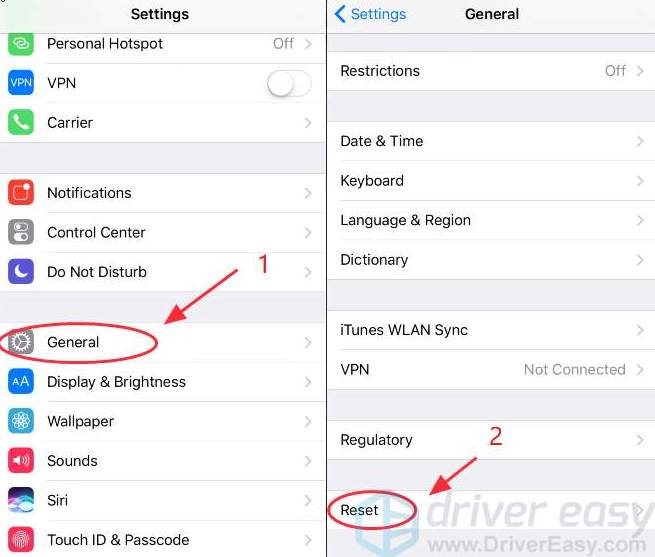
2) Tap Reset Network Settings and enter your passcode to continue.
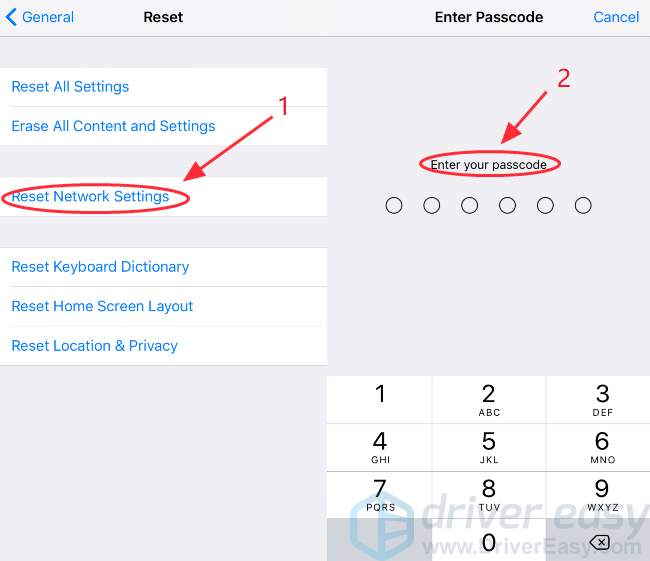
3) Then your network will be reset. Connect to your WiFi again and see if it works.
Method 4: Modify DNS on your iPhone
This method works when you can connect to your WiFi, but you can’t access to the Internet, or the WiFi speed slows down to a crawl. Changing the existing DNS server to Google DNS may work, because the Google DNS can help you get faster WiFi speed.
1) Go to Settings > WLAN.

2) Tap your WiFi name, and you will see the detailed information about your WIFi. Then tap DNS.
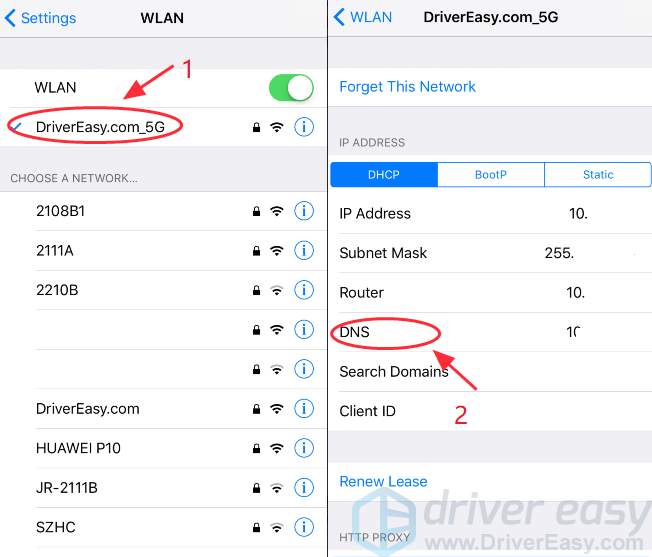
3) Type 8.8.8.8 (Google DNS) as Primary DNS and your original DNS as alternative DNS. Don’t forget to type a comma to separate these two DNS numbers.
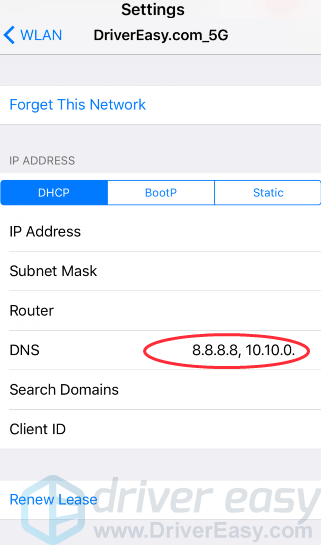
4) Then try to connect to your WiFi again.
Method 5: Turn on WLAN Assist
WLAN Assist (or WiFi Assist) is a new feature released in iOS 9. With WiFi Assist, you can stay connected to the Internet even if you have a poor WiFi connection, or your WiFi stops working suddenly. WiFi Assist is on by default. Once it’s activated on your iPhone, you will see the cellular data icon in the status bar. Go and check if your WiFi Assist is on.
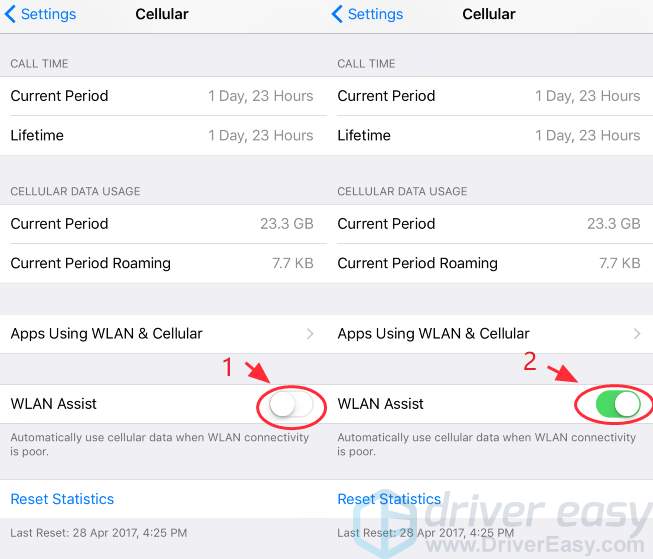
1) Go to Settings > Cellular > WLAN Assist.
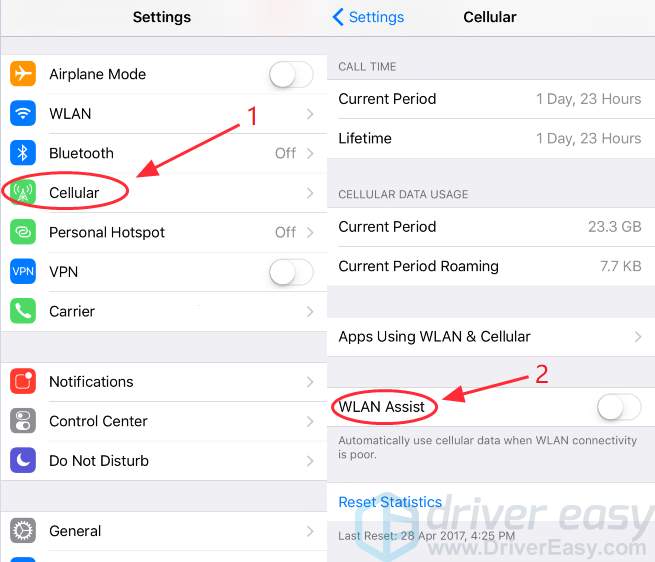
2) If WLAN Assist is off, tap the button to turn it on. If it’s already on, tap the button to turn it off, and then turn it on again.
3) Try to connect to your WiFi again.
That’s all about it. Feel free to comment below if WiFi not working still persists on your device.