


When you try to connect to the internet on your laptop but your usual WiFi network is not showing up, it’s very frustrating. But don’t worry; you can fix it. Read on to learn how…
Try these fixes
Here are some solutions for you to try. You don’t need to try them all; just try each one in turn until everything’s working again.
- Enable the WiFi service
- Turn on WLAN AutoConfig service
- Update WiFi network driver
- Restart your modem and wifi router
- Enable SSID broadcast for your WiFi
- Check the device interference
- Switch to ChromeOS
Why is my WiFi network not showing up in my computer?
Generally speaking, there are several causes for this issue:
- The WiFi problem
- The connecting problem
- The incorrect WiFi configuration in your WiFi router and your computer
- The missing or outdated WiFi driver issue
However, the good news is you can easily troubleshoot your problem and solve it. This guideline introduces 6 methods for you to troubleshoot.
Method 1: Enable the WiFi service
The problem happens most likely because your Windows disables the WiFi service. You can’t connect to the WiFi if your Windows disables it. So you can try these steps to enable WiFi service. There are two places you can check.
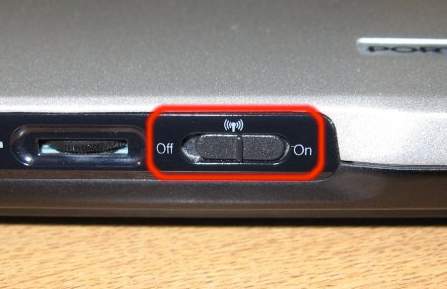
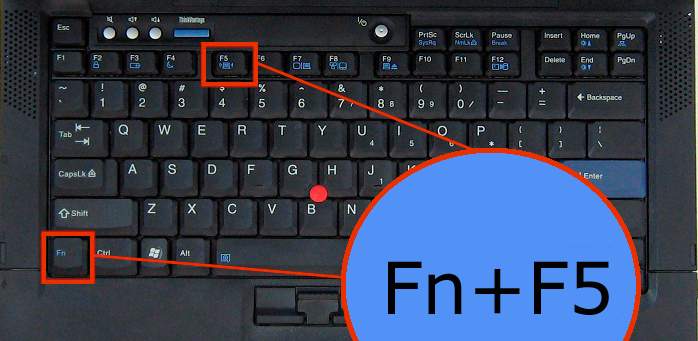
Way 1: Enable the WiFi service with the WiFi switch
Some laptops, such as HP, Lenovo, Dell, have a switch or a key on your keyboard to turn on/off WiFi (like Fn+F5). Check the switch or keys and turn your WiFi service on.
Way 2: Check your network settings
If you don’t have the WiFi switch on your laptop or computer, you can check it in your system.
1) Right click the Internet icon, and click Open Network and Sharing Center.
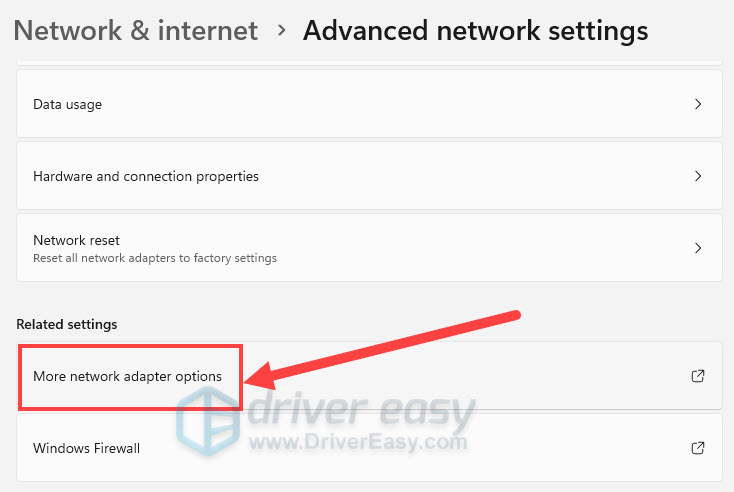
2) Scroll down and select Advanced network settings.
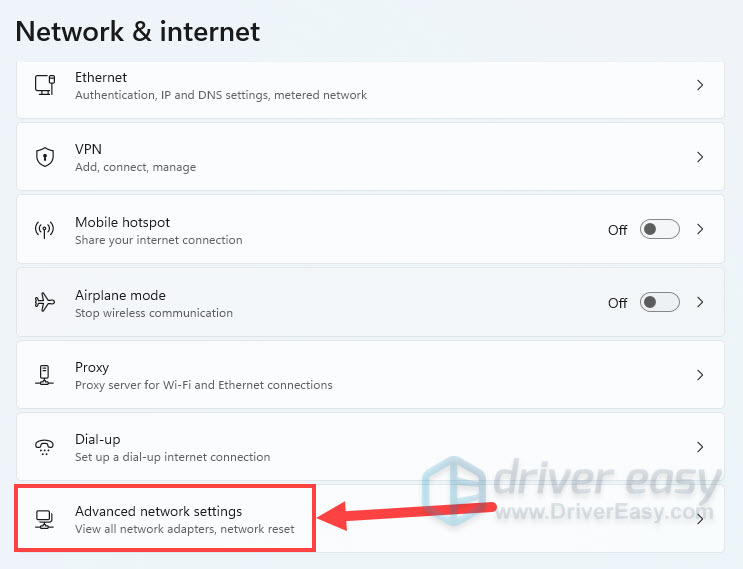
For Windows 10 users, click Change adapter settings.
3) Then click More network adapter options.
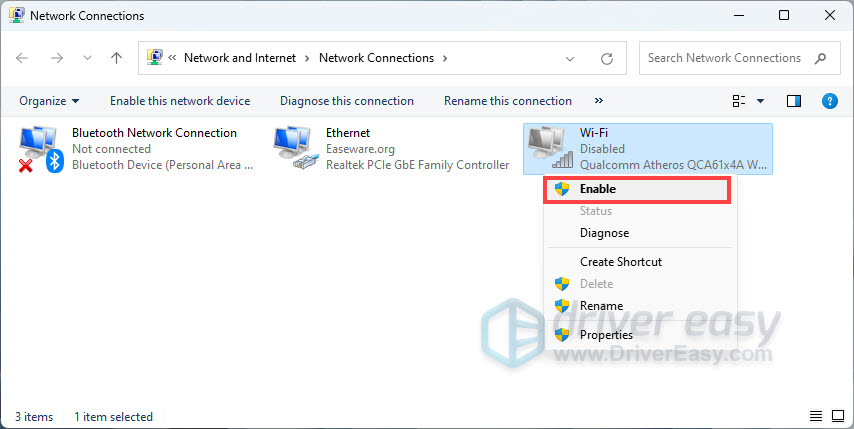
4) Right click WiFi, and click Enable. Note: if it has enabled, you will see Disable when right click on WiFi (also referred to Wireless Network Connection in different computers).
4) Restart your Windows and reconnect to your WiFi again.
Method 2: Turn on WLAN AutoConfig service
WLAN AutoConfig service (also referred to Wireless Configuration in Windows XP) can configure wireless security and connectivity settings. When enabled, WLAN AutoConfig settings apply to all IEEE 802.11 wireless network adapters installed on your computer. Moreover, when the WiFi becomes available, it will automatically connect to a preferred wireless network. You can follow these steps to enable it:
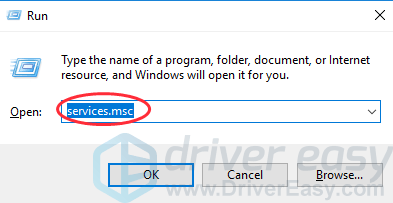
1) On your keyboard, press Windows logo key + R at the same time to invoke the Run box, and type services.msc, then press Enter.
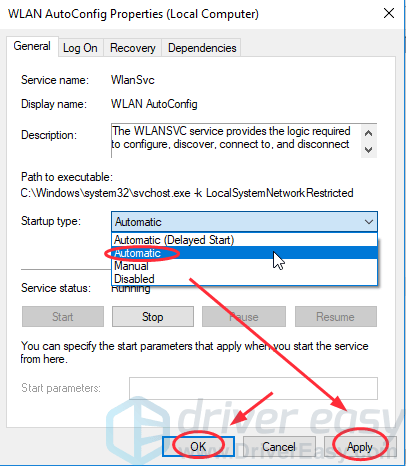
2) Right click Wlan AutoConfig (if you are using Windows XP, right click Wireless Configuration), and click Properties.

3) Select Automatic in Startup type, then click Apply, and click OK
4) Restart your PC and reconnect to your WiFi network to see if your WiFi shows up.
Method 3: Update WiFi network driver
Wireless network driver allows your operating system to communicate with your wireless and network adapters. If your wireless network is not showing up on laptop, it is probably due to the missing, outdated, or corrupt drivers.
There are two ways to update drivers: manually and automatically.
Manually update driver – You can manually update the network driver by searching the correct driver that is matched with your Windows OS on the manufacturer’s website, and install it in your computer. This requires the time and computer skills.
Automatically update driver – If you don’t have time or patience to manually update drivers, you can do that automatically with Driver Easy.
Driver Easy will detect the drivers condition in your computer, and install the correct drivers for your PC. More importantly, with Driver Easy, you don’t need to struggle figuring out the Operating System, and you don’t need to worry about making mistakes while processing. That will tremendously save your time and patience.
Here’s a step-by-step guide to automatically updating your WiFi network driver with Driver Easy:
1) Download and install Driver Easy (at first connect your computer to the Internet via Ethernet cable).
2) Run Driver Easy and click Scan Now. Then Driver Easy will scan your computer and detect any problem drivers.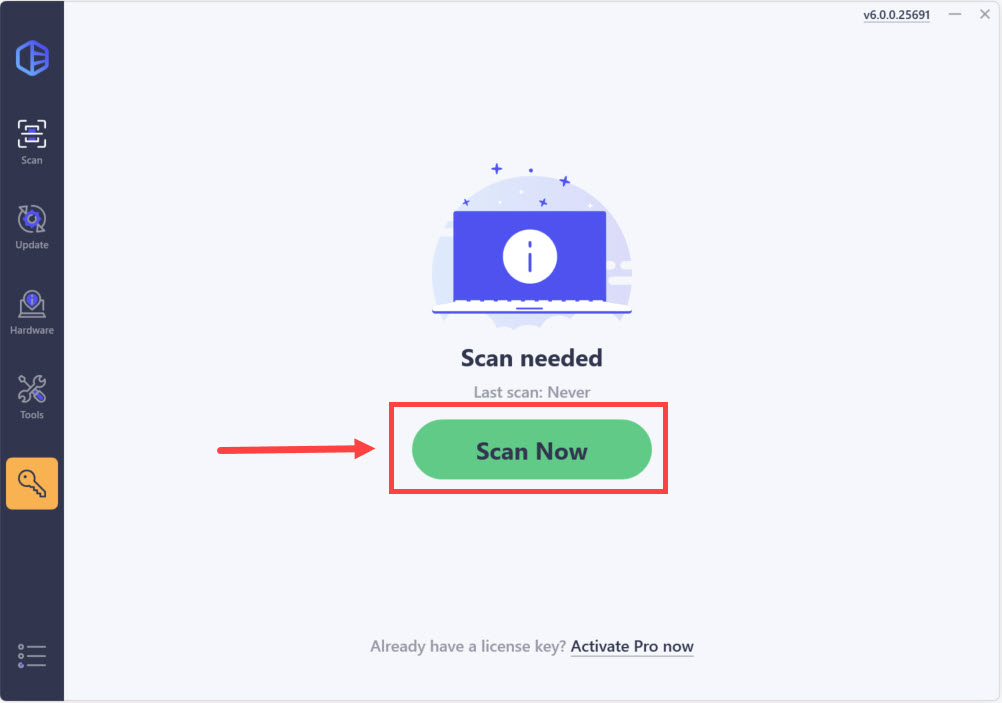
3) Click the Activate & Update button next to your WiFi network driver to automatically download and install the correct version of this driver. Or click Update All to automatically download and install the correct version of all the drivers that are missing or out of date on your system.
(Note: This will prompt an upgrade to the Pro version. Driver Easy offers a 7-day free trial, providing access to premium features such as high-speed downloads and one-click installs without any charges until the trial period ends.)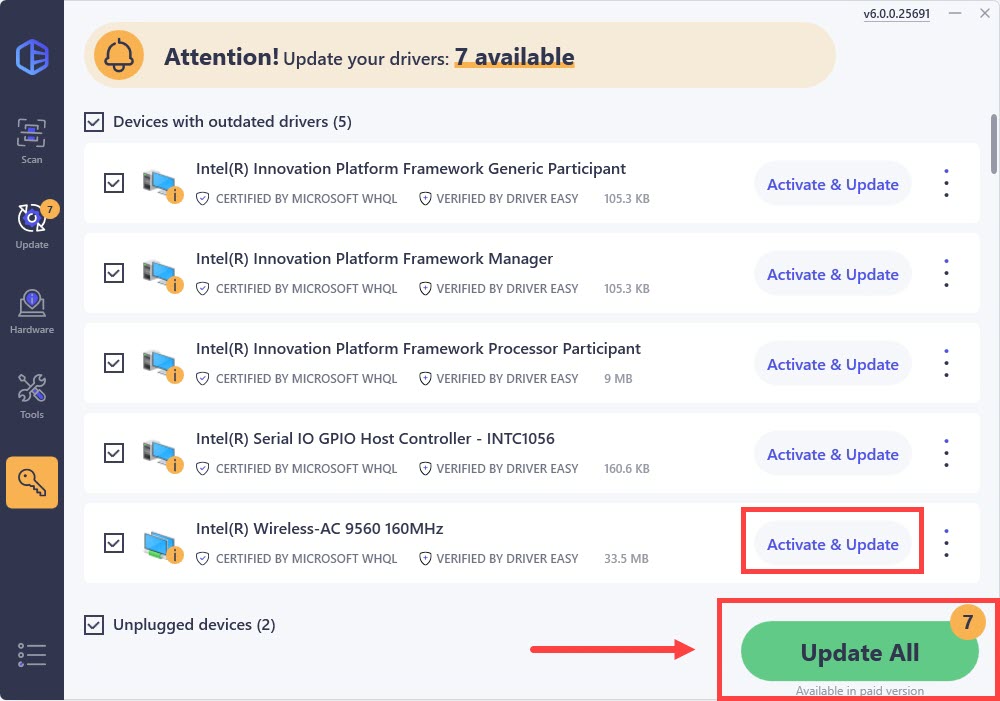
4) After updating the drivers, restart your computer, then connect to the WiFi network again, and see if your problem solves.
Method 4: Restart your modem and WiFi router
If the problem occurs to your own WiFi network at home, you can also check the WiFi itself to see if it’s your WiFi issue, including the router issue, SSID broadcast and device interference mentioned below.
This problem can be probably caused by the Internet Service Provider (ISP) issue. Restarting your modem and wireless router can help you reconnect to your ISP. Note: anyone who is connecting to the network will be disconnected temporarily while you are doing this.
1) Unplug your wireless router and modem from power source (remove the battery if your modem has a battery backup).
2) Wait for at least 30 seconds.
3) Plug your wireless router and modem back into power source again (put the battery back to the modem).
4) On your PC, reconnect to your WiFi network, then see if it shows up.
What is WiFi Network Frequency
Tips: If it is the first time to connect to the WiFi, you will need to pay attention to the WiFi network frequency. You can’t connect if your computer uses mismatched frequency with your router’s.
Usually WiFi network frequency has 2.4 GHz and 5 GHz. Luckily many routers are dual-band model now, so it both supports 2.4 GHz and 5 GHz band. To check your WiFi network frequency, you can go to the router manufacturer’s website. While you can also check your Windows WiFi network frequency: type netsh wlan show drivers in the Command Prompt and press Enter, then it will show you the supported protocols.
Generally speaking, 802.11a/ac uses the 5 GHz band, 802.11b/g uses the 2.4 GHz band, and 802.11n uses either the 2.4 GHz or 5 GHz band. if they don’t match or include the frequencies of your router, the WiFi network won’t show up on your computer.
Method 5: Enable SSID broadcast for your WiFi
Service Set Identifier (SSID) broadcast is what makes your WiFi network visible to your network adapter. Once you disable SSID broadcast, your WiFi network won’t show up in the list.
Tips: Many people disable SSID broadcast for security concerns. By doing this, they can hide the WiFi network, so the network name won’t be seen by others. But the first time to connect to the WiFi network, you’ll have to configure the profile settings manually, including the network name and security mode. After making the initial connection, devices can remember these settings and will not need to be specially configured again.
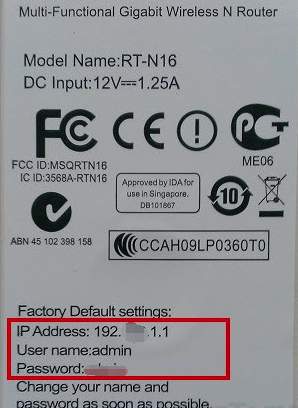
You can try the instructions below to enable your SSID broadcast. The specific interface may vary from different computers. Here we take TP-link WiFi router as an example:
1) Go and see the IP address, username and password on your wireless router.
2) Open your browser on PC or mobile phone (connect to the Internet via Ethernet cable on your PC or use mobile phone that has internet connection).
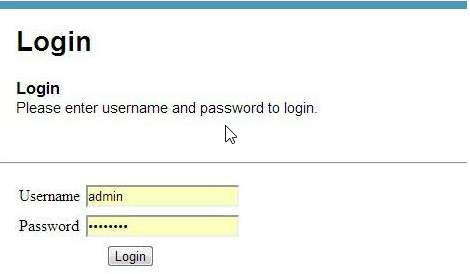
3) Type the IP address in your browser, and press Enter.

4) Type your User name and Password, then click Login.
5) Go to Wireless > Wireless Settings. Check the box next to Enable SSID broadcast, and click Save.
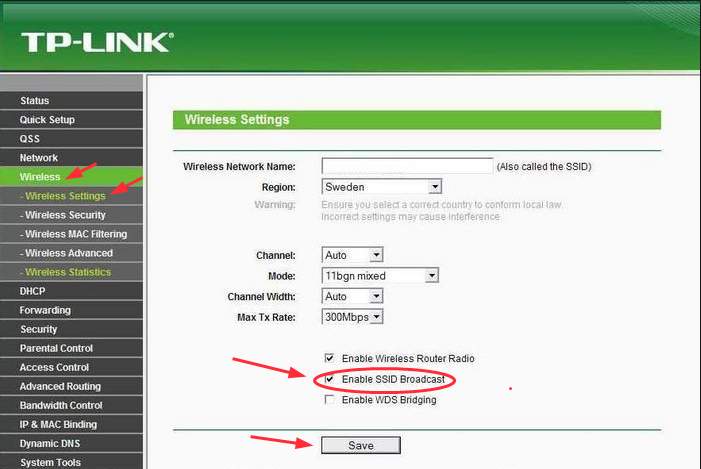
7) Restart your PC and reconnect to your WiFi network.
Method 6: Check the device interference
The WiFi signals can be interfered by many household devices, such as your cordless phone, microwave oven, Bluetooth speaker, etc. because they use the same 2.4 GHz or 5 GHz frequencies. Therefore, you can check these devices to see if it’s where the problem lies in.
1) Turn off those devices, and unplug the power source
2) On your PC, try to connect your WiFi again, and see if it shows up.
3) If the problem solves, it seems to result from the devices interference. Then move your modem and wireless router to another place, so they are not in the same light with the household devices.
In addition to the way mentioned above, you can also buy a 5 GHz router or dual band router, because many household devices use the frequency of 2.4GHz. So using a router of 5 GHz can avoid most interference.
Method 7: Switch to ChromeOS
Windows is a very old technology. Sure, Windows 11 is relatively new, but it’s still just the latest iteration of a decades-old operating system, designed for a bygone era (pre-internet).
Now that we have the internet, fast connection speeds, free cloud storage, and endless web apps (like Gmail, Google Docs, Slack, Facebook, Dropbox and Spotify), the entire Windows way of doing things – with locally installed programs and local file storage – is totally outdated.
Why is that a problem? Because when you’re constantly installing uncontrolled third-party programs, you’re constantly opening the door to viruses and other malware. (And Windows’ insecure permission system compounds this problem.)
Plus the way Windows manages installed software and hardware has always been a problem. If your computer shuts down unexpectedly, or a program installs, uninstalls or updates incorrectly, you can get ‘registry’ corruptions. That’s why Windows PCs always slow down and become unstable over time.
Also because everything’s installed and saved locally, it doesn’t take long before you run out of disk space, and your disk gets fragmented, which makes everything even slower and more unstable.
For most people, the simplest way to solve Windows problems is to ditch Windows altogether, and switch to a faster, more reliable, more secure, easier to use and cheaper operating system…
ChromeOS feels much like Windows, but instead of installing heaps of programs to email, chat, browse the internet, write documents, do school presentations, create spreadsheets, and whatever else you normally do on a computer, you use web apps. You don’t need to install anything at all.
That means you don’t have virus and malware problems, and your computer doesn’t slow down over time, or become unstable.
And that’s just the start of the benefits…
To learn more about the benefits of ChromeOS, and to see comparison videos and demos, visit GoChromeOS.com.
That’s all about it. If it helps, share with us which method that helps. If the WiFi network still doesn’t show up in the network list, and you are not sure how to deal with it, please feel free to leave us a comment below and we will see what more we can do to help.

