


It’s very frustrating to have a slow Internet connection, and every one wants to increase the Internet speed. Don’t worry. This guideline introduces how to speed up your Internet step by step.
How to make your Internet faster
Here are the methods you can try to improve Internet speed. Check it out…
- Check your Internet speed
- Troubleshoot the hardware issue
- Update your network driver
- Delete any Broadband-Hogging apps
- Switch to different channel
- Avoid Internet interference
- Change DNS server
Why is my Internet so slow?
The common reasons why your Internet is running slow are the ISP issue, the WiFi issue, and the hardware problems, etc. And sometimes it’s hard to troubleshoot and identify the exact issue.
But don’t be overwhelmed. There’re still solutions you can try to troubleshoot the issue and speed up your Internet. In this article, you’ll learn how to increase your Internet speed step by step.
1. Check your Internet speed
To know how to speed up Internet, you should know clearly your Internet speed at first.
You can check your Internet speed on the websites where can scan and tell the exact Internet speed. Just search internet speed test in your browser and you can choose a website to test.
Then you can know whether your actual Internet speed matches with your plan. If your Internet speed is too slow, you can call your ISP for suggestions.
2. Troubleshoot the hardware issue
To speed up Internet, one of the things you should do is to increase the internet connection. To do so, you can check the belows:
Reboot your WiFi router
It’s perhaps one of the most famous fixes in all of technology issues, and also helpful for many times. During a reboot, routers are pretty good at finding channels with less traffic, thereby raising their WiFi speeds.
1) Unplug your WiFi router from the power source.
2) Wait for at least one minutes.
3) Plug your WiFi router to the power source.
4) Try the WiFi connection again to see if it gets faster.
Check the router position
Many people does not recognize the importance of a good router position. A slight change of the position can make a difference for the WiFi speed and WiFi signals.
As we all know, the further away from your router, the weaker your WiFi signal is. Therefore, it’s crucial to have a good router position to make sure it can be reached as much as possible.
In a word, put the router as high as possible to extend the broadcasting range, and put the router to a relatively central position so that every part of the area can accept the WiFi signals.
Meanwhile, the obstacles, such as concrete and metal material can block the WiFi from being connected, so make sure your router isn’t blocked by any big and thick objects.
3. Update your network driver
The missing or outdated network driver can cause the network issue. So, to get a faster Internet, you can update your network driver in your computer.
There are two ways to update drivers: manually and automatically.
Manually update driver – You can manually update the network driver by searching the correct driver that is matched with your Windows OS on the manufacturer’s website, and install it in your computer. This requires the time and computer skills.
Automatically update driver – If you don’t have time or patience to manually update drivers, you can do that automatically with Driver Easy.
Driver Easy will automatically recognizes your system after scanning, then find and install automatically the latest drivers for you, which saves your time and enhances your Windows performance.
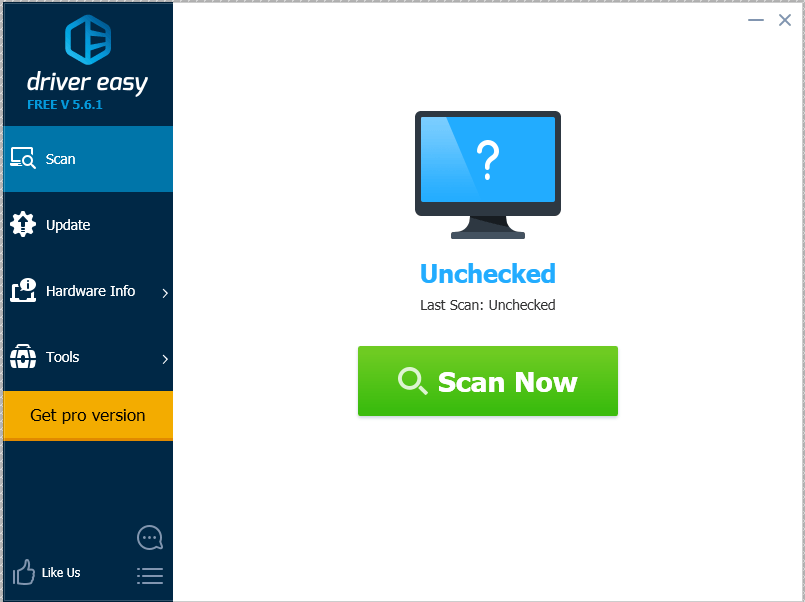
1) Download and install Driver Easy.
2) Run Driver Easy and click Scan Now. Driver Easy will then scan your computer and detect any problem drivers.
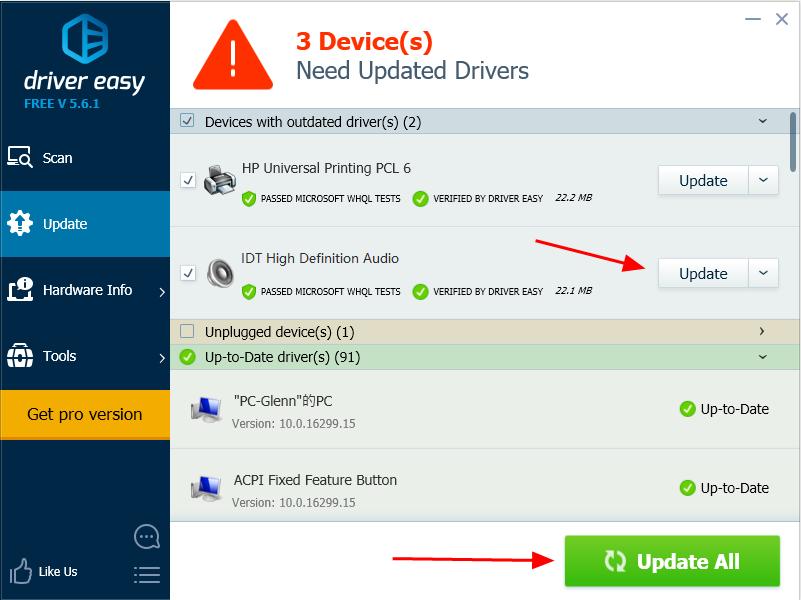
3) Click the Update button next to a flagged network driver to automatically download and install the latest audio driver (you can do this with the FREE version).
Or click Update All to automatically download and install the all the latest correct drivers that is missing or outdated in your system (This requires the Pro version. You will be prompted to upgrade when you click Update All).
4) Restart your computer and check whether your Internet works better.
4. Delete any Broadband-Hogging apps
If you are running applications like Google drive, Dropbox, or Onedrive to upload/download files, or if your brother is watching Netflix on his computer, the WiFi would obviously slow down, especially when searching on the browser. Just stop running those applications or streaming the video, or wait for it to finish, and your WiFi will become faster.
Similarly, you may need to use extensions like Adblock Plus to prevent the ads from using up your Internet.
Plus, you can also uninstall the programs that you don’t need in your computer to improve the performance. To know how to do that, check How to Uninstall Programs on Windows 10.
5. Switch to different channel
Your Internet can slow down when there’re lots of people connecting to the Internet in the same channel at the same time. So if you run into the congestion problem, you can switch to different channel to increase your network performance.
Here we take the TP link WiFi router as an example:
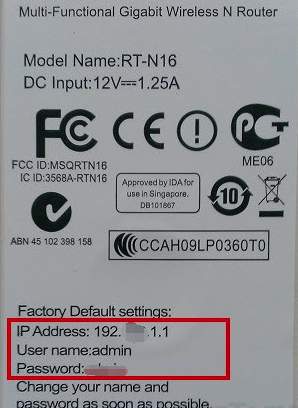
1) Go and see the IP address, Username and Password on your wireless router.
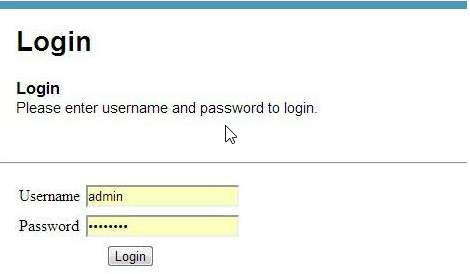
2) Open your browser on PC or mobile phone, then type the IP address in your browser, and press Enter.

3) Type your Username and Password, then click Login.
4) Go to Wireless and click Wireless 2.4 GHz or Wireless 5 GHz, and change Channel to a less-crowded one.
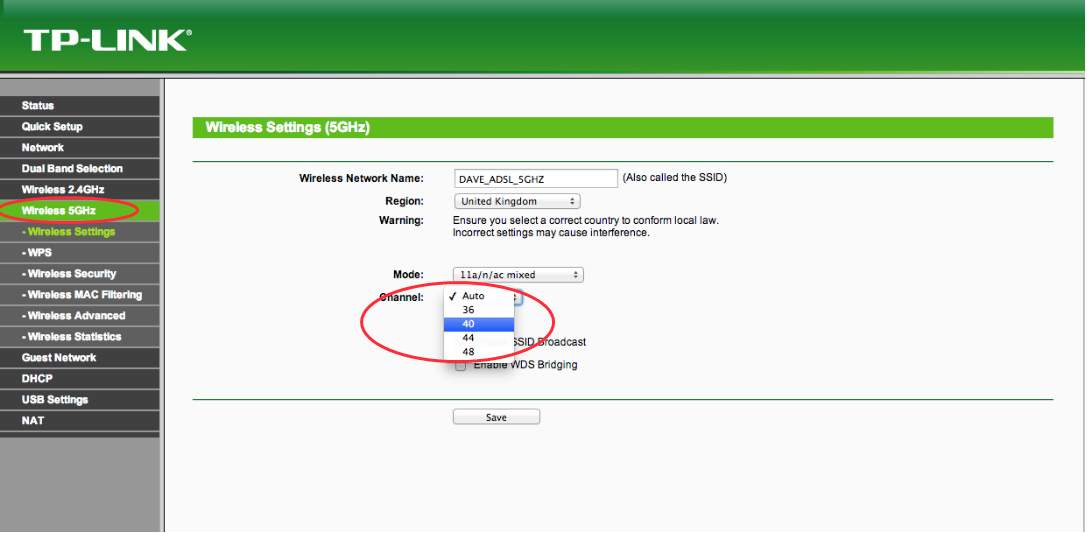
5) Try your WiFi connection again and see if it works faster.
6. Avoid Internet interference
Your network signal can ve interfered by many househod devices, such as your cordless phone, microwave oven, Bluetooth speaker, etc, as those devices use the same 3.4 GHz or 5 GHz frequency as your network does. Check avoid the interference:
1) Turn off those devices, and unplug the power source.
2) Try to connect your WiFi again, and see if it works better.
3) If the problem solves, it seems to result from the device interference. Then move your WiFi router to another place, so they are not in the same light with the household devices.
7. Change DNS server
You can try to change your DNS server to increase your Internet connection. In this method, you’ll learn how to change the DNS server in your router and in your computer.
Change DNS server for your router
By default, your router uses your ISP’s DNS servers, but it’s not always the fastest. The fastest DNS server usually is the one that’s physically closest to your location. Assuming you know something about the router configuration, you may want to consider changing your DNS for the router.
1) Go and see the IP address, Username and Password on your wireless router.
2) Open your browser on PC or mobile phone, then type the IP address in your browser, and press Enter.
3) Type your Username and Password, then click Login.
4) Go to DHCP > DHCP Settings, and change Primary DNS and Secondary DNS to the ones you know as the better DNS servers. Then click Save.
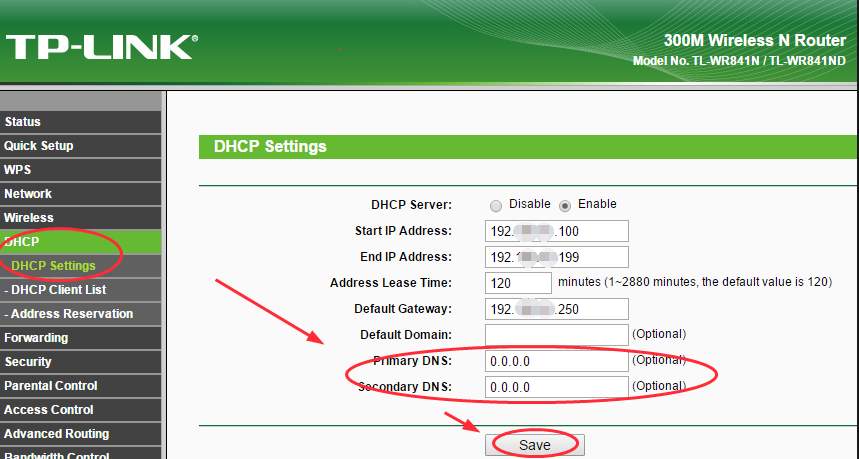
5) Try your WiFi again to see if it gets faster.
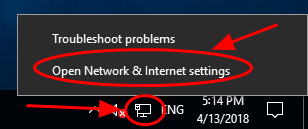
Change DNS server in your computer
You can change the DNS server in your computer to the Google Public DNS addresses. Here we take Windows 10 as an example:
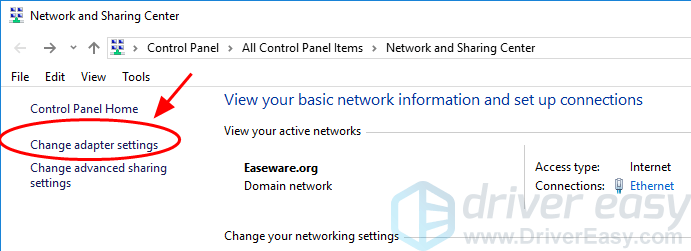
1) Right click the Internet icon at the bottom right corner, and click Open Network & Internet center.
2) Click Open Network Sharing center.
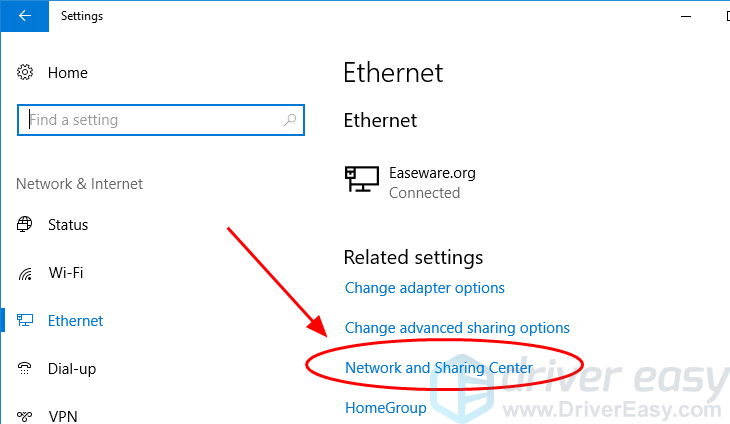
3) Click Change adapter settings.
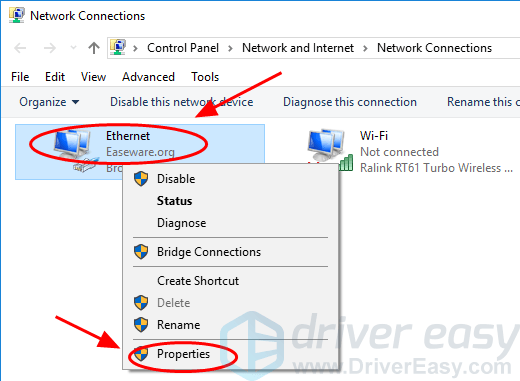
4) Right click on your current network, and select Properties.
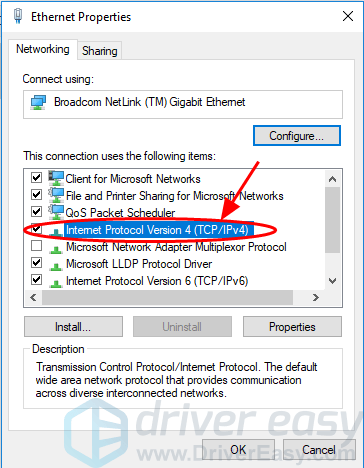
5) Double click Internet Protocol Version 4 (TCP/IPv4).
6) Select Use the following DNS server addresses. For Preferred DNS server and Alternative DNS server, enter the Google Public DNS addresses: 8.8.8.8 and 8.8.4.4.
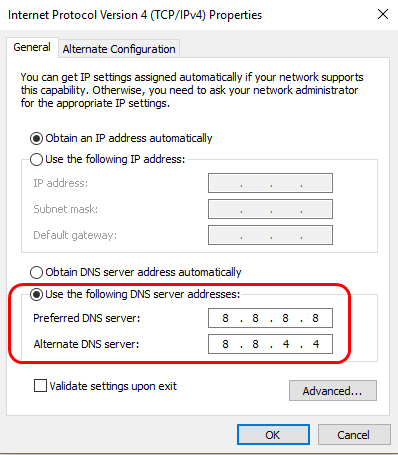
7) Click OK to save, and restart your computer.
These’re the possible ways to speed up your Internet. Please feel free to let us know which method helps, and do not hesitate to share with us your thoughts by leaving us a comment below.