


You may have tons of questions about updating your BIOS.
What does BIOS mean? Is it safe to update my BIOS? Why are people constantly saying that you shouldn’t update your BIOS while many of them actually did? Does my computer really need a BIOS update? If so, how to perform a BIOS update in a safe way?
In this post, we will walk you through all of these questions and show you how to update BIOS even if you’re a total computer newbie.
What does BIOS mean?
BIOS, short for Basic Input Output System, is the software installed on the motherboard. When you power on your computer, BIOS is the first software to run, initializing your system hardware components, and preparing your computer to boot.
Should I update BIOS?
Does it mean that you should update BIOS just because there’s a newer version? Actually no. But what is the BIOS update for?
- New Hardware Support: Many of the updates are released simply in order to support new hardware like a new CPU or graphics card. So if you want to upgrade your computer’s CPU or graphics card, you may need to update your BIOS.
- Fix Bugs: In addition, these new releases help fix some known bugs. If you’re experiencing some bugs and the new version happens to fix them, it may be worth taking the risk of updating your BIOS.
To make sure the update suits what you need, you can check the changelog for the BIOS update. If there’s nothing wrong with your computer, or maybe just running slow or overheating, don’t bother updating BIOS for it won’t improve your computer performance.
Recommended: How to Fix 100% Disk Usage in Task Manager
Is it safe to update BIOS?
- Each motherboard model requires its own BIOS version, so an incorrect or even a slightly different BIOS version can cause major problems.
- If something goes wrong such as a computer losing power during the update, it can eventually brick your computer and cost hundreds to repair.
- Even a correct BIOS version may cause boot problems because not all BIOS updates are tested as thoroughly as the one that came with your computer.
How to safely update BIOS?
Each manufacturer has its own instructions for updating a BIOS. Some manufacturers offer utilities that can update BIOS directly inside Windows by running an executable file (you can check its updated guide: Dell, HP, Lenovo, Asus, etc.), but we strongly recommend using updating BIOS from a USB flash drive to avoid any problems.
Step 1: Check your BIOS Version
Before updating BIOS, you need to check your current version of BIOS and compare it with the latest version on your motherboard’s support page.
1) Type msinfo in the search box and open System Information.
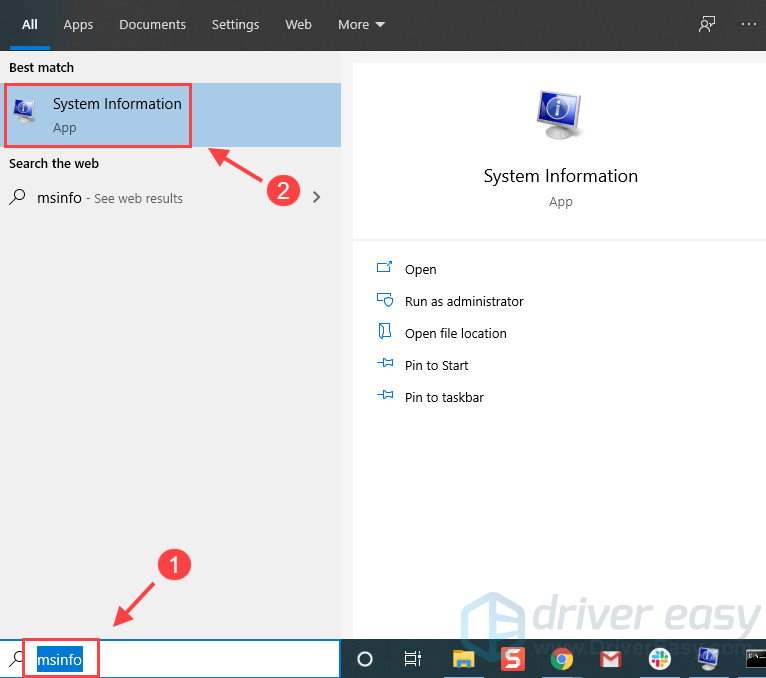
2) Check your BIOS Version/Date.

3) Type cmd in the search box and open Command Prompt, then enter the following command to get your serial number.
wmic bios get serialnumber
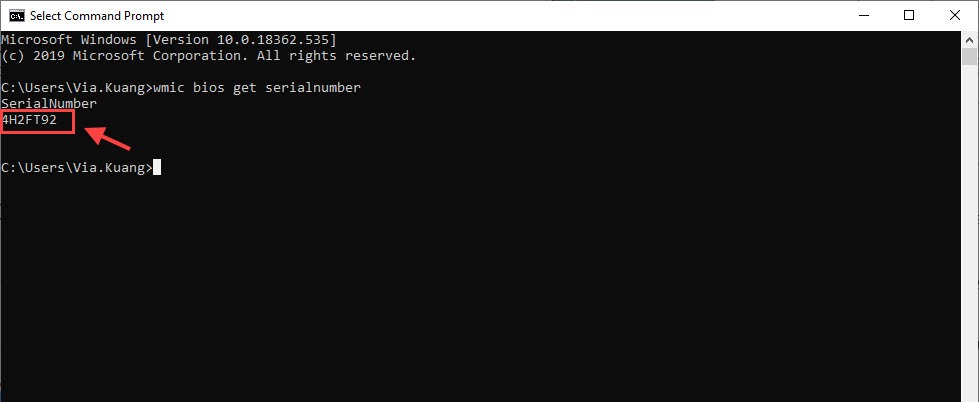
Note down the system serial number (also referred to as service tag), which is an alphanumeric character code you may need later on.
Step 2: Download the latest version of BIOS
Go to your manufacturer’s support website to download the latest BIOS version.
1. Dell
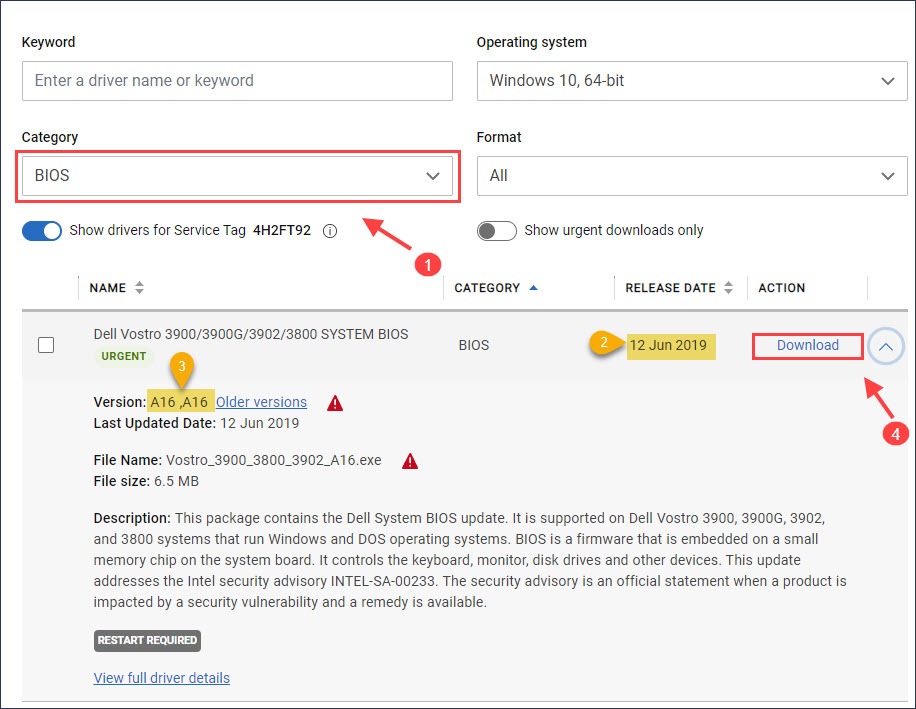
1) Go to Dell Drivers & Downloads page, and enter the serial number from step 1 and start searching.
2) Scroll down to the search results, and select BIOS under Category. Then it will display the available BIOS version for you. Check its RELEASE DATE and Version to make sure it’s the new version compared to your current one, and click Download.
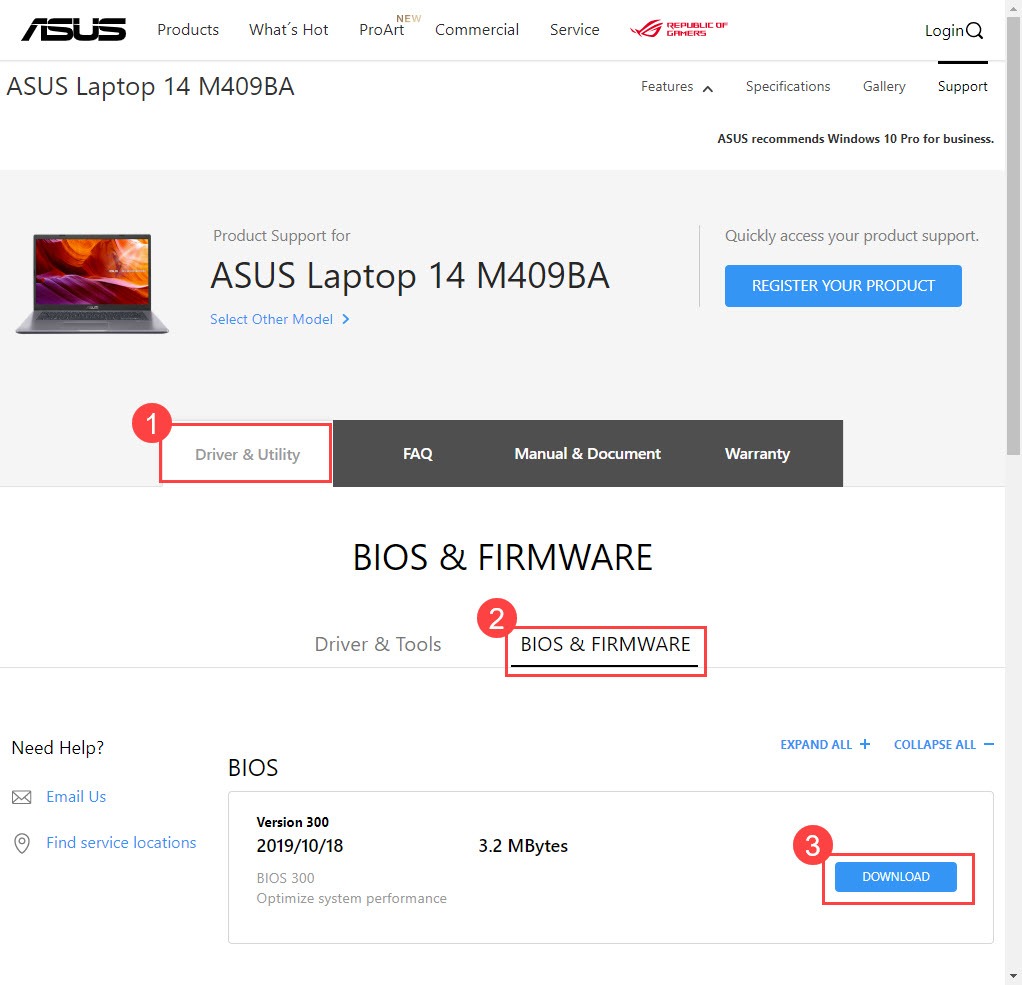
2. Asus
1) Go to the Asus Support page and enter your product model name.
2) Enter your PC’s model name and select the product from the product list. (M409BA, for example.)

Or you can select your product series and model, then click Driver & Utility.
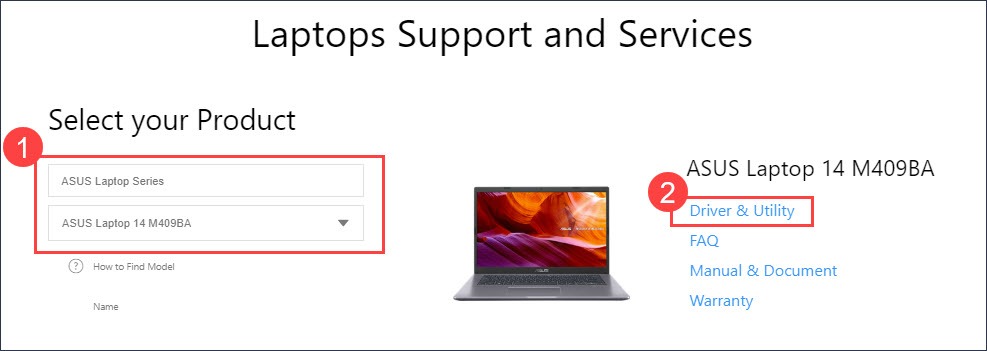
3) Go to the Driver & Utility > BIOS & FIRMWARE. Then click the Download button if this BIOS version is the one you need.
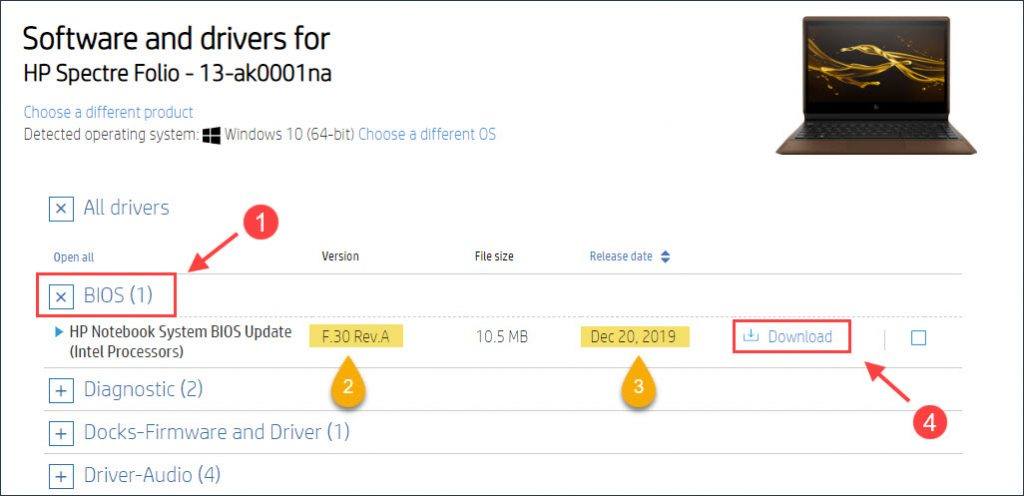
3. HP
1) Go to the HP Customer Support page, and select your product.
2) Enter the serial number you got from Step 1 and start searching.
3) Expand the BIOS section, and check its version and date then click Download.
4. Lenovo
1) Go to the Lenovo PC Support page.
2) Enter the serial number or let Lenovo detect it for you.
3) Click Drivers & Software > Manual Update > BIOS/UEFI.
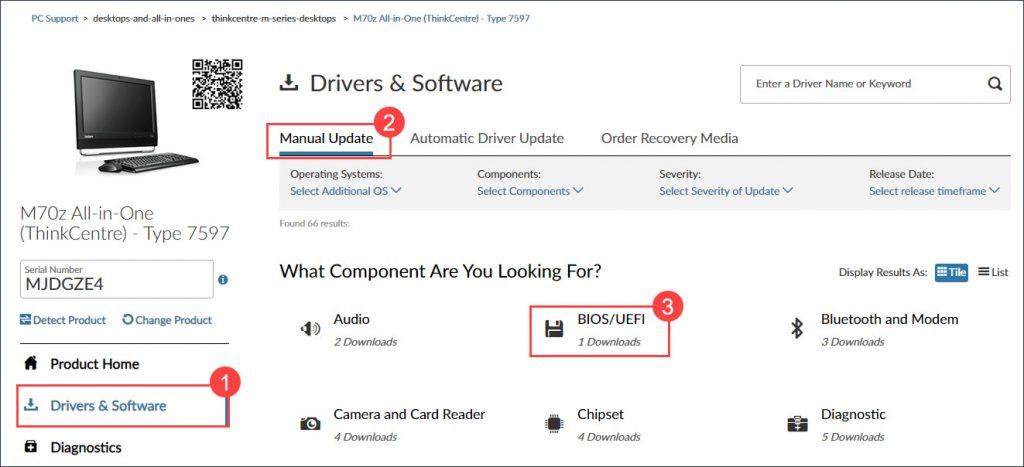
4) Check the version and date of the available BIOS update, then download it to your computer.
5. Other major BIOS vendors
Download the latest BIOS from the manufacturer’s website.
Step 3: Flash your BIOS
The BIOS flashing process varies by manufacturer. Therefore, for safety concerns, you can check the updating details of each BIOS manufacturer. However, we’ll walk you through the basics.
1) Extract the downloaded BIOS file as required and copy it to a USB disk.
2. Please remember NOT to rename the file at all.
3. Usually, the file should also include an installation guide, such as a README.txt. You’d better read these instructions carefully.
4. Leave the USB plugged into your computer during the whole update process.
2) Insert your USB flash driver and boot into BIOS by pressing the hotkey repeatedly when your computer starts.
- For most computers such as Dell, the BIOS key is F12/F2.
- Asus, MSI, and Gigabyte: Delete.
- HP: ESC.
3) Launch your BIOS update tool or flashing tool. Each BIOS has a different way of accessing the update tool.
1. Dell
- Use the arrow keys to select USB Storage Device and press Enter.
- At the command prompt, type the full BIOS filename e.g. O9010A12.exe, and press Enter key.
- Follow the instructions in the BIOS Update Utility screen to complete the update process.
2. ASUS
- Press F7 to open Advanced Mode.
- Choose Advanced then select ASUS EZ Flash 3 Utility/Start EZ Flash.
- Select your USB with the extracted BIOS file from the storage device list.
- Select the BIOS file and confirm that you wish to read this file.
- Confirm that you wish to update the BIOS.
3. HP
- Click Firmware Management or BIOS Management on the HP PC Hardware Diagnostics UEFI screen.
- Select BIOS Update.
- Click Select BIOS Image To Apply, then select HP_TOOLS – USB Drive.
- Select Hewlett-Packard > BIOS > Current.
- Select the BIOS update file that matches the System Board ID.
- Apply Update Now
4. MSI
- Navigate to M-Flash and agree to auto-reboot the system in Flash mode.
- Select the USB drive with the BIOS file you extracted earlier.
- Select the BIOS file.
- Accept the prompt.
- Re-apply your settings.
5. Gigabyte
- Navigate to Q-Flash – you may need to press the ALT key to bring up the Q-Flash shortcut from the BIOS menu.
- Select Update BIOS.
- Select the extracted BIOS from your storage drive.
- Press Enter and agree to update your BIOS.
4) Wait patiently for the update to finish, and make sure not to shut off your PC during this process.
5) Restart your computer when prompted to or wait for your computer to restart automatically.
Pro-Tip
To improve computer performance substantially, especially for gamers, we recommend updating your device drivers.
As the translator for your hardware and operating system, device drivers usually need an update to do a good job.
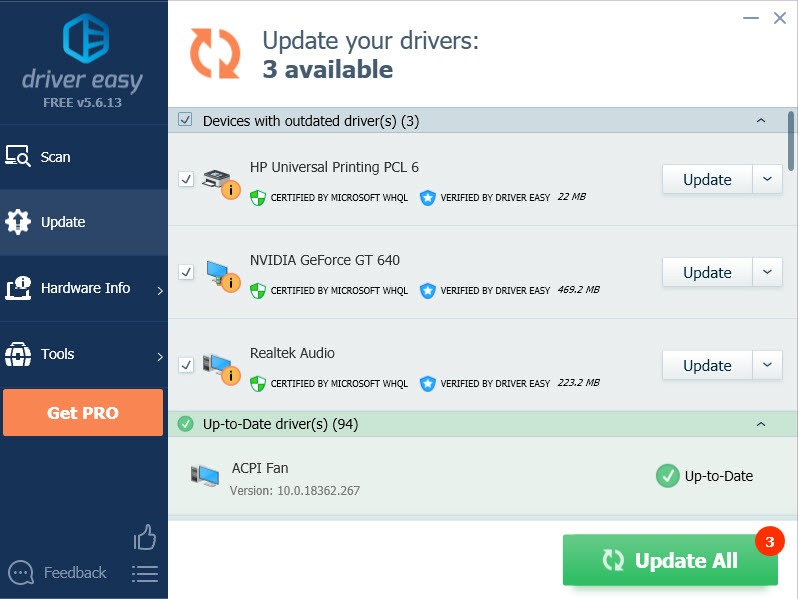
To update a device driver, you can always go to the manufacturer’s website to download the correct and latest driver and install it step by step. However, if you don’t have time or patience, you can do it automatically with Driver Easy.
1) Download and install Driver Easy.
2) Run Driver Easy and click the Scan Now button. Driver Easy will then scan your computer and detect any problem drivers.

3) Click the Update button next to your graphics card driver to automatically download the correct version of that driver, then you can manually install it (you can do this with the FREE version).
Or click Update All to automatically download and install the correct version of all the drivers that are missing or out of date on your system. (This requires the Pro version. You will get full support and a 30-day money back guarantee. You’ll be prompted to upgrade when you click Update All.)
4) Restart your computer for the changes to take effect.
Feel free to drop us a comment if you have any questions or suggestions.