


Avatar: Frontiers of Pandora is an exciting and visually stunning new open-world action-adventure game. However, some players have reported frequent crashing issues when trying to launch or play the game on a PC.
If you’re in the same boat, no worries! This step-by-step troubleshooting guide will cover the most common fixes for getting Avatar: Frontiers of Pandora to run smoothly without crashes.
Try these fixes
You may not need them all; simply work your way down the list until you find the one that works.
- Check the system requirements
- Run the game with administrator rights
- Disable background applications
- Update Windows
- Update your graphics card driver
- Verify game files
- Disable in-game overlay (Ubisoft Connect)
- Try -dx11/-dx12 in launch arguments (Ubisoft Connect)
- Start your game in High Priority
1. Check the system requirements
Before troubleshooting crashes further, first make sure your PC hardware meets or exceeds the minimum system requirements to properly run Avatar: Frontiers of Pandora.
| Operating system | Windows 10, Windows 11 (64-bit versions) |
| Processor | AMD Ryzen 5 3600 @ 3.6 GHz, Intel Core i7-8700K @ 3.70 GHz, or better |
| RAM | 16 GB (running dual-channel mode) |
| Video card | AMD RX 5700 (8 GB), Intel Arc A750 (8 GB, with ReBAR on), NVIDIA GeForce GTX 1070 (8 GB), or better |
| Hard drive | 90 GB available storage (SSD) |
| DirectX version | DirectX 12 |
| Operating system | Windows 10, Windows 11 (64-bit versions) |
| Processor | AMD Ryzen 5 5600X @ 3.7 GHz, Intel Core i5-11600K @ 3.9 GHz, or better |
| RAM | 16 GB (running dual-channel mode) |
| Video card | AMD Radeon RX 6700 XT (12 GB), NVIDIA GeForce RTX 3060 Ti (8 GB), or better |
| Hard drive | 90 GB available storage (SSD) |
| DirectX version | DirectX 12 |
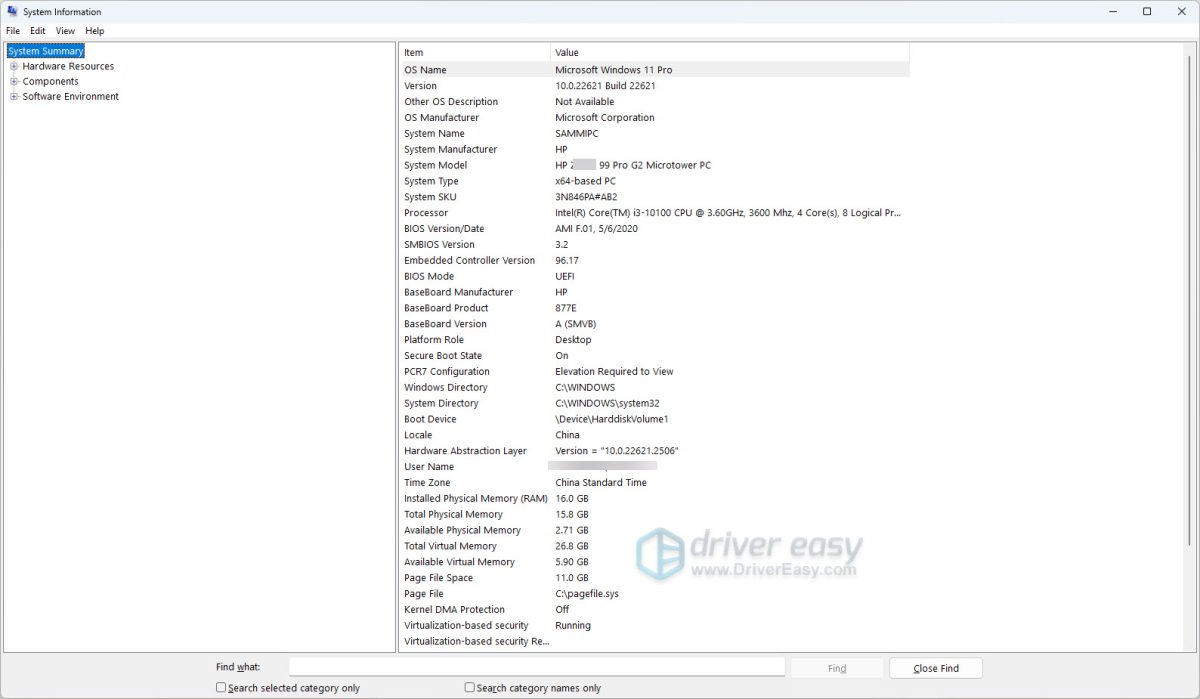
To check your PC specs, all you need to do is press the Windows logo + R keys simultaneously to open the Run box, then type msinfo32 and hit Enter.
If your PC perfectly meets the requirements, try the fixes below.
2. Run the game with administrator rights
Some games run into stability issues or crashes if they do not have administrator access to modify certain protected files, registry keys, or hardware functions. Running Avatar as an admin could resolve these permission-related clashes.
To let your game temporarily have administrator rights, right-click on its desktop icon or the .exe file in its install folder and choose Run as administrator from the menu.
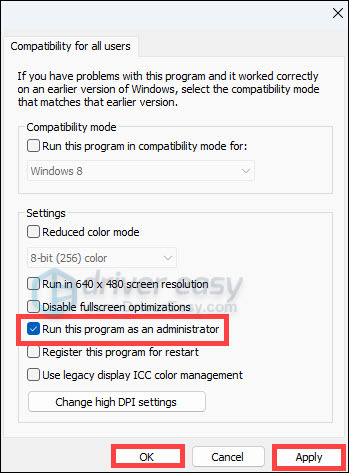
To make your game permanently run with admin rights for all users:
- Right-click its desktop icon or the executable file in the installation folder, and select Properties.
- Click on the Compatibility tab, then click Change settings for all users.
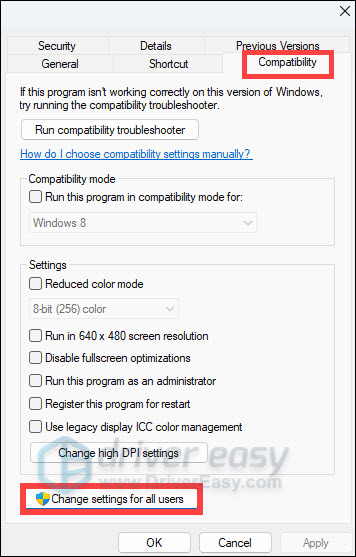
- Check the box next to Run this program as an administrator.
After applying the changes, launch the game. If your issue persists, don’t worry! Below are some other fixes for you to try.
3. Disable background applications
Other applications running in the background on your PC while trying to play Avatar could potentially interfere with stability or system resources. End unnecessary background processes before launching the game.
Note: The screenshots below have been mostly taken from a Windows 10 operating system. If you are using Windows 11, please be aware that the visual appearance of your screen may vary slightly, but the steps to perform the task remain consistent.
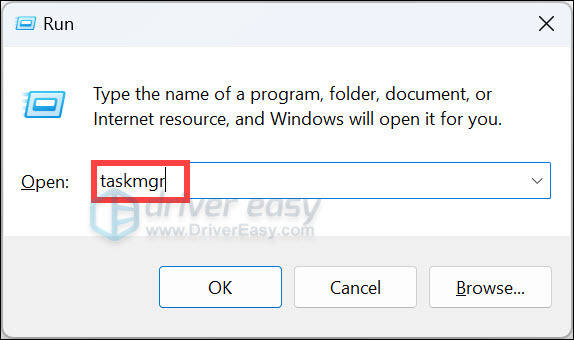
- On your keyboard, press the Windows logo + R keys simultaneously to open the Run box.
- Type taskmgr and hit Ener to open the Task Manager.
- Right-click the process that you don’t need to run while playing Avatar: Frontiers of Pandora and select End task.
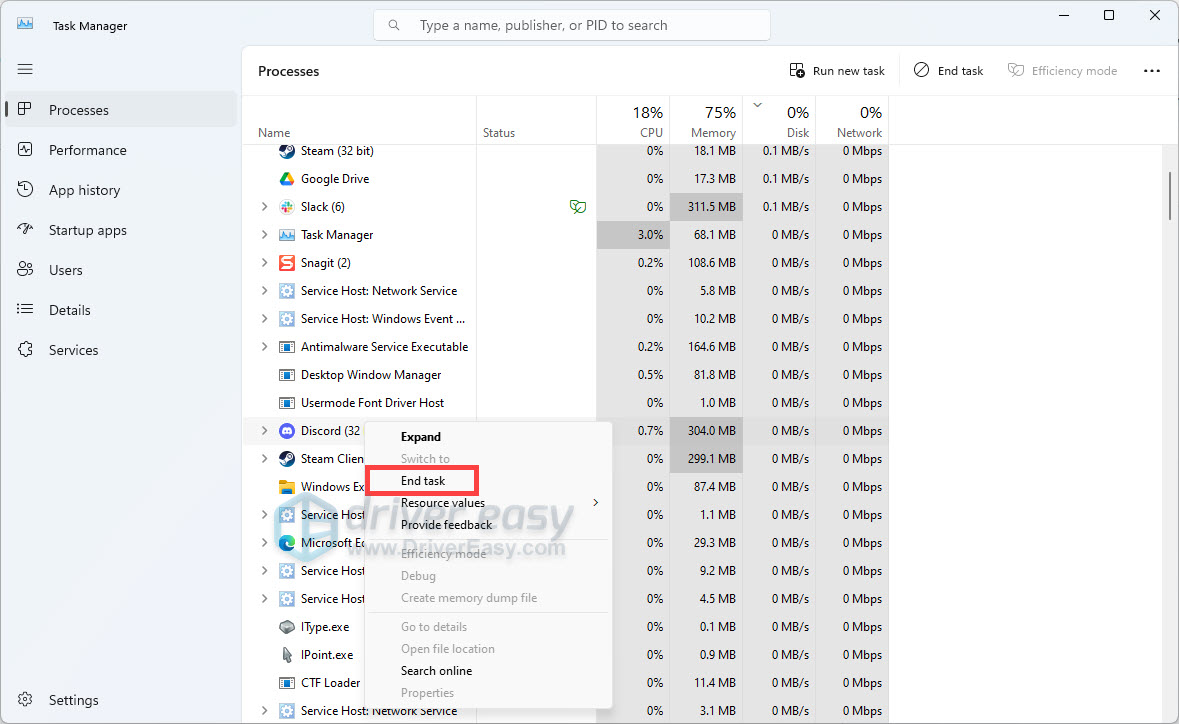
If your game still crashes, proceed to the next fix.
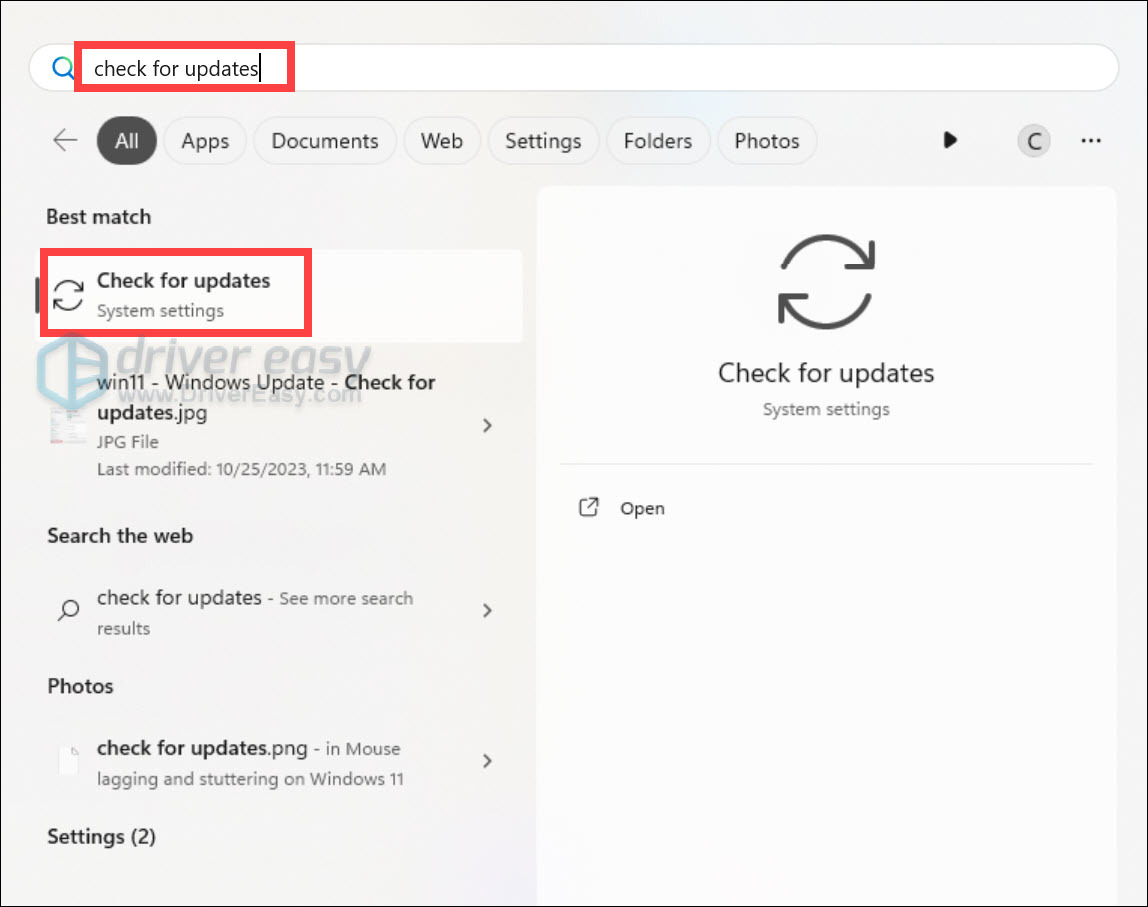
4. Update Windows
Keeping Windows updated with the latest patches and fixes can significantly improve gaming performance and prevent crashes related to OS bugs or conflicts.
Note: The screenshots below have been mostly taken from a Windows 10 operating system. If you are using Windows 11, please be aware that the visual appearance of your screen may vary slightly, but the steps to perform the task remain consistent.
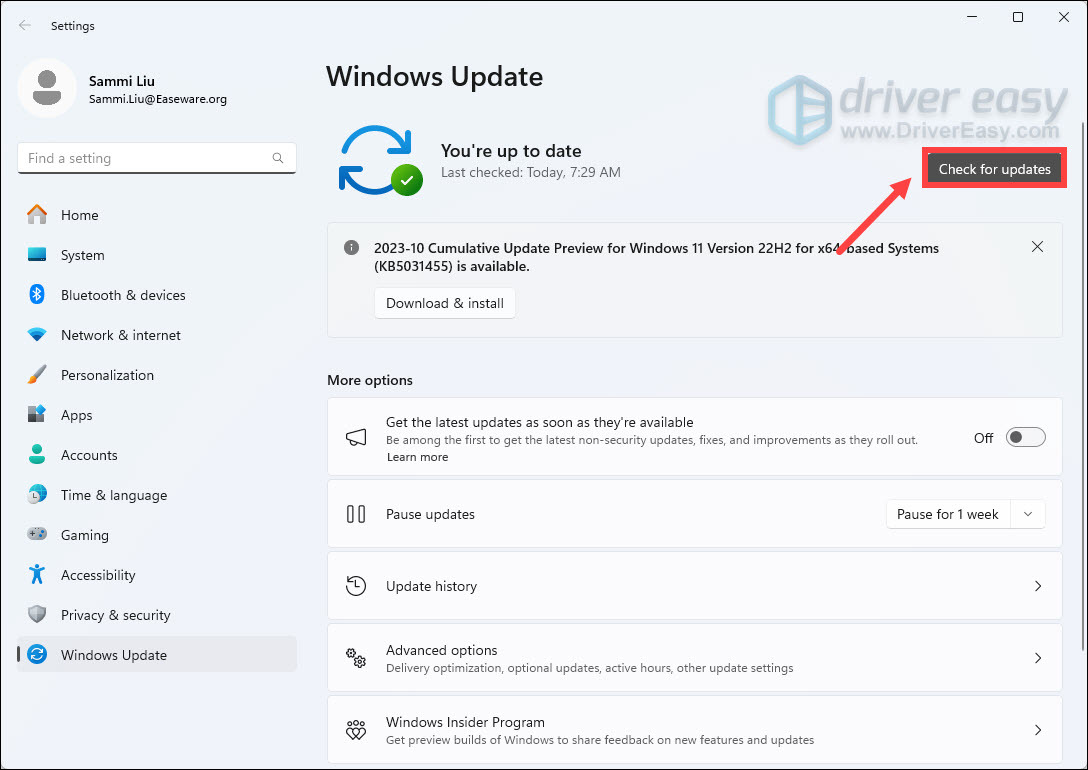
- On your keyboard, press the Windows logo key, then type check for updates. Open the settings Check for updates from the list of results.
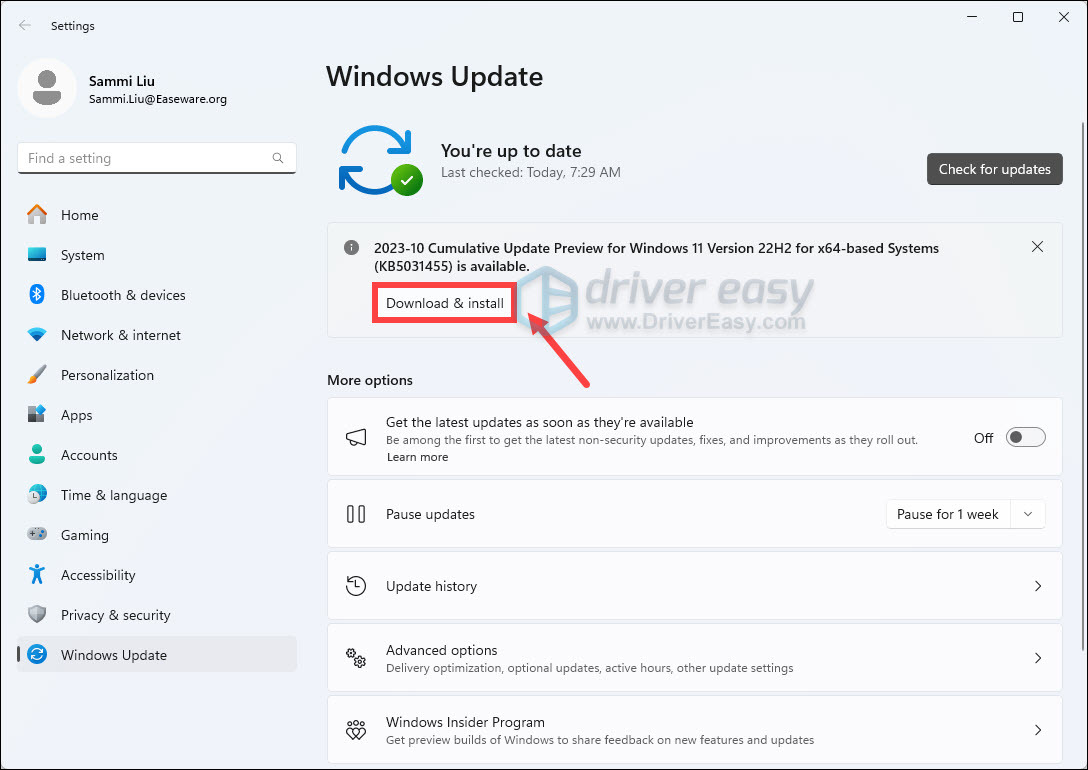
- When the updates are available, simply click on the button Download & install.
If your issue persists, try the next fix below.
5. Update your graphics card driver
One of the most common culprits behind game crashes and instability is outdated or faulty graphics card drivers. Nvidia, AMD, and Intel regularly issue optimized driver updates for games to run best on their GPUs.
Visit the website for your graphics card manufacturer and download the latest driver package:
If you don’t have to time or patience to update drivers manually, you can do it automatically with Driver Easy. You can update your drivers automatically with either the 7 days free trial or the Pro version of Driver Easy. It takes just 2 clicks, and you get full support and a 30-day money-back guarantee with the Pro version:
- Download and install Driver Easy.
- Run Driver Easy and click the Scan Now button. Driver Easy will then scan your computer and detect any problem drivers.

- Click the Activate & Update button next to the flagged device to automatically download and install the correct version of this driver.
Or click Update All to automatically download and install the correct version of all the drivers that are missing or out of date on your system (You’ll need the Pro version for this – when you select Update All, you’ll get a prompt to upgrade. If you’re not prepared to purchase the Pro version yet, Driver Easy provides a 7-day trial at no cost, granting access to all Pro features like fast downloads and easy installation. No charges will occur until after your 7-day trial period ends.)
- After updating, restart your computer to take effect.
6. Verify game files
Sometimes crashes or conflicts stem from the game files themselves becoming corrupted or left partially downloaded. Most game platforms have built-in utilities to check and restore game file integrity.
On Ubisoft Connect
- Open Ubisoft Connect PC.
- Go to the Games tab and choose your game.
- Select Properties in the menu. Under Local files, click Verify files.

- If prompted, select Repair. Ubisoft Connect PC will then download and restore any missing or corrupted files.
On Epic Games Launcher
- Open the Epic Games Launcher.
- Find the game in your Epic Games Library.
- Click the three dots on the right side of the game line. Select Manage.
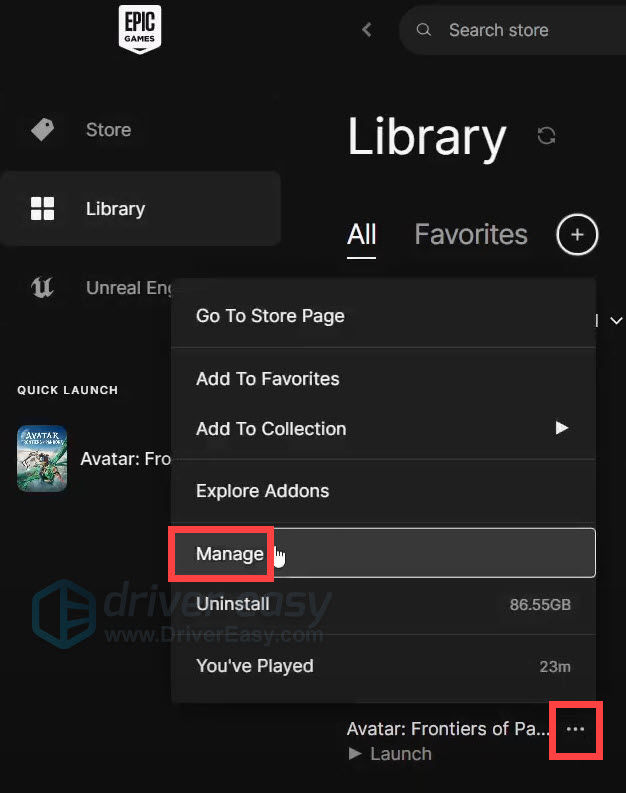
- Click on the VERIFY button.
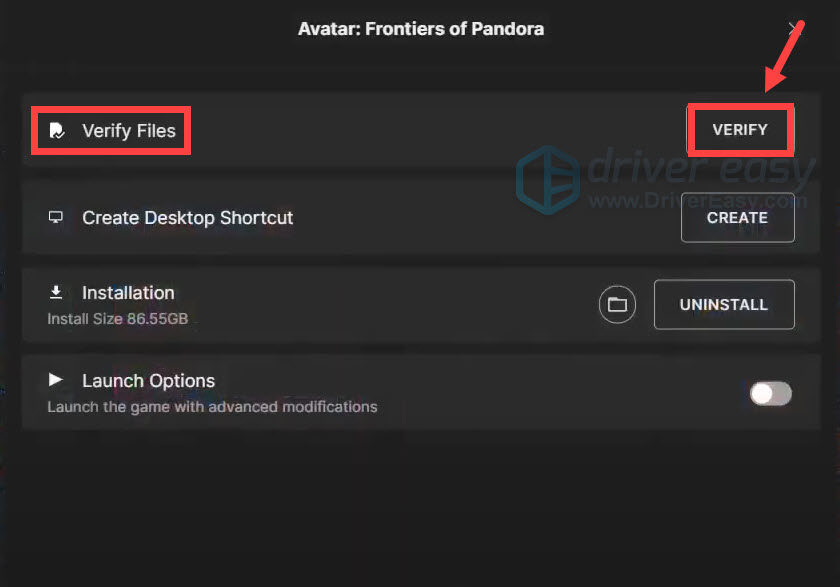
- Wait for validation to complete. It may take a while to verify all your files.
On Steam
- Launch Steam.
- In the LIBRARY, right-click Avatar and select Properties from the drop-down menu.
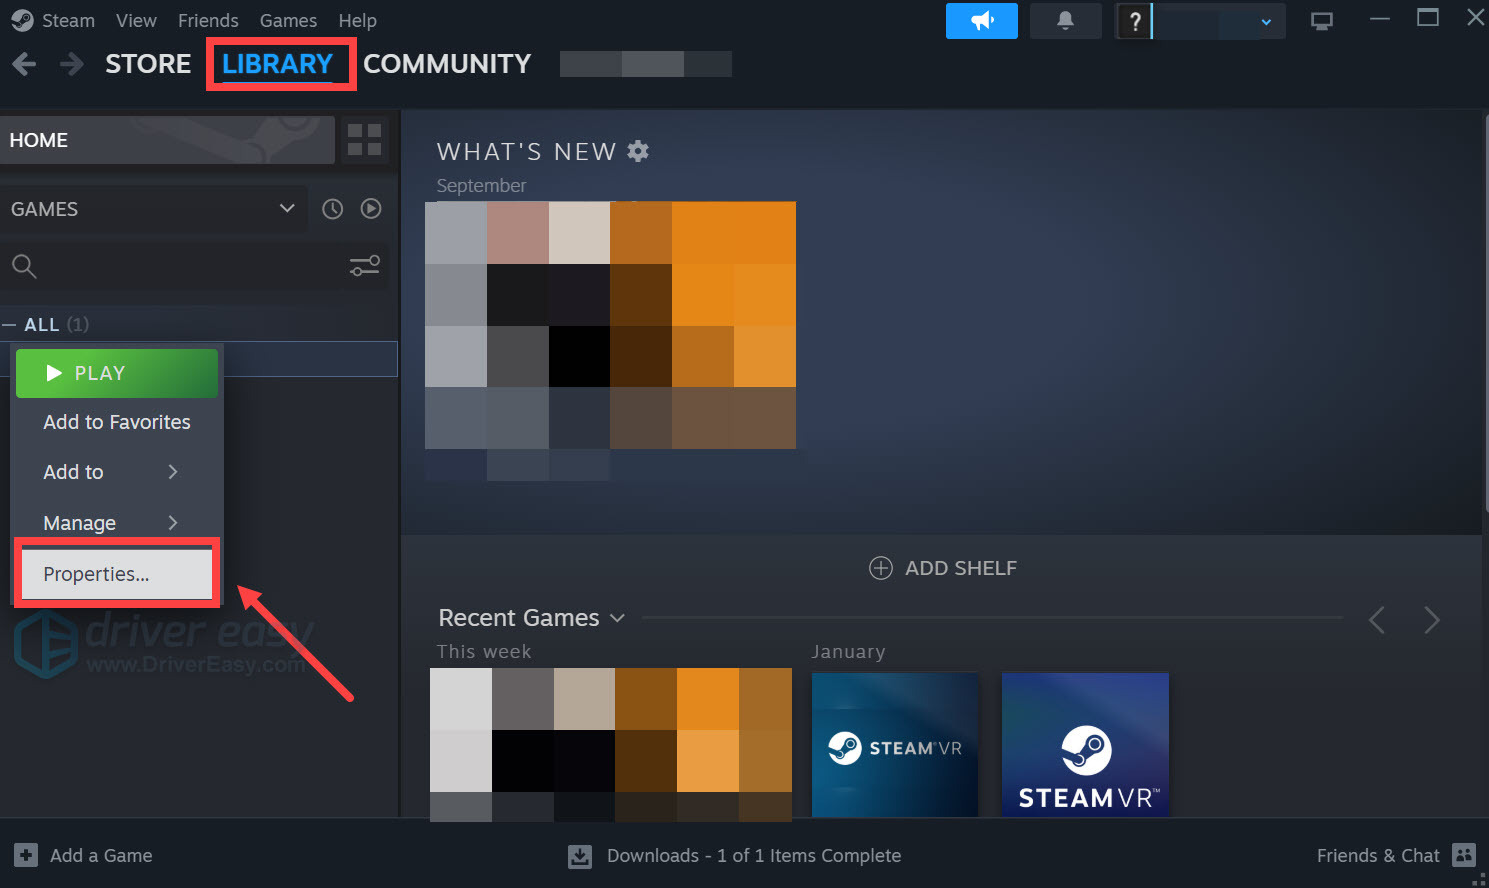
- Select the Installed Files tab and click on the Verified integrity of game files button.
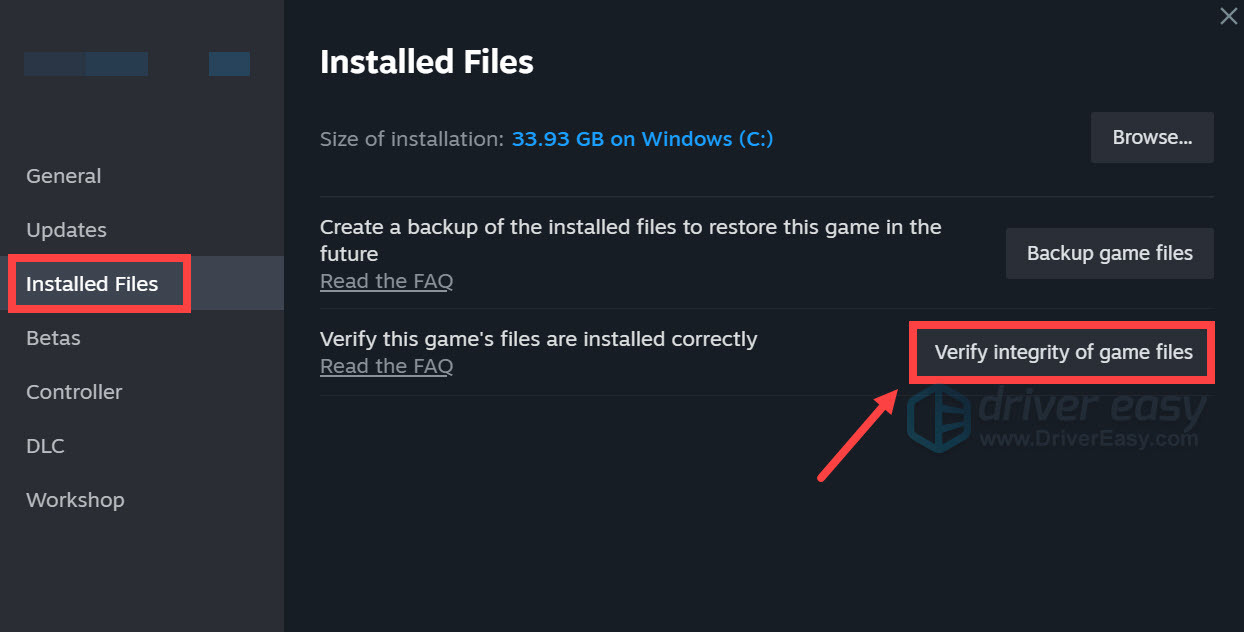
- Steam will verify the game’s files – this process may take several minutes.
When the process is completed, launch your game and see how things go.
7. Disable in-game overlay (Ubisoft Connect)
The overlay feature often requires additional processing power and memory, and disabling it may reduce the overall burden on your system during gameplay.
- On Ubisoft Connect PC, open the side menu by selecting the three-lined icon.
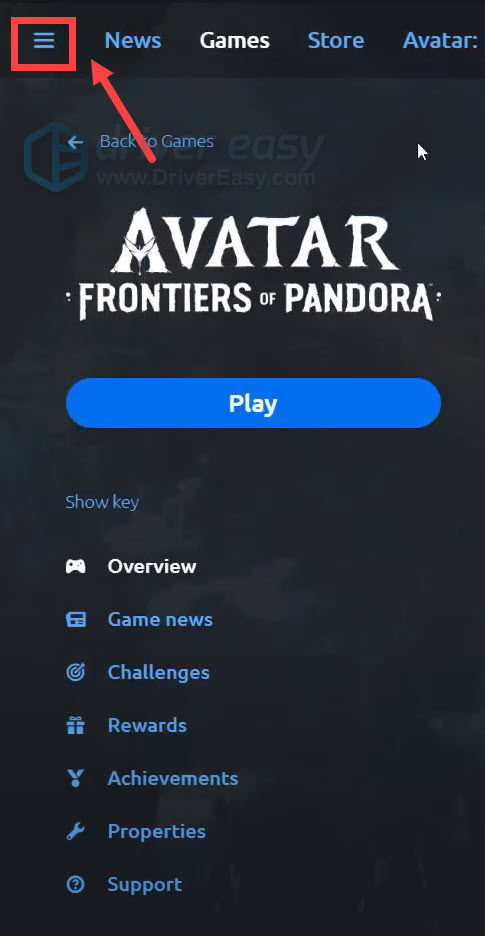
- Select Settings.
- In the General section, uncheck the box next to Enable in-game overlay for supported games.
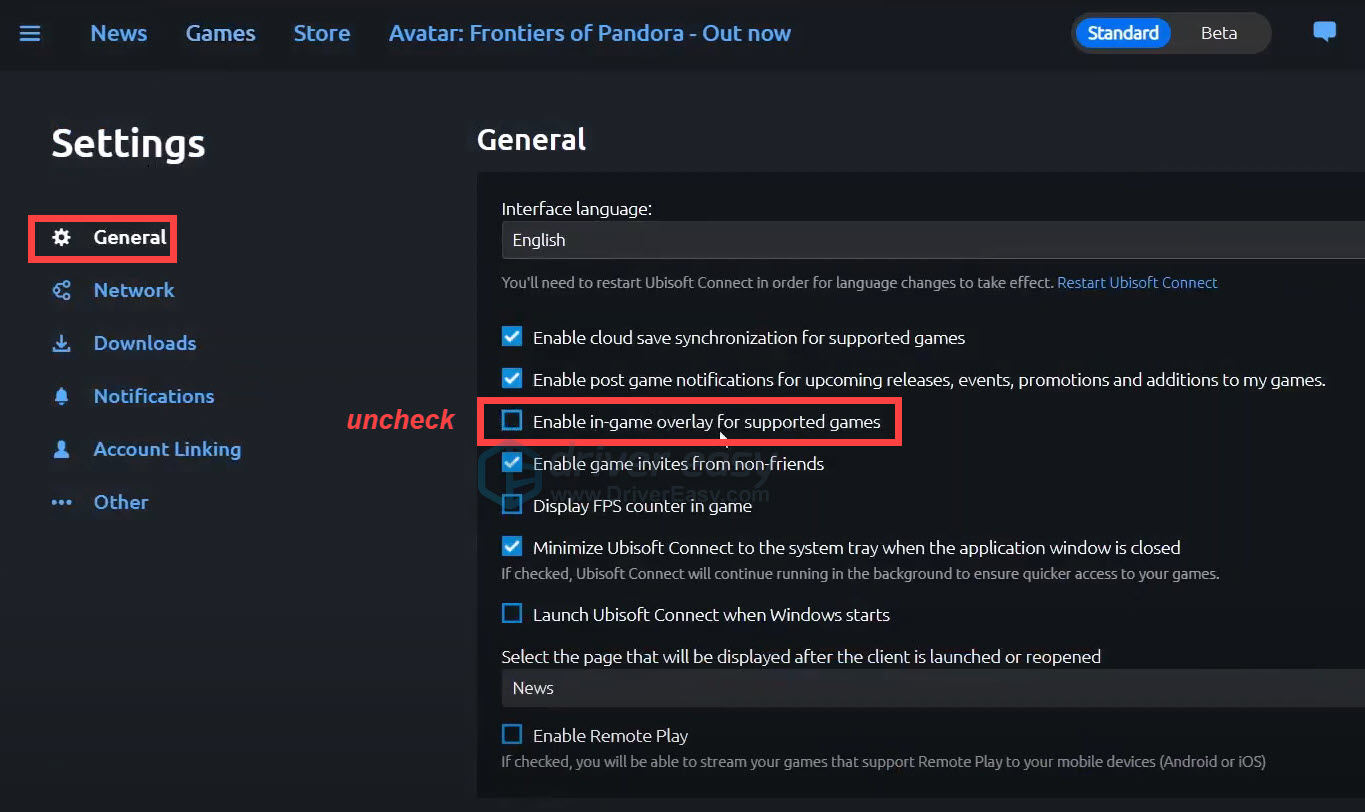
Try to relaunch your game to see if it takes effect.
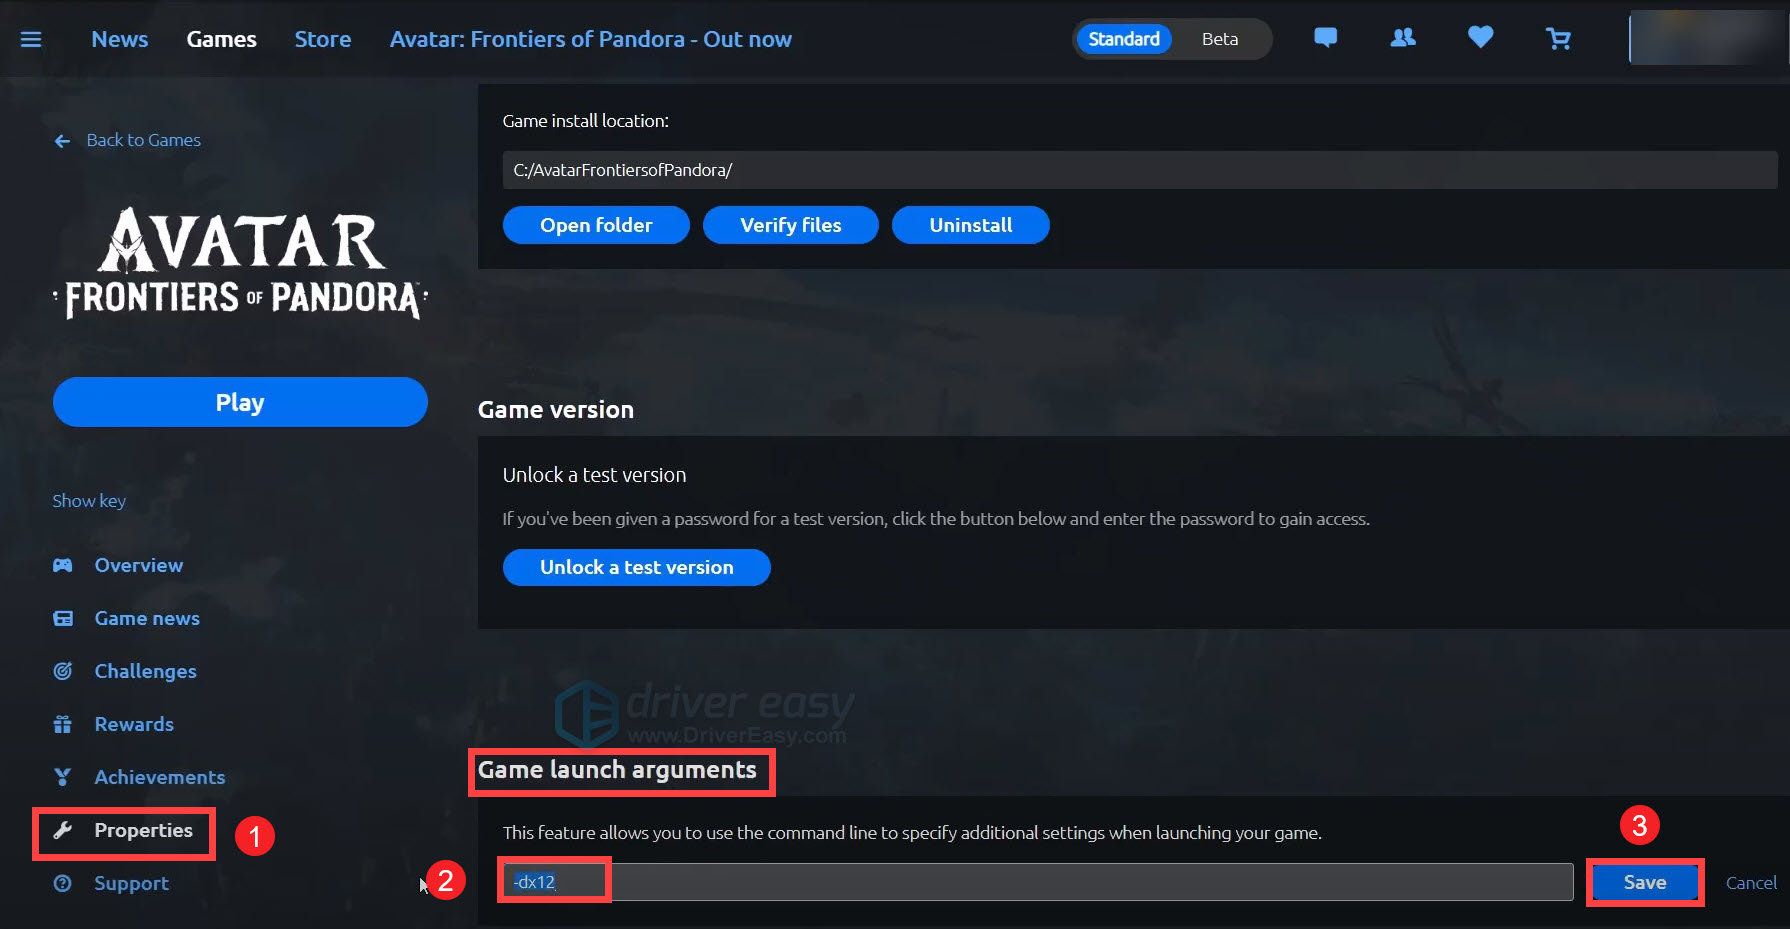
8. Try -dx11/-dx12 in launch arguments (Ubisoft Connect)
Certain games may have compatibility issues or encounter errors related to specific DirectX versions. By forcing the game to use either DirectX 11 (“-dx11”) or DirectX 12 (“-dx12”) through launch arguments, you are providing a directive for the game to utilize a particular graphics API.
- Open Ubisoft Connect PC.
- Go to the Games tab and choose your game.
- Select Properties in the menu. Under Game launch arguments, enter -dx12 or -dx11 into the box and click Save.
If this doesn’t work, proceed to the next fix.
9. Start your game in High Priority
Make Windows dedicate more resources to Avatar by setting the game process priority higher in Task Manager:
Note: The screenshots below have been mostly taken from a Windows 10 operating system. If you are using Windows 11, please be aware that the visual appearance of your screen may vary slightly, but the steps to perform the task remain consistent.
- On your keyboard, press the Windows logo + R keys simultaneously to open the Run box.
- Type taskmgr and hit Enter.
- In the Processes tab, right-click your game and select Go to details.
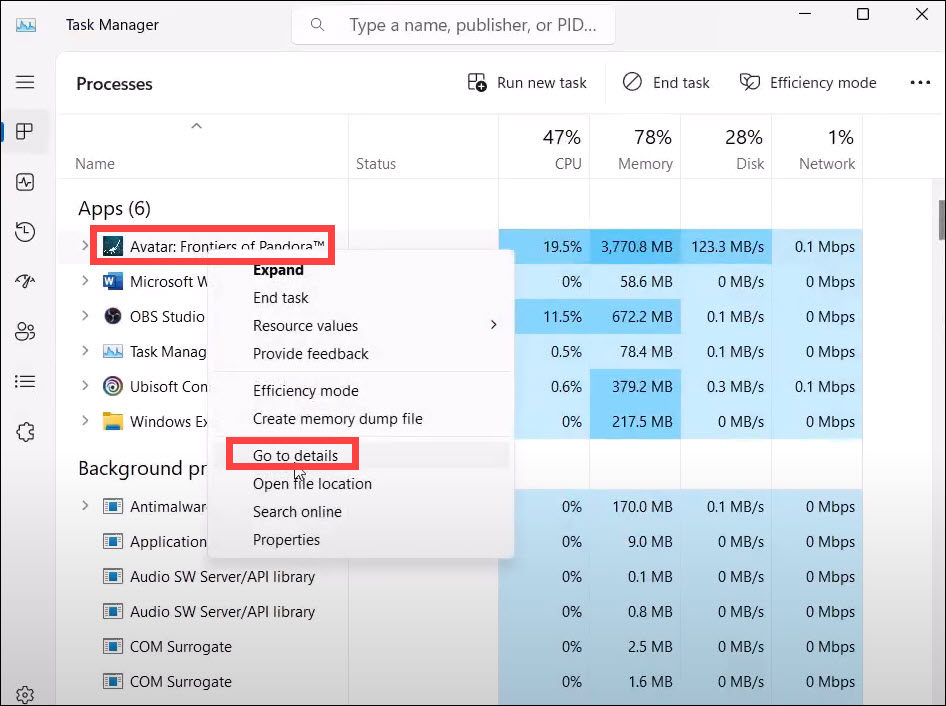
- Now the executable will be highlighted, right-click it and select Set priority > High.
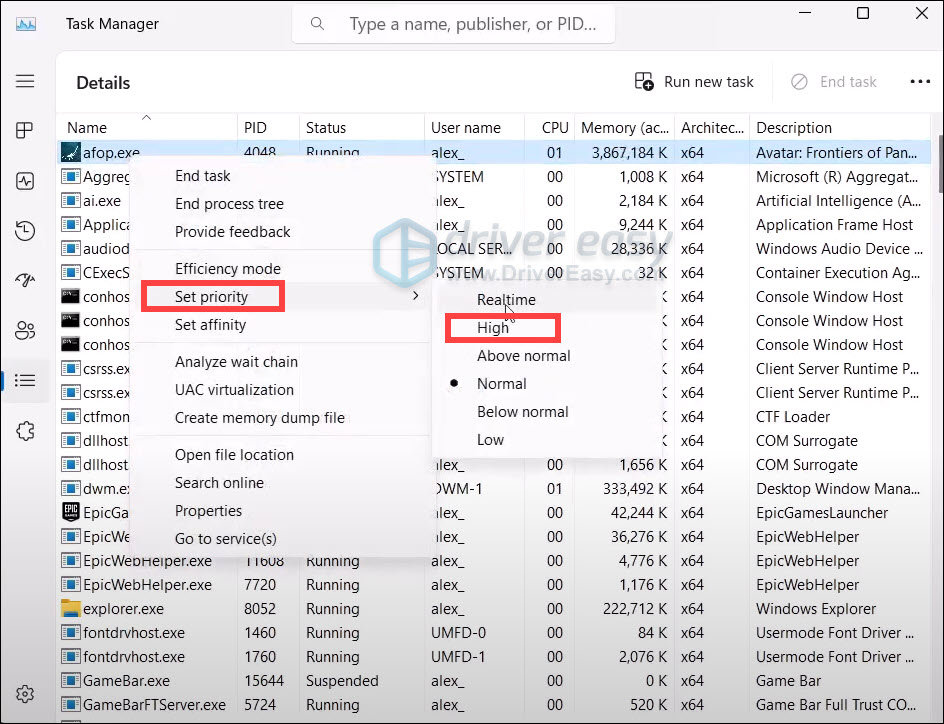
After applying the changes, launch Avatar: Frontiers of Pandora.
Hopefully, this guide helps! Let us know which method works for you and if you manage to fix the issue using methods aside from the ones that are listed above, do not hesitate to let us know in the comment section below!