


Surface Pro plugged in but refuses to charge? This is so annoying! But don’t worry. Many Surface users have been there. The good news is that it’s quite easy to fix…
Try these fixes
You don’t need to try them all; just work your way down the list until you find the one that works for you.
Fix 1: Check the connections
Once you find that your Surface Pro won’t charge, the first thing you should check is the power connection light.
If the LED light is off or flashing, make sure that the adapter you are using is the one recommended by the manufacturer and check if your adapter is plugged correctly and tightly.
- First, you can flip the charger 180 degrees, and check to see if the LED light comes on and if your Surface starts charging again.
- If not, disconnect all connectors of your Surface, including the power connector. Clean everything with a soft and dry cloth.
- Check for any damage, especially near the connectors.
If the LED light is perfectly on but your Surface still isn’t charging, there’s no problem with the connections of the battery charger. You can try the fixes below to solve this issue.
Fix 2: Perform a complete restart
According to many Surface users, the not charging issue can be easily fixed by performing a complete restart.
1) Press and hold the power button of your device for around 30 seconds and then release it. In the meantime, you may see changes on the Surface Pro screen, ignore them, and don’t release the Power button until 30 seconds end.
2) Press and hold the power button and the volume-up button on the edge of your Surface at the same time for about 15 seconds until the Surface logo pops up and then releases them.
3) Wait for about 10 seconds.
4) Press the power button to turn it on.
Charge your Surface Pro again to test the issue. If it works, then congrats! If not, you can try the fix below.
Fix 3: Reinstall your Battery Driver
Surface Pro may fail to charge if you are using the wrong or outdated battery driver. So you can try reinstalling the battery driver to see if it fixes the problem.
1) Type Device Manager in the search box, and select Device Manager from the list of results.
2) Select the arrow next to the Batteries to expand its drop-down list. Right-click Microsoft ACPI-Compliant Control Method Battery and select Uninstall device.

Or you can double-tap Microsoft ACPI-Compliant Control Method Battery, select the Driver tab, and select Uninstall, then OK.
3) After you’ve completed the uninstall, restart your Surface Pro. Windows will detect the driver is missing and re-install it.
Your battery should then be charging now.
Bonus Tips:
If any of these fixes above solved your problem, you may need to update your system to avoid the same issues in the future. To update your system, simply run Windows Update and you will be able to install the system updates for your Surface.
To keep your Surface performing its best, you can also update its drivers and firmware. Here is how:
1. Manually:
You can update your Surface drivers and firmware by visiting the Microsoft Support site: Download drivers and firmware for Surface to download and manually install the latest drivers.
2. Automatically
If you don’t have the time, patience, or skills to update your drivers manually, you can do it automatically with Driver Easy.
Driver Easy will automatically recognize your system and find the correct drivers for it. You don’t need to know exactly what system your computer is running, you don’t need to risk downloading and installing the wrong driver, and you don’t need to worry about making a mistake when installing.
You can update your battery driver automatically with either the FREE or the Pro version of Driver Easy. But with the Pro version it takes just 2 clicks (and you get full support and a 30-day money back guarantee):
1) Download and install Driver Easy.
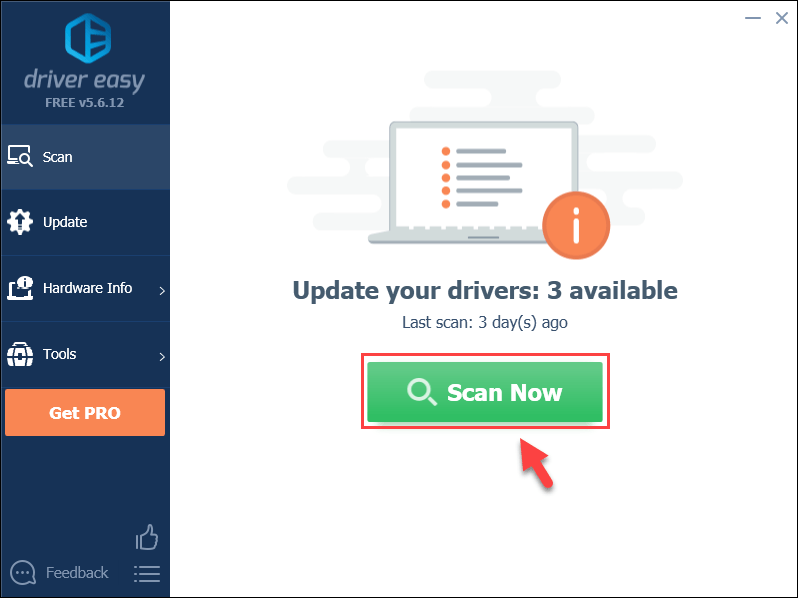
2) Run Driver Easy and click Scan Now. Driver Easy will then scan your computer and detect any problem drivers.
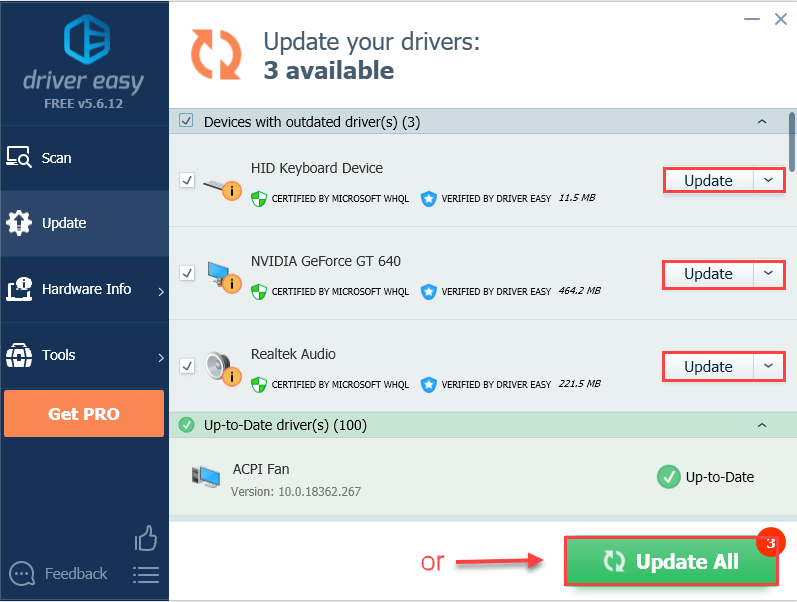
3) Click the Update button next to the flagged driver to automatically download the correct version of this driver, then you can manually install it (you can do this with the FREE version).
Or
Click Update All to automatically download and install the correct version of all the drivers that are missing or out of date on your system (this requires the Pro version – you’ll be prompted to upgrade when you click Update All).
4) Restart your Windows system after updating the driver for your battery management device.
Feel free to drop us a comment and share your experience with other users!