


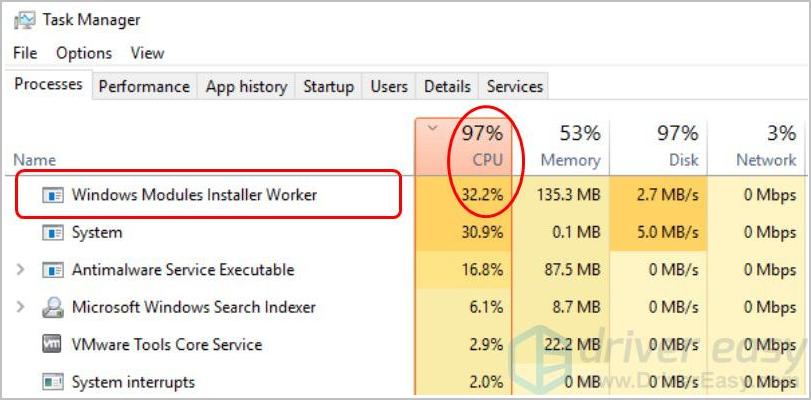
Does the screenshot above look familiar? If you’re on Windows 10/11, and you notice that the Windows Modules Installer Worker process is using a large percentage of your CPU, you certainly aren’t the only one. We’ve seen many Windows Users are reporting this issue. But the good new is, you can fix it. We’ve put together 2 solutions you can try.
What is Windows Modules Installer Worker?
Windows Modules Installer Worker(TiWorker.exe) is a Windows Update Service that looks for new updates and installs it to your computer. In other words, when your computer’s system is checking for Windows update or installing any update, this process will be running automatically.
How do I fix Windows Modules Installer Worker High CPU?
Here are 2 solutions you can try to fix this problem. You may not have to try both of them; if Method 1 doesn’t work, then you can try Method 2 to resolve the issue. In addition, you can try our Bonus Tip to solve your computer woes.
Note: Both Method 1 & Method 2 will stop Windows Automatic update on your computer
Method 1: Stop and disable the Windows Update service
Only when the Windows Update service is running, can Windows checks or installs updates. So if we stop and disable the Windows Update service, Windows can’t check or install any update. As a result, the Windows Module Installer Worker process won’t use a large percentage of your CPU then.
Here’s how you can do stop and disable the Windows Update service:
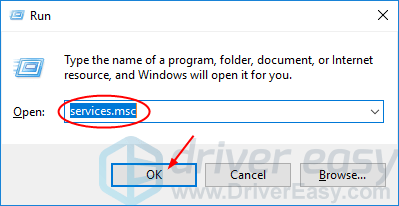
1) On your keyboard, press the Windows logo key ![]() and R at the same time to invoke the Run box.
and R at the same time to invoke the Run box.
2) Type services.msc and click OK.
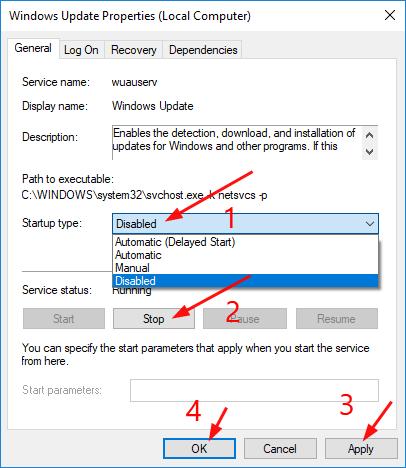
3) You should then see the Services window again. Double-click Windows Update.

4) Set its startup type to be Disabled and click Stop. Then click Apply > OK.
5) The CPU usage on your computer should return to normal. If it doesn’t you can try Method 2 below.
Method 2: Change your Internet setting
The other way to stop Windows Automatic Update on your computer is to change your Internet to metered connection. See how:
Case 1: You’re using a Wi-Fi Network
Case 2: You’re using an Ethernet Network
Case 1: You’re using a Wi-Fi Network
1) Go to Start > Settings > Network & Internet > Wi-FI. Then click Advanced Options.
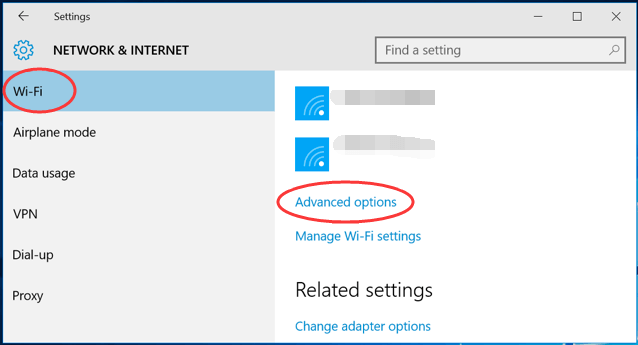
2) Tick on Set as metered connection.
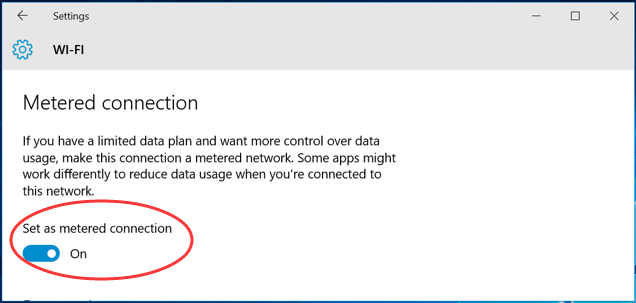
You’re done. Check if the problem still exists.
Case 2: You’re using an Ethernet Network
1) On your keyboard, press the Windows logo key ![]() and R at the same time to invoke the Run box.
and R at the same time to invoke the Run box.
2) Type regedit and click OK.

3) Click Yes when prompted by UAC ( User Account Control ).
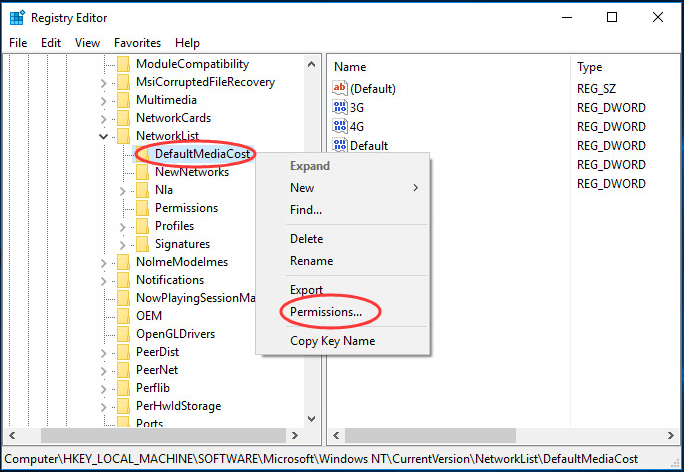
4) On the open window, go to
HKEY_LOCAL_MACHINE > SOFTWARE > Microsoft > Windows NT > CurrentVersion > NetworkList > DefaultMediaCost
Then Right-click DefaultMediaCost and select Permissions.
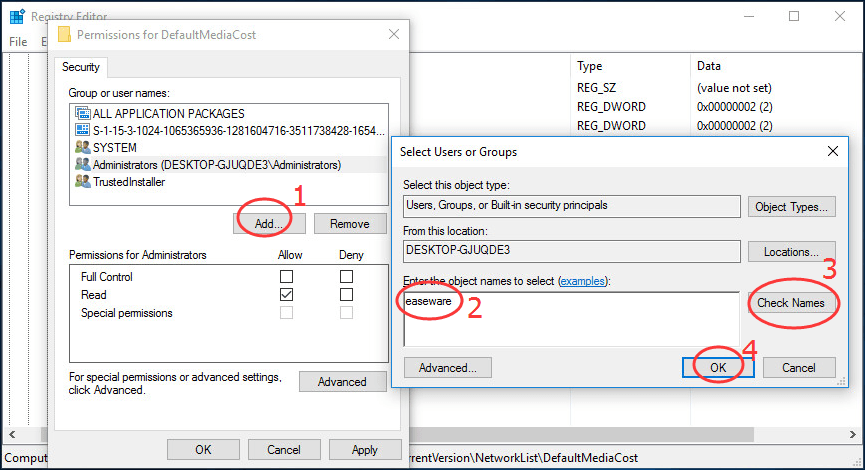
5) Click Add... Then type your user name into Enter the object names to select and click Check Names.
Click OK.
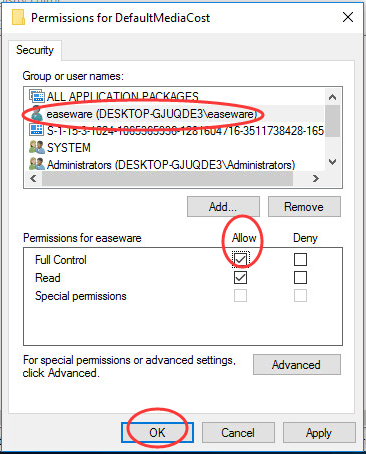
6) Click the user you just add, then tick on allow for Full Control.
Click OK.
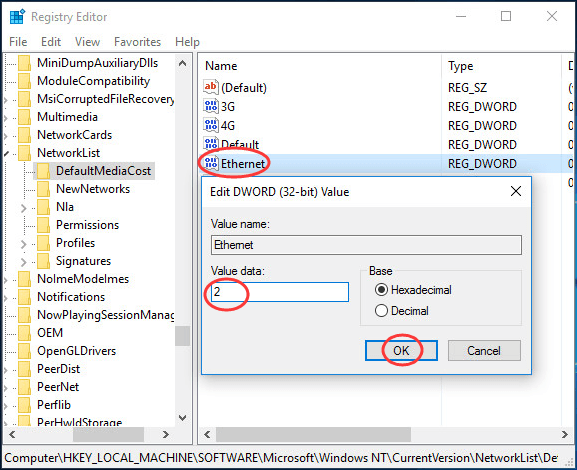
7) Double-click on Ethernet. Then set its Value data to be 2.
Click OK and close Regedit Editor window.
8) Reboot your computer.
Now Windows Modules Installer Worker may not cause High CPU on your Windows 10/11.
Want us to fix the problem for you?

If none of the fixes above worked, or you just don’t have the time or confidence to troubleshoot the problem for yourself, get us to fix it for you. All you need to do is buy a 1-year subscription to Driver Easy (just $29.95) and you get free technical support as part of your purchase. Then you can contact our computer technicians directly, explain your problem, and they’ll investigate to see if they can resolve it remotely.
