


This post applies when your wireless keyboard is working from time to time. Please note that a wireless keyboard is different from a Bluetooth keyboard or a wired one.
If you are having a wireless keyboard, there should be a receiver, or there should be wireless symbol on the USB connector or on your keyboard itself. If not, then you are having a Bluetooth keyboard or a wired keyboard.
Step 1: Check Keyboard Power or Possible Interference
Step 2: Try Different Ports or a Different Computer
Step 3: Resynchronize Keyboard with the USB Receiver
Step 4: Install the Latest Driver
Step 1: Check Keyboard Power or Possible Interference
1) Remove the batteries from your keyboard and then insert them back on again. If the problem persists, please try inserting a new set of batteries and try again.
2) Items such as wireless routers, radios, desktop fans may interfere with the signal of the keyboard. Please try to keep these items away from the keyboard, then see if your wireless keyboard works normally again.
3) Please do not put the receiver near any electrical devices, a distance of 8 to 10 inches is recommended. Also, the keyboard should not be put on metallic surfaces or objects.
Step 2: Try Different Ports or a Different Computer
1) Please connect your keyboard directly to your PC without using any sorts of USB hubs. If your device is already directly connected to a USB port, then please try connecting via a different port. If you are a desktop user, it is suggested that you connect via the USB port at the back of your computer.
2) If possible, you can also try connecting the same keyboard to your other computer. If the problem persists, then your device is to blame. You might want to replace it with a new one.
Step 3: Resynchronize Keyboard with the USB Receiver
The exact procedures differ on different brands of keyboards, so we are only talking about the general procedures.
1) Look for the power button on the receiver for your keyboard. Press the power button and then see if the light on it starts to blink.
2) Press and then release the Connect Channel button on your keyboard.
3) See if you can see green light coming out of the receiver now. Green lights mean that the synchronization was successful.
You might need to refer to the manual that came along with the keyboard for more assistance for the exact procedures.
Step 4: Install the Latest Driver
If none of the above methods help you solve this problem, please make sure that ll the device drivers in your computer are up-to-date, especially the driver for your keyboard.
Of course you can go to the manufacturer website to search for and then download the needed drivers one by one. Or you can choose the alternative.
It is suggested that you use Driver Easy, an automatic driver updater that helps you with the scanning, downloading and updating device drivers easily.
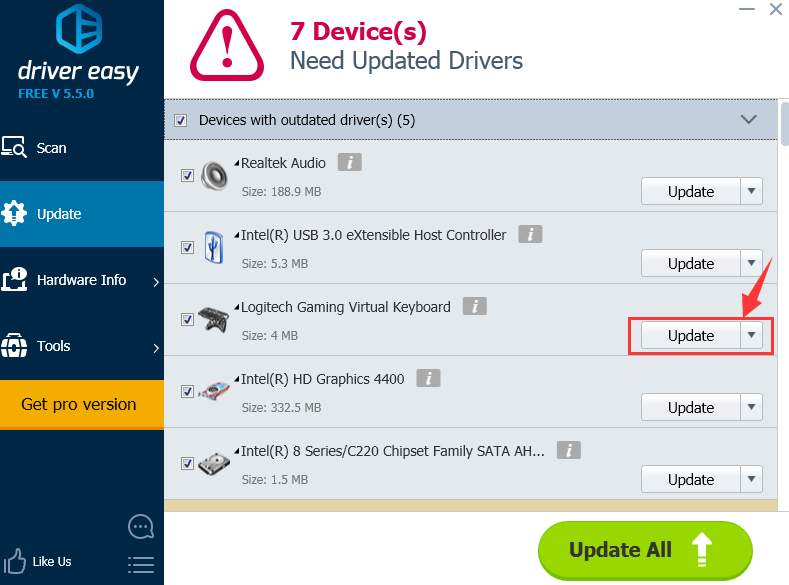
Once you got Driver Easy installed on your PC, double click to run it and then run the scan.
Hit the Update button for the driver that you need from the list of choice.
If you are having a wireless keyboard, there should be a receiver, or there should be wireless symbol on the USB connector or on your keyboard itself. If not, then you are having a Bluetooth keyboard or a wired keyboard.

Step 1: Check Keyboard Power or Possible Interference
Step 2: Try Different Ports or a Different Computer
Step 3: Resynchronize Keyboard with the USB Receiver
Step 4: Install the Latest Driver
Step 1: Check Keyboard Power or Possible Interference
1) Remove the batteries from your keyboard and then insert them back on again. If the problem persists, please try inserting a new set of batteries and try again.
2) Items such as wireless routers, radios, desktop fans may interfere with the signal of the keyboard. Please try to keep these items away from the keyboard, then see if your wireless keyboard works normally again.
3) Please do not put the receiver near any electrical devices, a distance of 8 to 10 inches is recommended. Also, the keyboard should not be put on metallic surfaces or objects.
Step 2: Try Different Ports or a Different Computer
1) Please connect your keyboard directly to your PC without using any sorts of USB hubs. If your device is already directly connected to a USB port, then please try connecting via a different port. If you are a desktop user, it is suggested that you connect via the USB port at the back of your computer.
2) If possible, you can also try connecting the same keyboard to your other computer. If the problem persists, then your device is to blame. You might want to replace it with a new one.
Step 3: Resynchronize Keyboard with the USB Receiver
The exact procedures differ on different brands of keyboards, so we are only talking about the general procedures.
1) Look for the power button on the receiver for your keyboard. Press the power button and then see if the light on it starts to blink.
2) Press and then release the Connect Channel button on your keyboard.
3) See if you can see green light coming out of the receiver now. Green lights mean that the synchronization was successful.
You might need to refer to the manual that came along with the keyboard for more assistance for the exact procedures.
Step 4: Install the Latest Driver
If none of the above methods help you solve this problem, please make sure that ll the device drivers in your computer are up-to-date, especially the driver for your keyboard.
Of course you can go to the manufacturer website to search for and then download the needed drivers one by one. Or you can choose the alternative.
It is suggested that you use Driver Easy, an automatic driver updater that helps you with the scanning, downloading and updating device drivers easily.
Once you got Driver Easy installed on your PC, double click to run it and then run the scan.
Hit the Update button for the driver that you need from the list of choice.
That’s all. You are getting the best-matched device drivers installed on your PC.
If you want to install all the needed device drivers all at once, by all means, have a try at the pro version of Driver Easy. You will be able to enjoy the incomparable download speed and the download-all-drivers-in-just-1-click feature with the pro version.
If you are not satisfied whatsoever, just ask for a refund 30 days within the purchase and we will take care of the rest for you. Guarantee!
12
12 people found this helpful
0 Comments
Most Voted