


To communicate with your USB devices, your computer needs the correct driver. If you’re facing issues with your USB-Serial Controller D, this always means that the current driver installed is outdated or corrupt. To fix it, you need to update your USB-serial Controller D driver.
How to update your USB-serial controller d driver
There are two ways you can update your USB-serial Controller D driver:
- Option 1 – Manually
- You’ll need some computer skills and patience to update your drivers this way because you need to find exactly the right driver online, download it and install it step by step.
- Option 2 – Automatically (Recommended)
- This is the quickest and easiest option. It’s all done with just a couple of mouse clicks – easy even if you’re a computer newbie.
Option 1 – Manually
To update your USB-Serial Controller D driver manually, first, you’ll need to go to Device Manager to update the driver automatically. If Windows fails to find any updates, then head to the manufacturer’s official website to download the exact driver for your device and install it manually.
Step 1: Update your USB-Serial Controller D driver via Device Manager
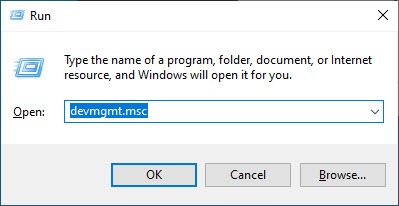
- Hold down the Windows logo key and press the R key to open the Run box, enter devmgmt.msc in the search box and hit Enter.
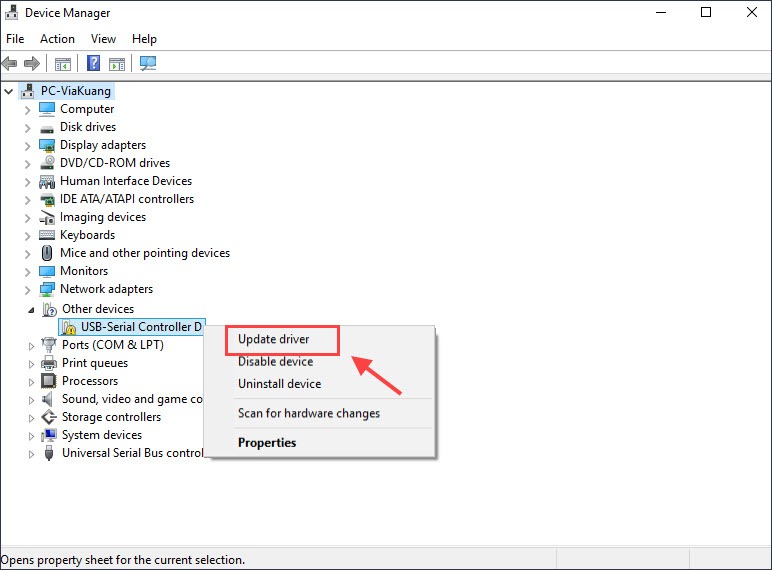
- Expand the Other devices category and right-click your USB-Serial Controller D and select Update driver.
- Select Search automatically for updated driver software. Windows will find the latest driver and install it for you automatically if it finds one.
However, Windows cannot always find the latest driver for you, so you can head to the manufacturer’s website to download the latest driver and manually install it or do it automatically in Option 2.
Step 2: Download the USB-Serial Controller D driver from the manufacturer’s website
- Head to the official website of the manufacturer and download the latest driver.
- Double-click the downloaded driver file and follow the on-screen instructions to finish the installation.
- Restart your computer for the changes to take effect.
– Expand Other devices and right-click USB-Serial Controller D > Select Properties.
– Under the Driver tab, you can view its driver provider, driver version and date, etc.
Option 2 – Automatically
If you don’t have the time, patience, or computer skills to update the USB-Serial Controller D driver manually, you can do it automatically with Driver Easy.
Driver Easy will automatically recognize your system and find the correct drivers for it. You don’t need to know exactly what system your computer is running, you don’t need to risk downloading and installing the wrong driver, and you don’t need to worry about making a mistake when installing.
You can update your drivers automatically with either the FREE or the Pro version of Driver Easy. But with the Pro version it takes just 2 clicks:
- Download and install Driver Easy.
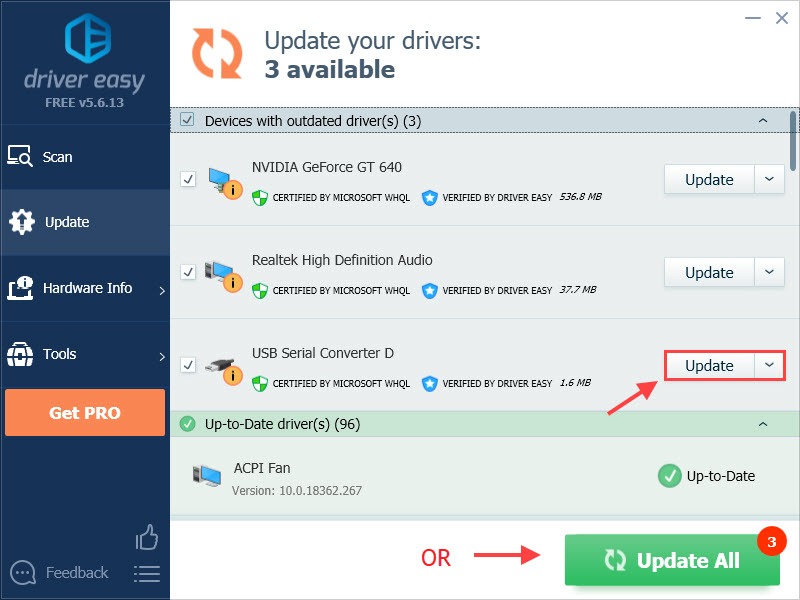
- Run Driver Easy and click the Scan Now button. Driver Easy will then scan your computer and detect any problem drivers.
- Click Update All to automatically download and install the correct version of all the drivers that are missing or out of date on your system (this requires the Pro version – you’ll be prompted to upgrade when you click Update All. You get full support and a 30-day money back guarantee.)
Note: You can do it for free if you like, but it’s partly manual. - Restart your computer for the changes to take effect.
Hopefully, you have updated your USB-Serial Controller D driver successfully.
Feel free to leave us a comment if you have any questions or suggestions.