


If Minecraft keeps crashing on your computer, don’t panic. Whether you’re getting issues like Minecraft keeps crashing, or your Minecraft crashes on startup, you can try these solutions to fix your problem.
How to fix Minecraft crashing?
Here are the solutions that have helped people resolve the same issue. You don’t need to try them all; just work your way down until you find the one that works.
- Restart your computer
- Install the latest game patches
- Update your graphics card driver
- Stop overclocking your CPU
- Configure the correct settings
- Repair your system files
Before we move any further…
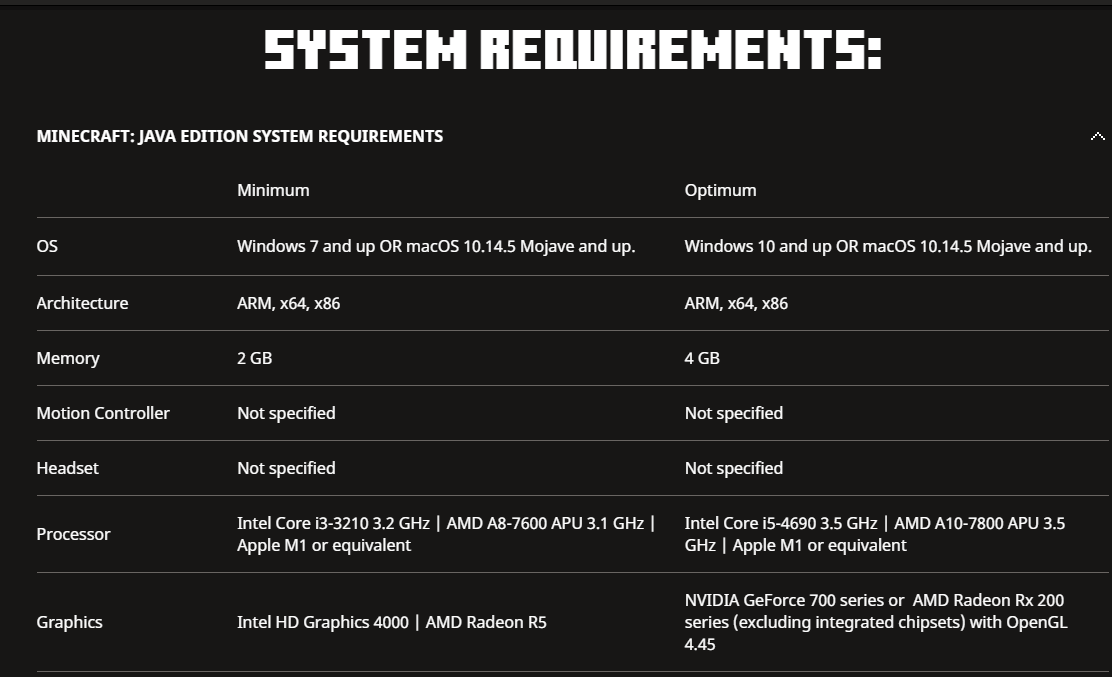
Always make sure that your computer meets the minimum system requirements for Minecraft, especially if your Minecraft crashes ever since it’s installed on your computer.
To check the system requirements for Minecraft, you can go to this post here: https://www.minecraft.net/en-us/store/minecraft-java-bedrock-edition-pc#accordionv1-0afde1e050-item-203d6a0d57 and scroll down and view the requirements there.
Why does Minecraft crash on my computer?
When Minecraft crashes, it typically closes the game and may report an error to show you the location of the exception that causes the crash.
There are several causes for Minecraft crashing on startup: the mods, bugs in the game, the corruption of the game files, and the missing or outdated graphics card driver.
Fortunately, you can fix the crashing quickly and easily. Try the fixes below.
Fix 1: Restart your computer
Restarting a PC works like a charm for many technical issues, it never hurts to restart your computer, and sometimes this is enough to fix your issues. You can just simply close your Minecraft, restart your PC and open your Minecraft to see if it works.
Fix 2: Update the game patches
Generally, the bugs in the game are likely to cause the crashing, and Mojang keeps releasing the patches to improve Minecraft and fix bugs.
So you should install the patches and keep your game up to date. This helps fix some bugs that crash your game. You can download the latest Minecraft here.
If you are using mods, you can try to remove the mods, and uninstall and reinstall the latest version of Minecraft on your computer.
If Minecraft still crashes after updating your game patch, don’t worry. Here’s the next thing to try.
Fix 3: Update your graphics card driver
A missing or outdated graphics driver can cause Minecraft to crash in your Windows, so you can update your graphics card driver to fix the crash.
There are two ways to update your graphics card driver: manually and automatically.
Manually update your graphics card driver – You can go to your graphics card manufacturer’s website, find the correct graphics card driver, and install it on your computer. This requires time and computer skills.
Automatically update your graphics card driver – If you are not familiar with playing around with drivers, you can do that automatically with Driver Easy.
Driver Easy will detect the driver’s condition in your computer, and install the correct drivers for your PC. More importantly, with Driver Easy, you don’t need to struggle to figure out the Operating System, and you don’t need to worry about making mistakes while processing. That will tremendously save you time and patience.
You can update your drivers automatically with either the 7 days free trial or the Pro version of Driver Easy. It takes just 2 clicks, and you get full support and a 30-day money-back guarantee with the Pro version:
- Download and install Driver Easy.
- Run Driver Easy and click the Scan Now button. Driver Easy will then scan your computer and detect any problem drivers.

- Click the Activate & Update button next to the flagged device to automatically download and install the correct version of this driver.
Or click Update All to automatically download and install the correct version of all the drivers that are missing or out of date on your system (You’ll need the Pro version for this – when you select Update All, you’ll get a prompt to upgrade. If you’re not prepared to purchase the Pro version yet, Driver Easy provides a 7-day trial at no cost, granting access to all Pro features like fast downloads and easy installation. No charges will occur until after your 7-day trial period ends.)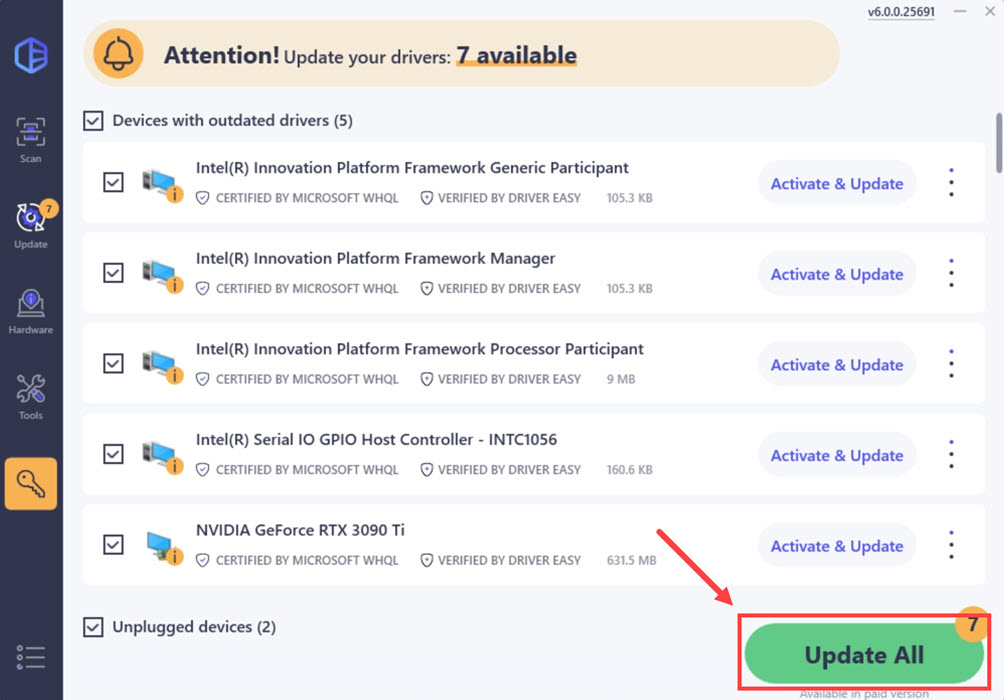
- After updating, restart your computer to take effect.
Fix 4: Stop overclocking your CPU
Overclocking means setting your CPU and memory to run at speeds higher than their official speed grade. Almost all processors ship with a speed rating. However, this may cause your games to get stuck on loading or crashing, so you should set your CPU clock speed rate back to default to fix the issue.
Fix 5: Configure the correct settings
Enabling VBOs for your Minecraft can cause the crash as well, so you can check the following instructions to turn off VBOs. It works for many other users. There are two options to turn off VBOs for your Minecraft:
Way 1: Turn off VBOs in your Minecraft Settings
If you can launch the game, you can turn off VBOs in your Minecraft Settings:
- Go to Settings in your game.
- Go to Video Settings.
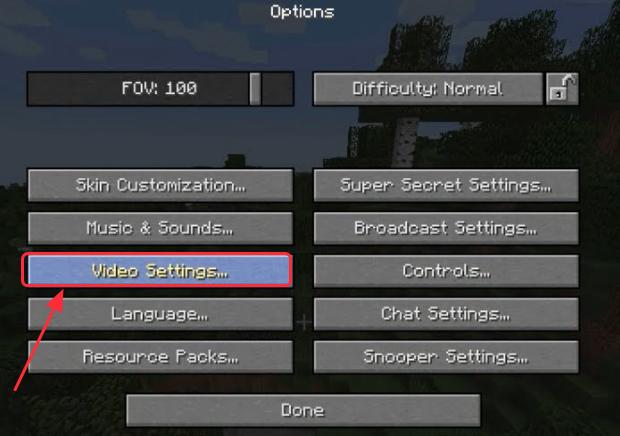
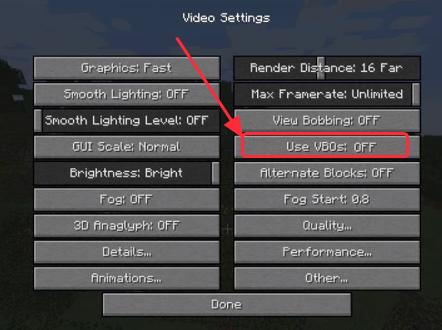
- You’ll see settings about VBOs at the bottom, then turn off VBOs.
- Restart your PC and open your game.
Way 2: Turn off VBOs in your Minecraft file
If Minecraft crashes as long as you open the game and you can’t launch Minecraft, you can turn off VBOs in the Minecraft options.txt file.
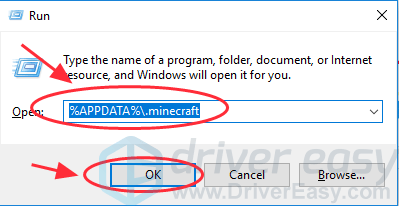
- On your keyboard, press the Windows logo key and R at the same time to invoke the Run box. Type %APPDATA%\.minecraft in the Run box, and click OK. You’ll open the .minecraft folder.
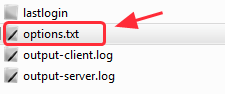
- In the .minecraft folder, go to the options .txt file, then click to open options.txt.
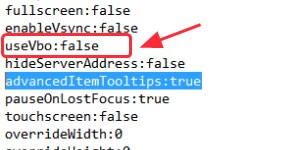
- Change useVbo to false.
- Save the file, restart your computer and try your game again.
Fix 6: Repair your system files
If the fixes above failed to solve the crashes, it might be caused by a corrupt or missing game file, especially a DLL file that your Minecraft shares. Many Minecraft players find restoring system files helps them get rid of random crashes.
To check and restore your system file might take time and computer skills. You will need to run numerous commands, wait for the process to complete, or risk your personal data.
Step 1. Scan corrupt files with System File Checker
System File Checker (SFC) is a Windows built-in tool to identify and repair corrupted system files.
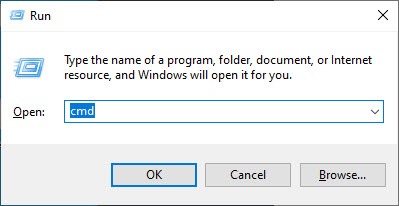
1) On your keyboard, press the Windows logo key and R at the same time to open the Run box. Type cmd and press Ctrl+Shift+Enter to run Command Prompt as administrator.
Click Yes when prompted for permission to make changes to your device.
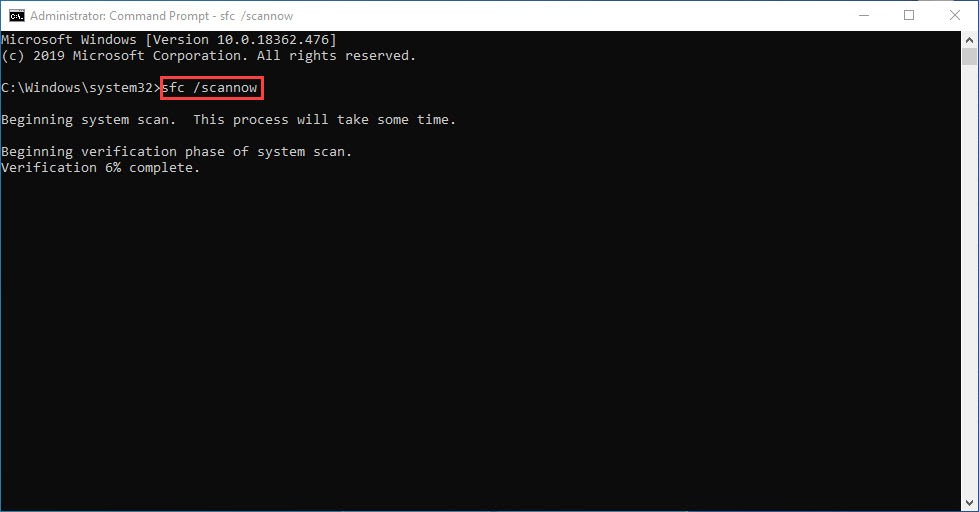
2) In the Command Prompt, type the following command and hit Enter.
sfc /scannow
3) System File Check will begin to scan all system files and repair any corrupted or missing ones it detected. This may take 3-5 minutes.
4) You may receive something like the following messages after the verification.
- no errors
- it fixed some errors
- could not fix all errors
- could not fix errors at all
- ……
No matter what message you receive, you can try running dism.exe (Deployment Image Servicing and Management) to check the device performance and health of your PC.
Step 2. Run dism.exe
1) Run Command Prompt as admin and enter the following commands.
- This command line will scan the health of your PC:
dism.exe /online /cleanup-image /scanhealth
- This command line will restore the health of your PC:
dism.exe /online /cleanup-image /restorehealth
2) After the restore health process finishes, you may get some error messages.
- If restoring heath gives you errors, you can always try this command line. This will take up to 2 hours.
dism /online /cleanup-image /startcomponentcleanup
- If you get Error: 0x800F081F with the restore health scan, reboot your PC and run this command line.
Dism.exe /Online /Cleanup-Image /AnalyzeComponentStore
If the System File Check finds any files corrupted, follow the on-screen instructions to repair them, and then restart your computer for the changes to take full effect.
These are the five top solutions to fix the Minecraft crash issue. If you have any questions or thoughts, feel free to comment below and let us know.

