


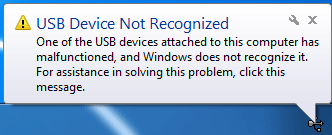
 When you plug in your USB flash drive, a balloon warning in system tray would pop up to tell you that USB Device Not Recognized. Sometimes you don’t even see this notification and your USB flash driver just stops working.
No worries, it’s possible and, in some cases, quite easy to fix. Here are 3 solutions for you to try. You may not need to try them all, just work your way down and find the one works for you.
Method 1: Reinstall USB Driver
Method 2: Update USB Driver Automatically (Recommended)
Method 3: Remove External Devices
Method 4: Create INF Files
When you plug in your USB flash drive, a balloon warning in system tray would pop up to tell you that USB Device Not Recognized. Sometimes you don’t even see this notification and your USB flash driver just stops working.
No worries, it’s possible and, in some cases, quite easy to fix. Here are 3 solutions for you to try. You may not need to try them all, just work your way down and find the one works for you.
Method 1: Reinstall USB Driver
Method 2: Update USB Driver Automatically (Recommended)
Method 3: Remove External Devices
Method 4: Create INF Files
Method 1: Reinstall USB Driver
Faulty or outdated USB driver can render your USB devices not responding. To fix it: 1) On your keyboard, press the Windows logo key and R at the same time to invoke a Run command. Type devmgmt.msc in and press Enter.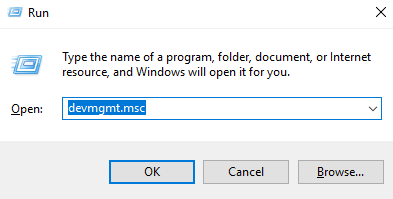
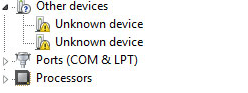
 If you cannot see such a device under Universal Serial Bus controllers, check if you can see it under Other devices.
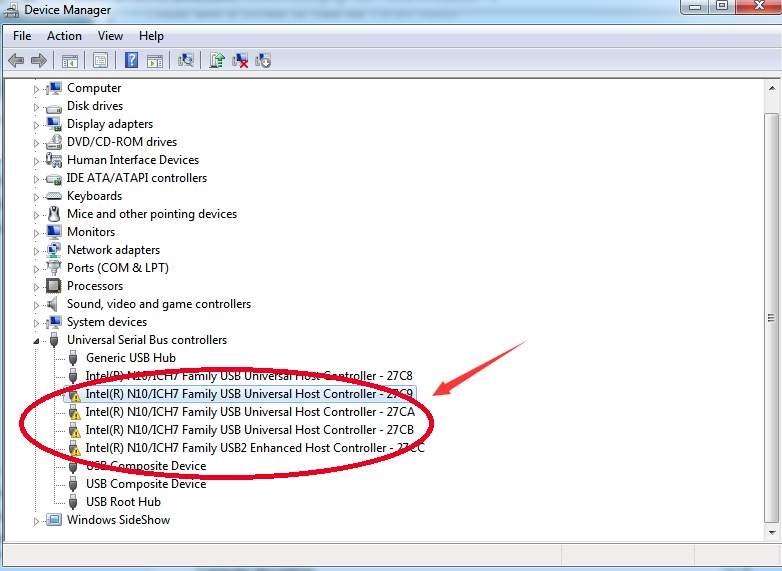
 3) Double-click the device with a yellow exclamation mark. Go to Driver, click Uninstall.
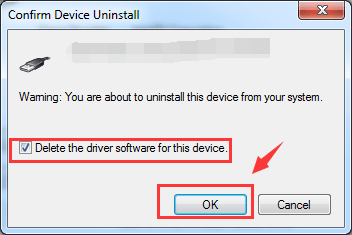
 4) Check the box for Delete the driver software for this device and click OK.
 5) Reboot your computer with the USB flash drive connected. See if Microsoft helps you detect and install the new USB driver.
If you have more than one Host Controllers with the yellow exclamation marks in front, repeat these procedures more than once.
5) Reboot your computer with the USB flash drive connected. See if Microsoft helps you detect and install the new USB driver.
If you have more than one Host Controllers with the yellow exclamation marks in front, repeat these procedures more than once.
Method 2: Update USB driver automatically
If Microsoft fails to find the latest version of the USB driver for you, you might need to search for it by yourself. If you don’t have the time, patience or computer skills to update your drivers manually, you can do it automatically with Driver Easy. Driver Easy will automatically recognize your system and find the correct drivers for it. You don’t need to know exactly what system your computer is running, you don’t need to risk downloading and installing the wrong driver, and you don’t need to worry about making a mistake when installing. You can update your drivers automatically with either the FREE or the Pro version of Driver Easy. But with the Pro version it takes just 2 clicks (and you get full support and a 30-day money back guarantee): 1) Download and install Driver Easy. 2) Run Driver Easy and click the Scan Now button. Driver Easy will then scan your computer and detect any problem drivers.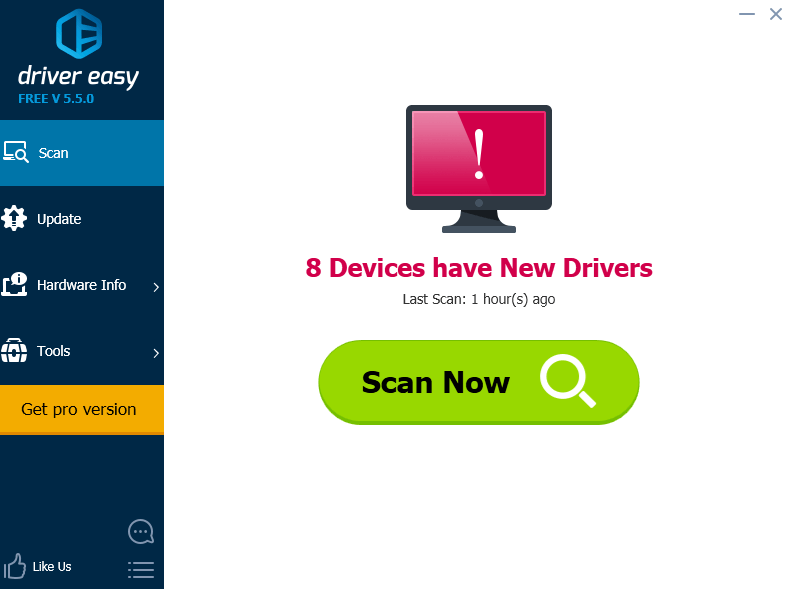 3) Click the Update button next to the flagged USB device to automatically download and install the correct version of this driver (you can do this with the FREE version).
Or click Update All to automatically download and install the correct version of all the drivers that are missing or out of date on your system (this requires the Pro version – you’ll be prompted to upgrade when you click Update All).
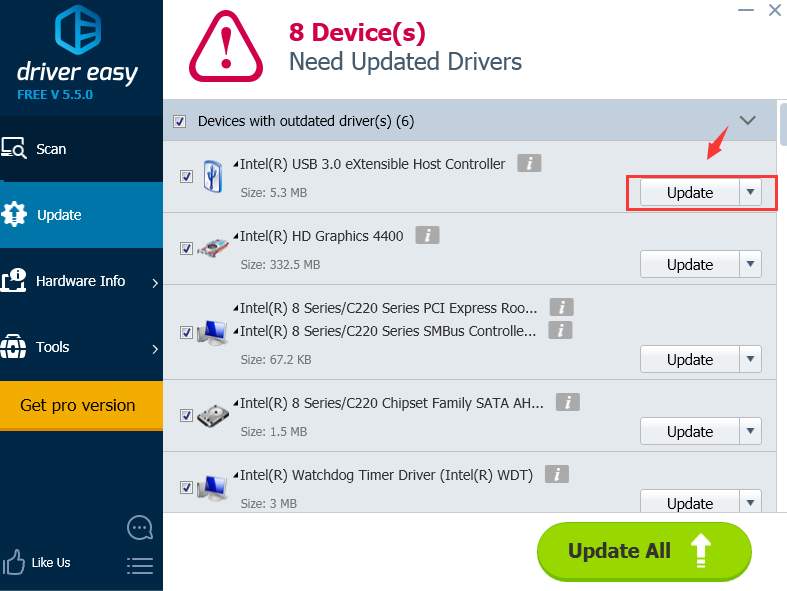
3) Click the Update button next to the flagged USB device to automatically download and install the correct version of this driver (you can do this with the FREE version).
Or click Update All to automatically download and install the correct version of all the drivers that are missing or out of date on your system (this requires the Pro version – you’ll be prompted to upgrade when you click Update All).
Method 3: Remove External Devices
If there are too many USB devices connected to your PC, some of them might not respond or work properly. To fix it, you can try clean restart your PC: Remove or disconnect all unnecessary discs and devices from your computer. Make sure that the computer is off, and then remove any discs and USB devices and the memory cards from the card reader slot. Disconnect non-essential devices such as camera, MP3-playersprinters, scanners, external hard drives etc., and leave mouse, keyboard and monitor connected. If you are a laptop user: 1) Turn off the computer and make sure you have disabled or disconnected all unnecessary external devices. Remove the computer from any port replicator or docking station. 2) Unplug the AC adapter from the computer and remove the battery from the battery compartment. 3) Press and hold the Power button for about 15 seconds to drain any residual electrical charge from the capacitors that protect the memory. 4) Insert the battery and AC adapter back into the laptop, but make sure you don’t connect any external devices just yet. 5) Press Power button to turn on the computer. Then reconnect the USB devices one by one. If you are using desktop: 1) Turn off the computer completely and disconnect the power cord from the back of the computer. 2) Press the power button on the computer for 5 seconds. 3) Reconnect the power cord and turn on the power. Then reconnect the USB devices one by one.Method 4: Create INF Files
1) Go to C:\Windows\inf folder. Make sure you can see these files listed: (there could be other files) usb.inf, usb2.inf, usbport.inf, usbprint.inf, usbstor.inf, usbvideo.inf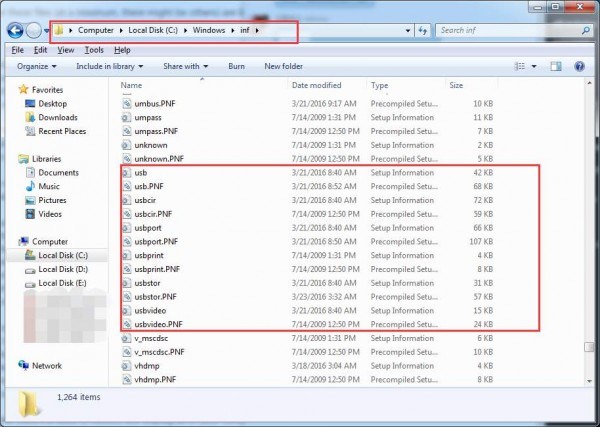 3) If some of the above files are missing, you need to create them.
If you have another computer with all the USB ports well functioned, look for the files in that computer, copy and paste them here.
4) If you don’t have another computer, here is the alternative for you.
Download the mentioned files from this webpage http://www.infdump.com/. You can find the files by searching with the name of the files.
Download the files usb.inf, usb2.inf, usbport.inf, usbprint.inf, usbstor.inf, usbvideo.inf, one by one.
You can save them directly to the C:\Windows\inf folder when you are downloading or you can copy them to the C:\Windows\inf folder all together after you have downloaded all of them.
5) After the files are replaced or created, you need to unplug all of your USB devices and then plug them back in again. If necessary, you can also do a reboot.
Related post:
What to do if USB not recognized in Windows 10?
3) If some of the above files are missing, you need to create them.
If you have another computer with all the USB ports well functioned, look for the files in that computer, copy and paste them here.
4) If you don’t have another computer, here is the alternative for you.
Download the mentioned files from this webpage http://www.infdump.com/. You can find the files by searching with the name of the files.
Download the files usb.inf, usb2.inf, usbport.inf, usbprint.inf, usbstor.inf, usbvideo.inf, one by one.
You can save them directly to the C:\Windows\inf folder when you are downloading or you can copy them to the C:\Windows\inf folder all together after you have downloaded all of them.
5) After the files are replaced or created, you need to unplug all of your USB devices and then plug them back in again. If necessary, you can also do a reboot.
Related post:
What to do if USB not recognized in Windows 10?
46
46 people found this helpful
1 Comment
Most Voted