


Feeling the sound of your speakers or headphones is rather flat? Don’t worry, you’re not alone. The root cause may not lie in the audio output devices, but in your sound card drivers and Windows settings instead. So now it’s about time you follow this tutorial, make some fine tuning, and wait to enjoy the mind-blowing bass boost effect as you expected.
Step 1: Update your sound card driver
Out-dated or corrupt drivers have limited functions, so they could fail to provide you with the best sound quality or get your audio output devices in tip-top condition. If you want to make the most of your devices (say speakers or headphones), you should keep their drivers up to date.
You have 3 options to update the audio drivers:
Option 1 – Download & install the drivers from manufacturers – You’ll need some computer skills and patience to update your driver this way, because you need to find exactly the right driver online, download it and install it step by step.
Option 2 – Update the driver via Device Manager – This is the most common method to update your driver, but sometimes Windows may fail to provide you with the latest (and even necessary) device drivers.
Option 3 – Update the driver automatically (recommended)– This is the quickest and easiest option. It’s all done with just a couple of mouse clicks – easy even if you’re a computer newbie.
Option 1 – Download & install the drivers from manufacturers
Usually you can get the sound card drivers from your motherboard’s manufacturer (e.g. Dell, Lenovo, HP). To do this, simply visit its official website, find the drivers corresponding with your specific flavor of Windows version (for example, Windows 10, 64 bit) and download the drivers manually. If you’re using the Realtek HD Audio Driver, you can also download the driver from Realtek. (However, if you want to get the latest version of Realtek HD Audio Driver, you should still go to the website of your motherboard’s manufacturer.)
Once you’ve downloaded the correct driver for your system, double-click on the downloaded file and follow the on-screen instructions to install the driver. On completion, restart your PC for the changes to be fully implemented.
Option 2 – Update the driver via Device Manager
To update your audio driver via Device Manager, here’s the procedure:
- On your keyboard, press the Windows logo key
 and R at the same time to invoke the Run dialog box. Then, type devmgmt.msc and click OK.
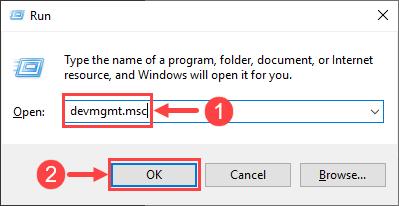
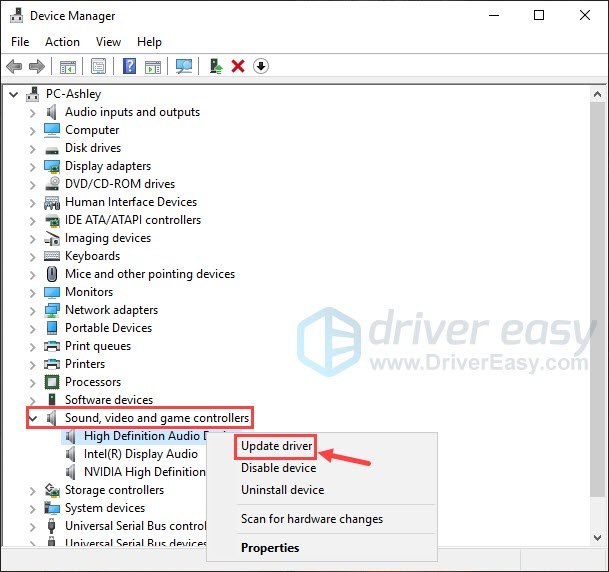
- In the Device Manager window, double-click Sound, video and game controllers to expand its drop-down list. Then right-click on your sound card and select Update driver.
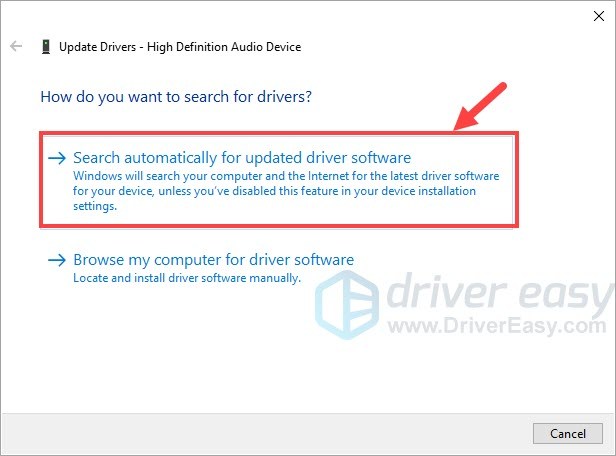
- Click Search automatically for updated driver software. Then follow the onscreen instructions to update your driver.
- If you’re presented with the notification that reads “The best driver software for your device is already installed,” that means your audio driver has probably been up-to-date. But if you’re not sure about that, please turn to option 1 or option 3 to look for the latest version of your audio driver.

- Reboot your PC for the changes to take effect.
Option 3 – Update the driver automatically (recommended)
Some people may find it hard to locate the correct driver online. And even if you successfully find it, it’s still time-consuming and error-prone to install the driver. So if you don’t have the time, patience or computer skills to update your audio drivers manually, you can do it automatically with Driver Easy.
Driver Easy will automatically recognize your system and find the correct drivers for it. You don’t need to know exactly what system your computer is running, you don’t need to risk downloading and installing the wrong driver, and you don’t need to worry about making a mistake when installing. Driver Easy takes care of everything.
You can update your drivers automatically with either the FREE or the Pro version of Driver Easy. But with the Pro version it takes just 2 clicks (and you get full support and a 30-day money back guarantee):
- Download and install Driver Easy.
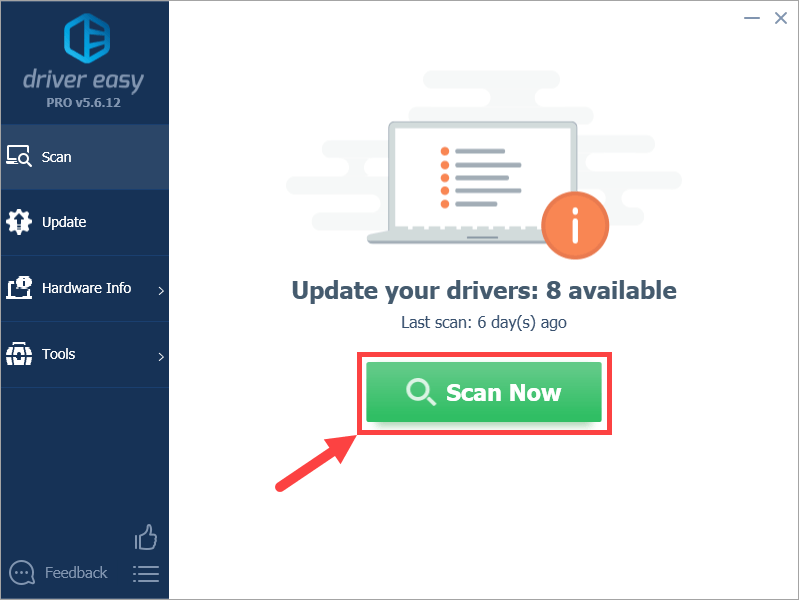
- Run Driver Easy and click the Scan Now button. Driver Easy will then scan your computer and detect any problem drivers.
- Click Update All to automatically download and install the correct version of all the drivers that are missing or out of date on your system (this requires the Pro version – you’ll be prompted to upgrade when you click Update All). Or if you just want to update your sound card driver for now, simply click the Update button next to it.
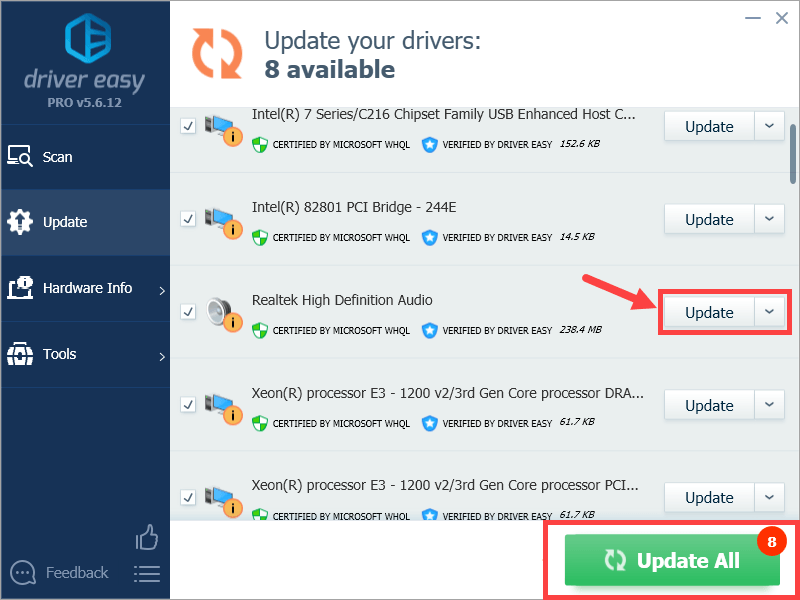
Note: you can do it for free if you like, but it’s partly manual.
Driver Easy uses only genuine drivers, straight from your hardware manufacturer. And they’re all tested and certified – either by Microsoft or by itself. Or both.
Step 2: Adjust bass boost settings in Windows 10
Whether you’re using a headset or speakers, you can follow the steps below to adjust your bass boost settings:
- Right-click the speaker icon
 at the bottom right corner of your taskbar (namely the system tray), then select Sounds.
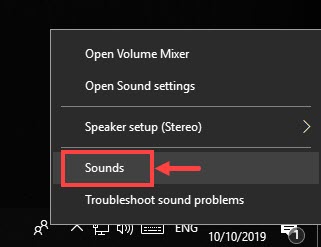
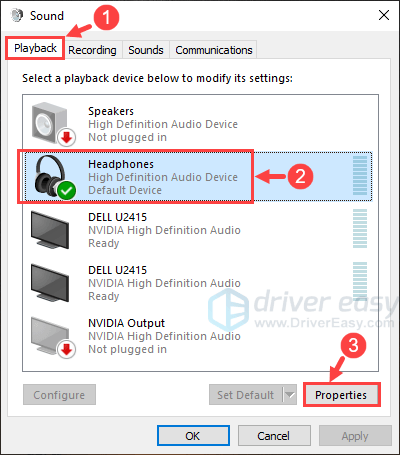
- On the Playback tab, click to highlight the playback device you’re using, then click Properties. (If you want to adjust the settings for your speakers, click Speakers instead of Headphones. )
- On the Enhancements tab, locate the Bass Boot checkbox and select it. After that, click Settings.
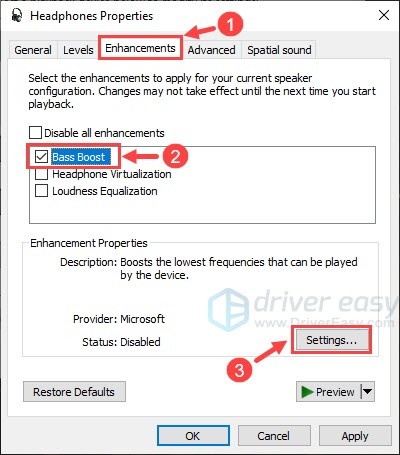
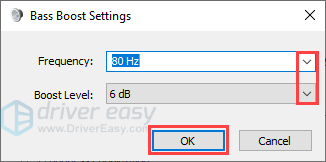
- In the next window, click the chevron icons of Frequency and Boost Level to tweak the bass boost settings according to your preference. Or you can simply leave them on auto. When finished, click OK.
- There you go – now you should be able to enjoy the marvelous bass boost effect via your playback devices.
Hopefully this post helped you solve the problem! If you have any further questions or ideas, please feel free to leave a comment below. Thanks for reading!