


On Windows 10 and 11, IRQL_NOT_LESS_OR_EQUAL is one of the most common blue screen errors. IRQL (Interrput Request Level) is a Windows feature that defines the hardware priority the CPU operates on at a specific time, and the error indicates a device driver or program is trying to access a memory address without permission. In general, this is usually a memory-related issue.
If you’re seeing this error, don’t worry—this is often not too hard to fix, and here are some proven methods to help you make things right. You may not need to try them all, just work your way down until you find the one that works for you.
- Check for faulty or outdated device drivers
- Check the memory stability
- Scan and repair system files
- Perform a System Restore
- Try to analyze the crash log
- Reset or reinstall Windows
Solution 1: Check for faulty or outdated device drivers
One of the common causes of this error is that you’re using a faulty or outdated device driver. Problem drivers could also lead to memory leak, so a more targeted troubleshooting would be checking your computer drivers first.
Instead of reinstalling the problem driver, a more efficient way is to update the drivers on your PC, which will override the existing problem driver and can solve the issue in most cases.
There’re 2 ways you can update your drivers: manually or automatically.
Option 1: Update drivers manually
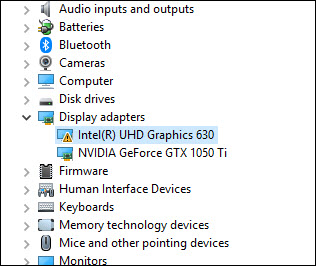
You can do it manually, start with checking through each driver in Device Manager for a yellow exclaimation mark, an indication of a missing or problem driver. You can then go to the manufacturer’s website of your computer or the specific device and search for the driver.
If you have trouble identifying the problem driver, try the automatic option below to scan for driver issues.
You can also check for driver updates using Windows Update, but note that this only gives you the Windows recommended drivers, which may not be the latest and might not cover all devices:
1) On your keyboard, press Win+R together to invoke the Run box. Type or paste ms-settings:windowsupdate, then click OK.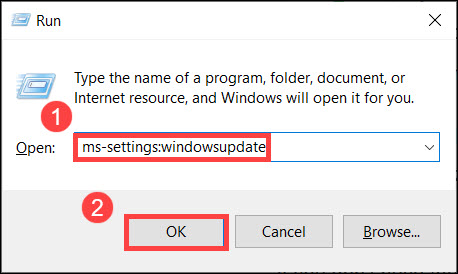
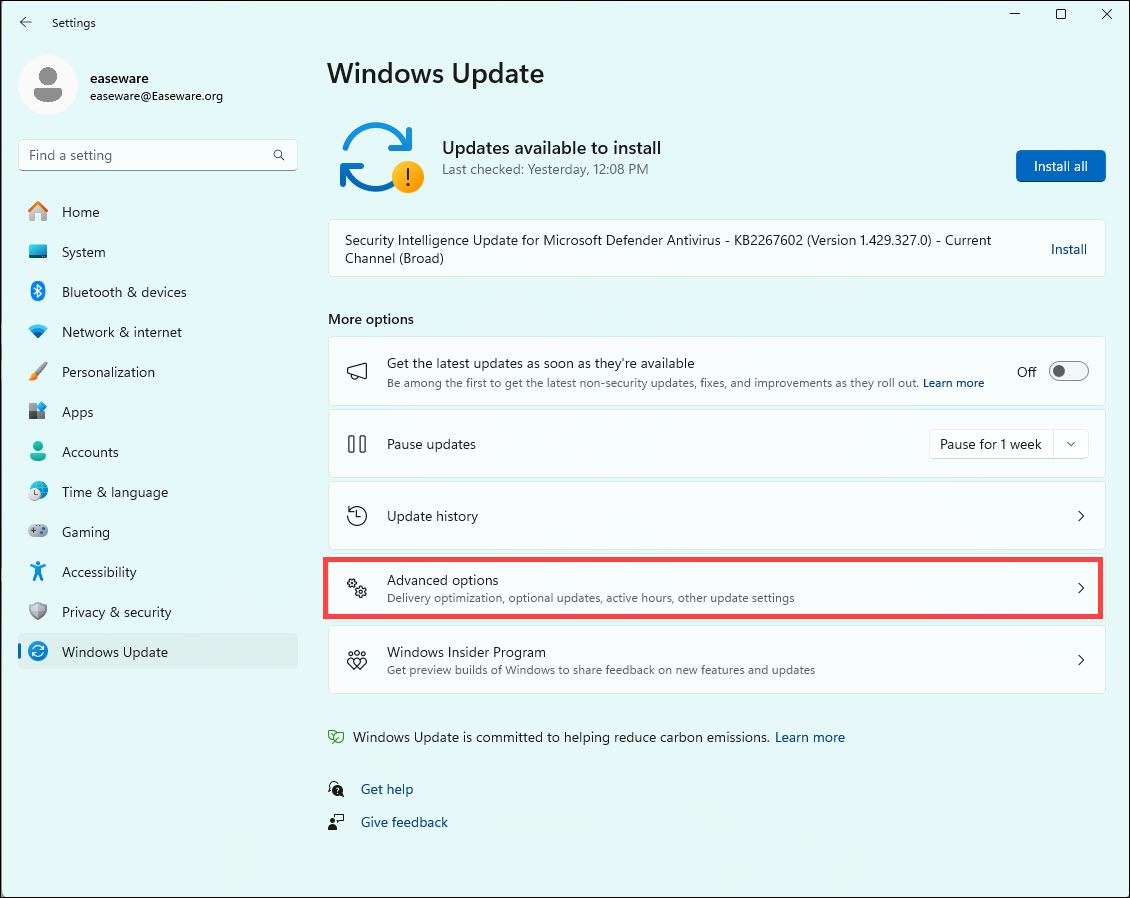
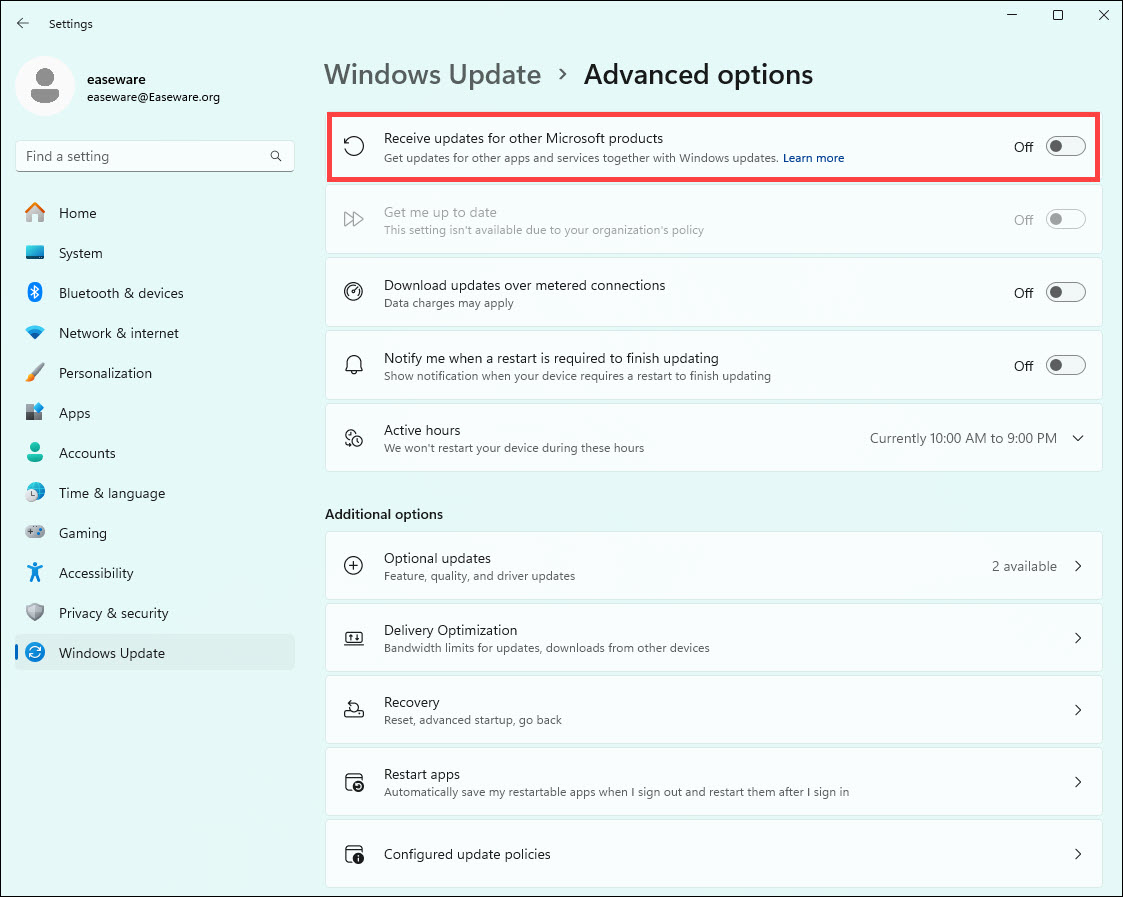
2) In the Windows Update window, select Advanced options.
3) In Update options, click the toggle to turn on Receive updates for other Microsoft products when you update Windows.
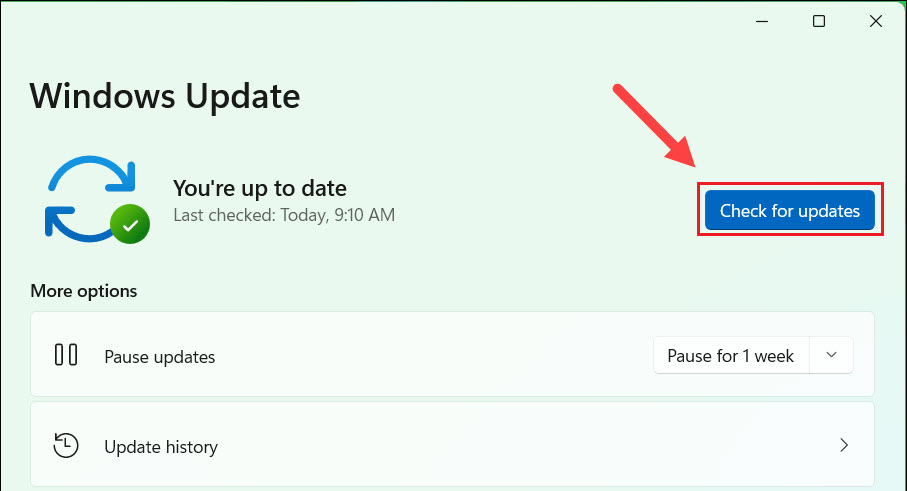
4) Go back and click Check for updates, and Windows should download and install the recommended new drivers.
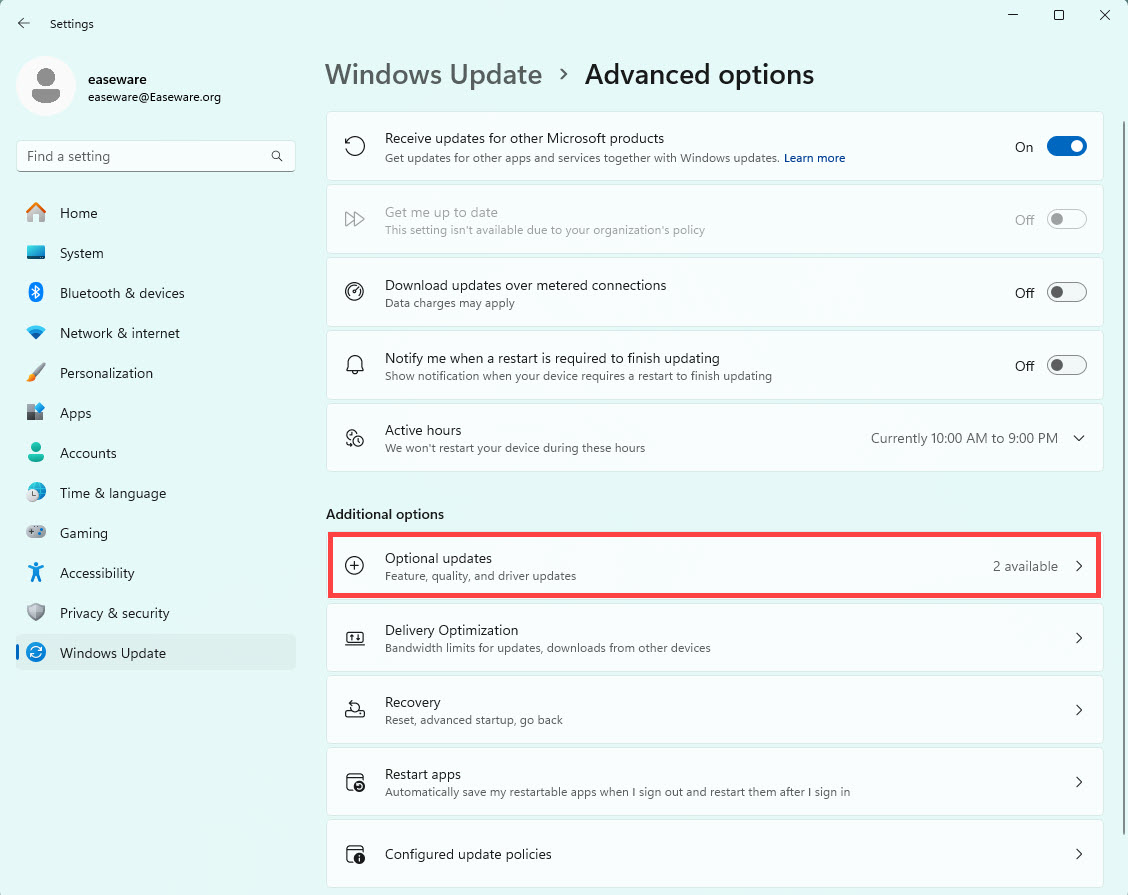
5) You can also click Optional updates to check for available driver updates provided by Windows.
If the issue persists, try the automatic option below.
Option 2: Update drivers automatically
If you don’t have the time, patience or computer skills to update the drivers manually, you can do it automatically with Driver Easy.
Driver Easy will automatically recognize your system and find the correct drivers for it. You don’t need to know exactly what system your computer is running, you don’t need to be troubled by the wrong driver you would be downloading, and you don’t need to worry about making a mistake when installing. Driver Easy handles it all.
- Download and install Driver Easy.
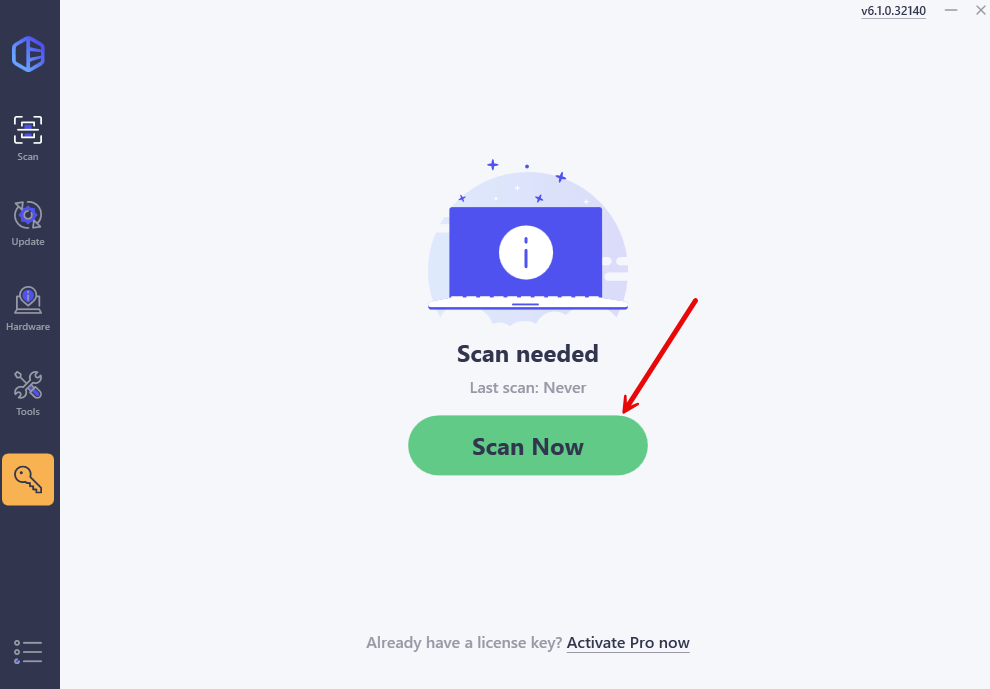
- Run Driver Easy and click the Scan Now button. Driver Easy will then scan your computer and detect any problem drivers.
- Click the Activate & Update button next to the flagged device to automatically download and install the correct version of this driver.
Or click Update All to automatically download and install the correct version of all the drivers that are missing or out of date on your system (You’ll need the Pro version for this – when you select Update All, you’ll get a prompt to upgrade. If you’re not prepared to purchase the Pro version yet, Driver Easy provides a 7-day trial at no cost, granting access to all Pro features like fast downloads and one-key installation. No charges will occur until after your 7-day trial period ends.)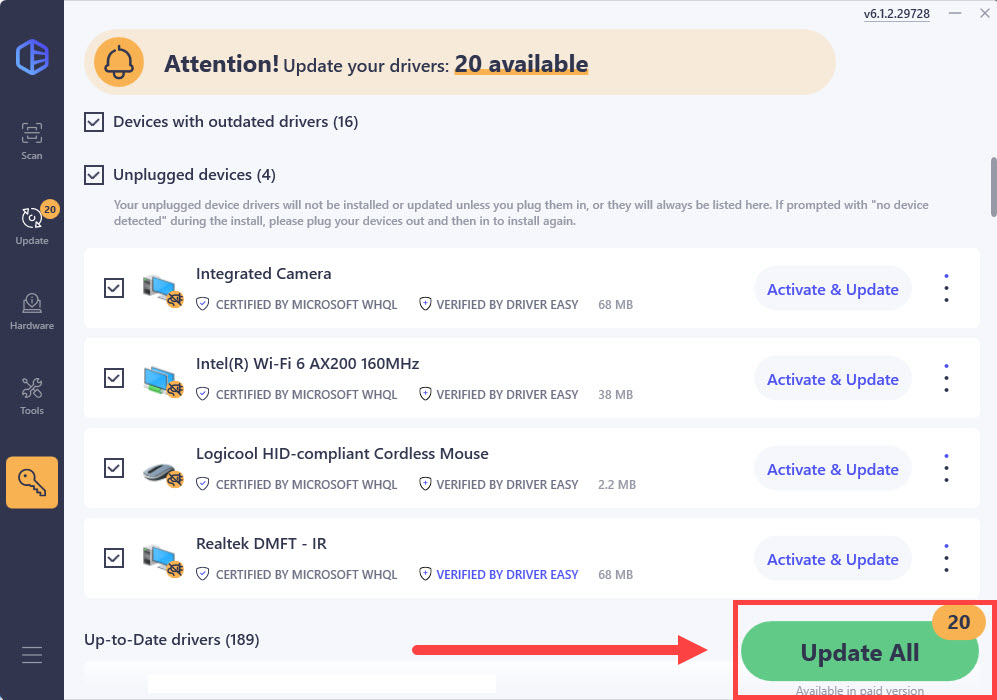
- Restart your computer for the change to take effect.
Solution 2: Scan and repair system files
You can also run a system scan to check for missing or corrupted system files. Windows provides a built-in file checker that can help you with it.
Step 1: Scan corrupt files with System File Checker
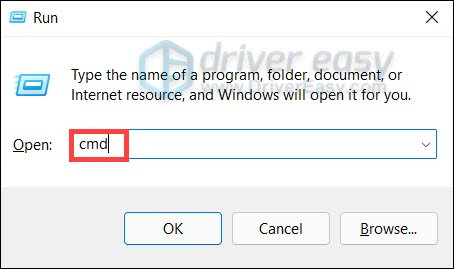
- On your keyboard, press Win+R (the Windows logo key and the R key) to open the Run box. Type cmd and press Ctrl+Shift+Enter to run Command Prompt as administrator.
- In Command Prompt, type sfc /scannow and hit Enter. Allow System File Check to scan your system. It could take up to 5 minutes.
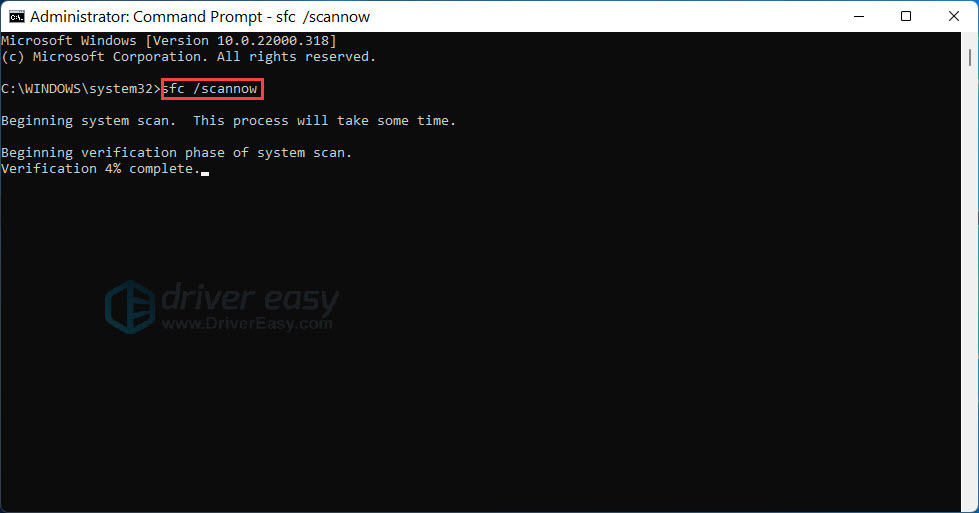
- You may see something like the followings after the verification:
- no errors
- it fixed some errors
- could not fix all errors
- could not fix errors at all
No matter what message you saw, next you can try to fix the issue with the DISM tool.
Step 2: Repair with the DISM tool
1) Run Command Prompt as administrator and enter the following commands.
- This command scans your system:
dism.exe /online /cleanup-image /scanhealth
- This line should repair your system:
dism.exe /online /cleanup-image /restorehealth
If the restore process raises errors, you can always try the following command. Note this could take up to 2 hours.
dism /online /cleanup-image /startcomponentcleanup
- If you see Error: 0x800F081F during the process, reboot and run the following:
Dism.exe /Online /Cleanup-Image /AnalyzeComponentStore
If the System File Check finds any files corrupted, follow the on-screen instructions to repair them, and then restart your PC for the changes to take full effect.
Once completed, restart your computer and check if Windows crashes again.
Solution 3: Check the RAM stability
Some users reported that the error occurred after replacing or adding new RAM. If that’s your case, try returning to the previous setup and see how it goes. If you are using 2 or more memory sticks, try reducing the RAM amount.
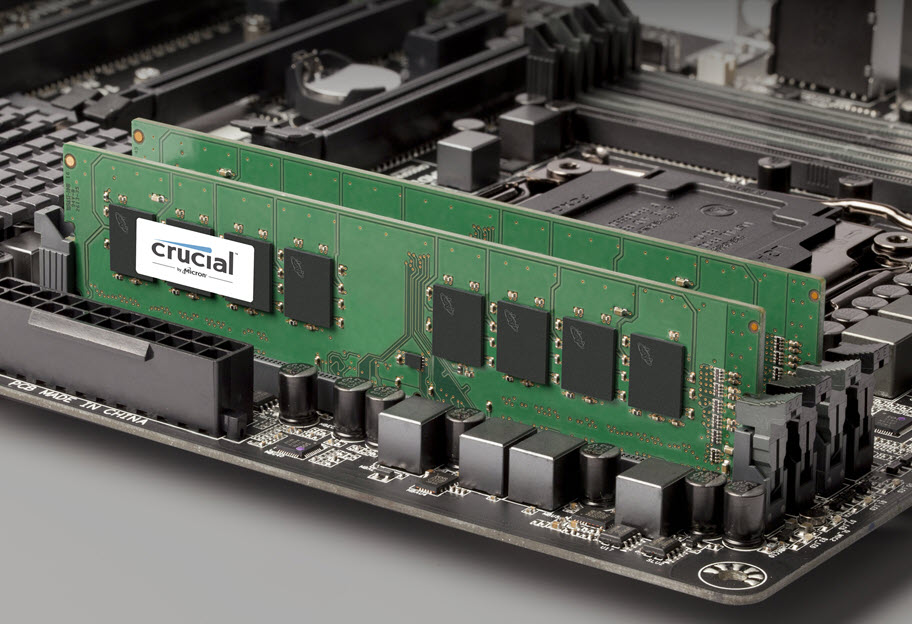
You can also use a free memory testing tool like MemTest86 or OCCT to check if your RAM is stable. Be sure to test one memory stick at a time. If you are not familiar with computer hardware, consult your computer manufacturer or local repair shop.
Solution 4: Perform a System Restore
You can do a system restore to return your computer to an earlier state while keeping most of the personal files. If your System Protection is turned on, Windows will create a restore point before you install the driver. Then you can follow these steps to restore the driver to an earlier version to fix this issue.
System Restore allows your system to go back to an earlier state. This will reset most of the system settings but it won’t affect your personal data.
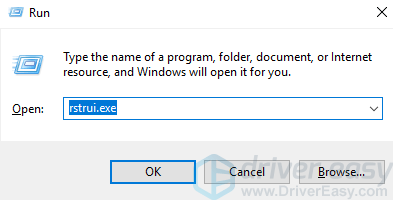
1) Press Win+R (Windows logo key and R key) at the same time to invoke a run box.
2) Type rstrui.exe and click OK. The System Restore Window will open.
3) Click Next then you may see the following screen. Select a restore point created before the error occurred. You can tell from the created Date and Time. Click Next to continue and follow the on-screen instructions to finish the restore.

4) Reboot your PC and check to see if the blue screen is gone.
Solution 5: Try to analyze the crash log
This method requires some computer knowledge. If the fixes above didn’t give you luck, you can try the following steps to locate the root cause and research for possible solutions. (Note this will provide troubleshooting clues rather than actual fixes to the error, which would be useful for users who are looking for alternatives to reinstalling.)
Normally Windows will generate a memory dump file when a bluescreen happens for debugging purposes. You can use certain tools like WinDbg to analyze the dump file and view the crash log to determine what could be the cause of the bluescreen.
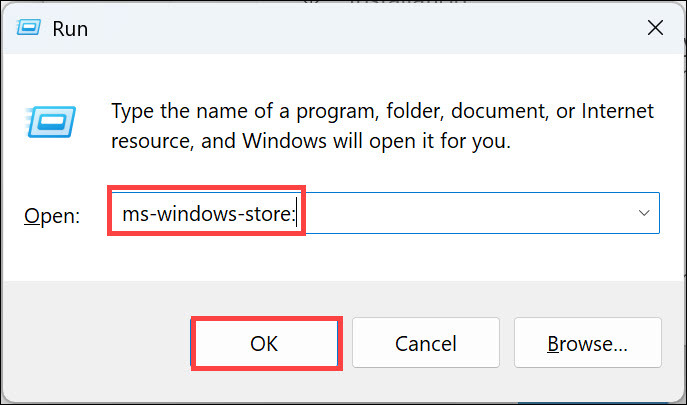
- On your keyboard, press Win+R to invoke the Run box. Type or paste ms-windows-store: and click OK to open the Microsoft Store app.
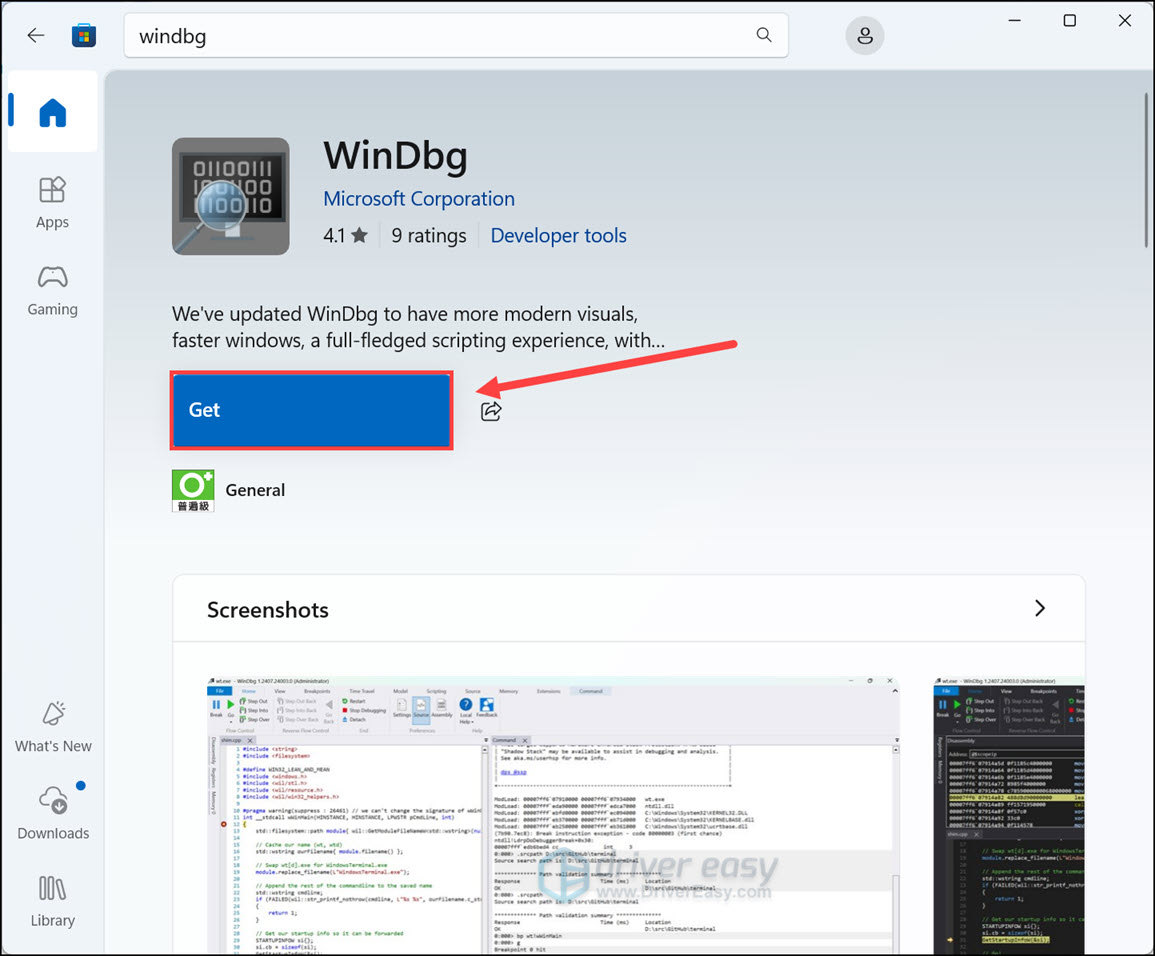
- Search and install the WinDbg app from Microsoft Store.
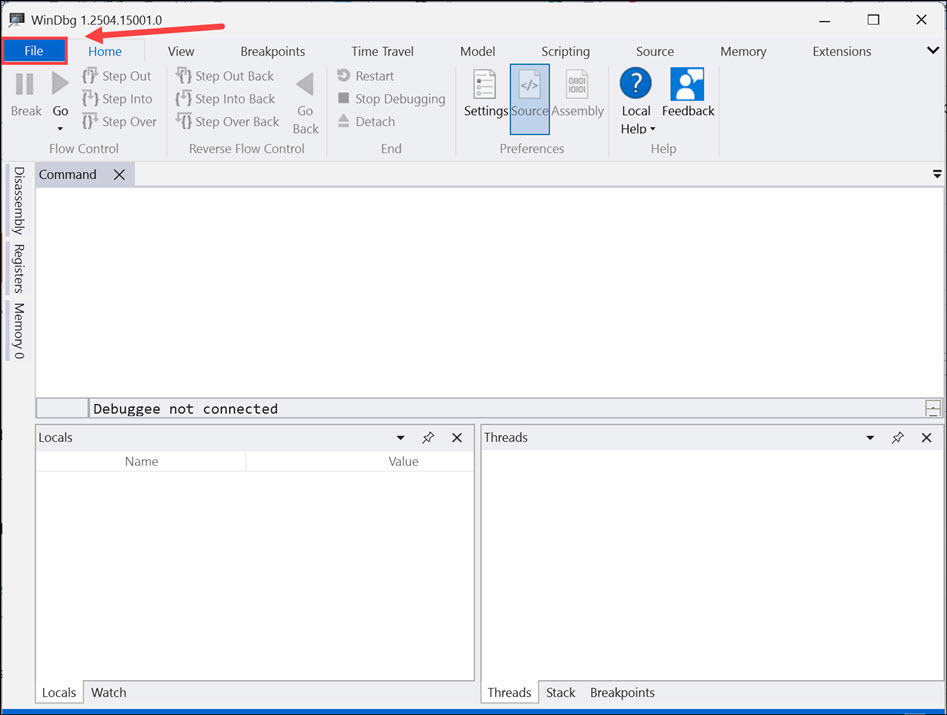
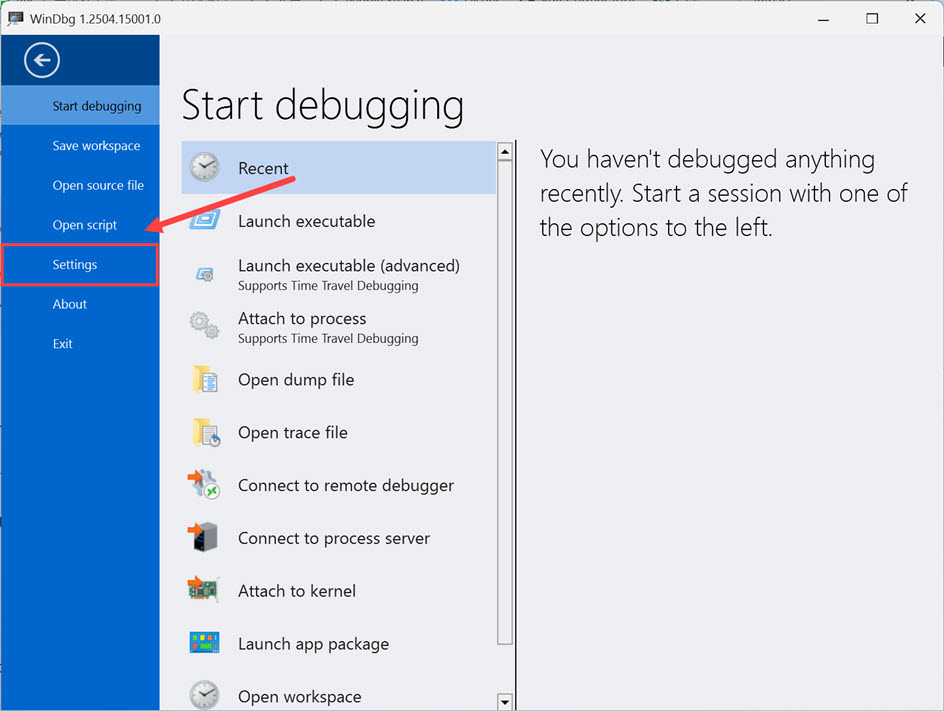
- Open WinDbg. At the top left corner, click File.
- Click Settings.
- Click Debugging settings.
In the Default symbol path, type or paste srv*https://msdl.microsoft.com/download/symbols and click OK.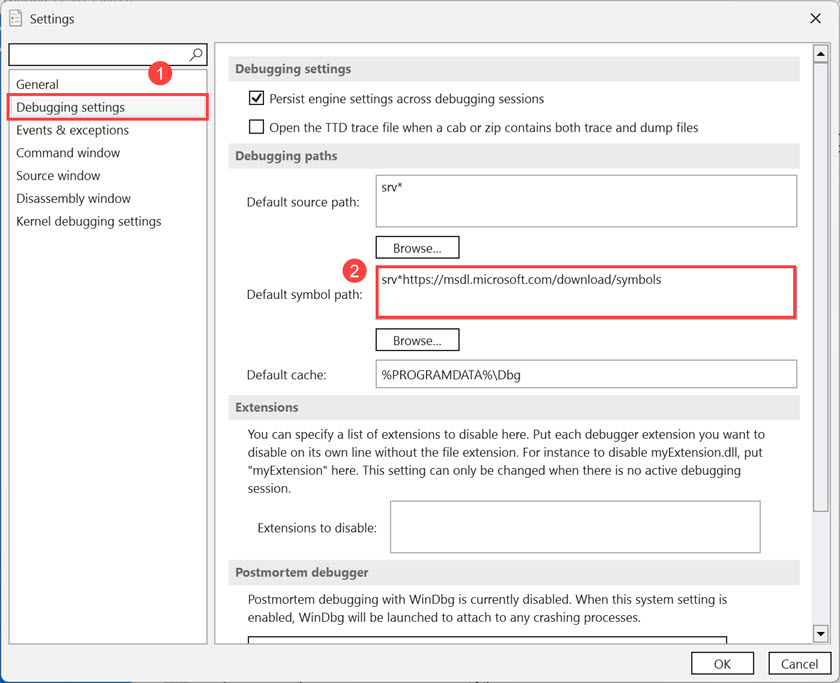
- Click File. Then click Open source file, and select Open dump file. In the right pane, click Browse to select a dump file and then click Open.
Usually you can find dump files in these locations (Look for the *.dmp files):
1. C:\Windows\Minidump\
2. C:\Users\{Your_Username}\AppData\Local\CrashDumps\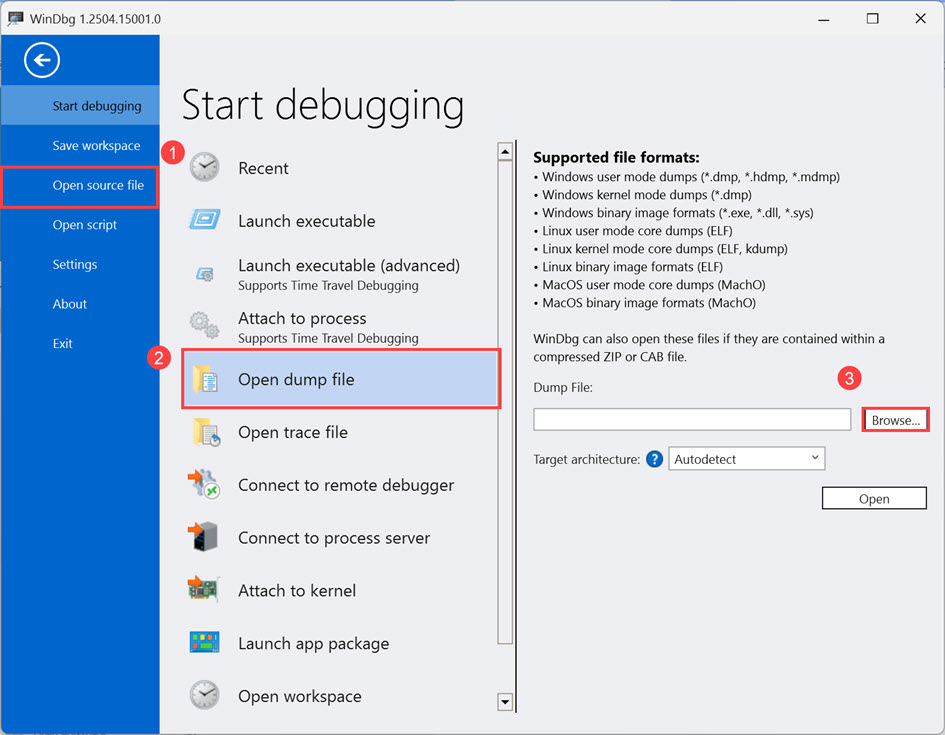
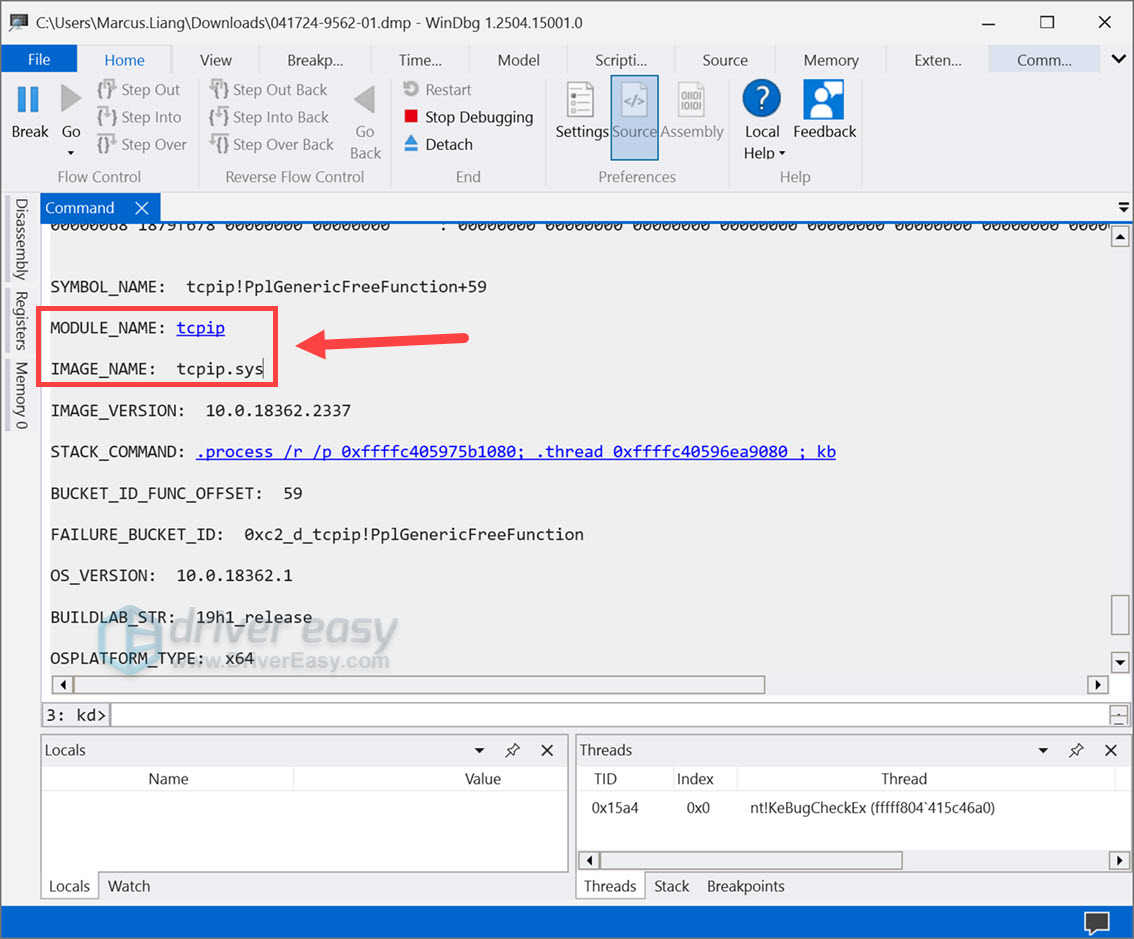
- Type or paste the command !analyze -v and press Enter to start the analysis.
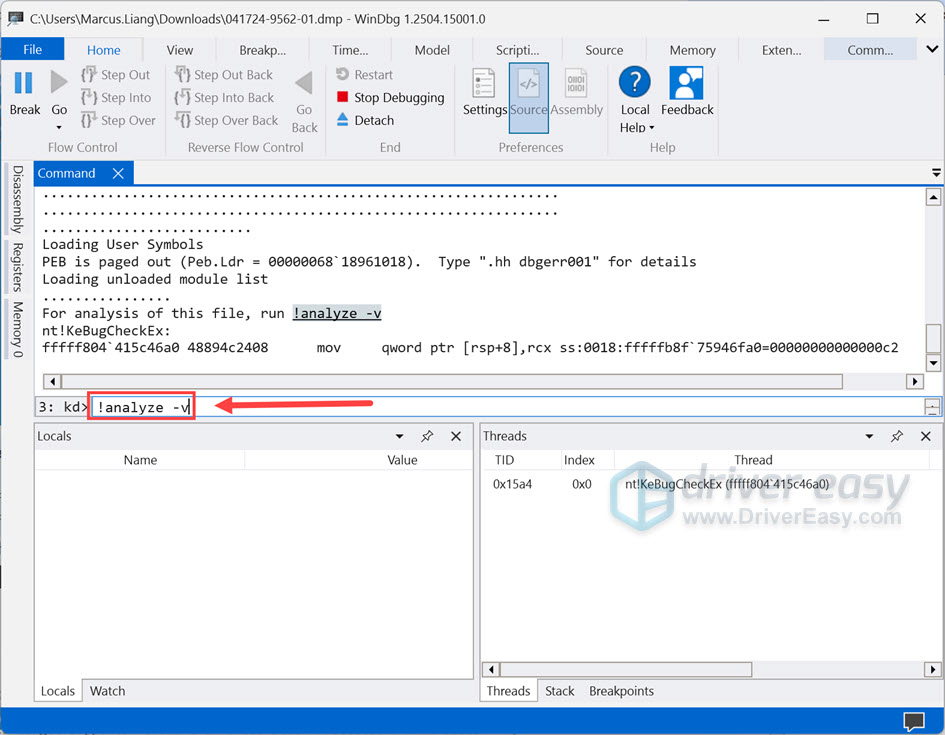
- You should be able to find the problem module and image in the results. Since there could be different causes to this error code, you can search the module/image name along with the error code for further troubleshooting steps.
Solution 6: Reset or reinstall Windows
If all else fails, you may have to reset Windows, or maybe even reinstall it together. Reinstalling will delete all the data on your hard drive, so don’t forget to back up all your important files beforehand.
But treat these options as a last resort, because they both take quite a long time.
Hope the solutions above will help you fix the IRQL NOT LESS OR EQUAL blue screen error. If you have any questions, please feel free to leave your comments. We’d love to hear any ideas and suggestions.