


Has it happened to you that the integrated camera on your Lenovo laptop suddenly stops working?
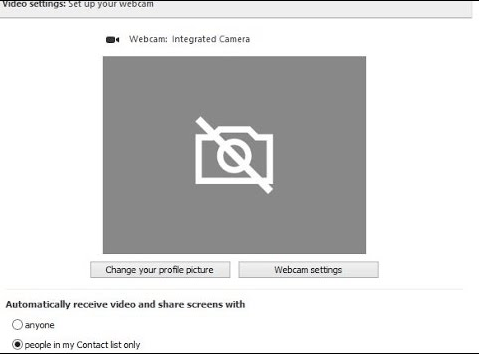 You have no clue as to why would this happen since you were Skyping with your friends just a day ago. You have checked the status of your camera and the wiring condition trying to find out the problem, but everything looks fine.
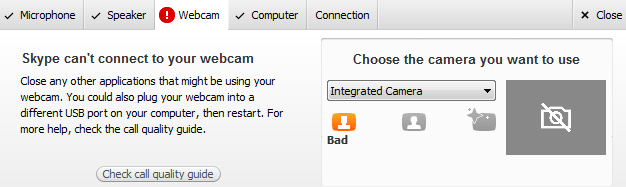 That leaves you one possible cause, outdated camera driver.
Here is a post showing you how you could update your Lenovo integrated camera in three different ways, please choose accordingly.
Ways to Update Lenovo Integrated Camera Driver
1. Windows Update
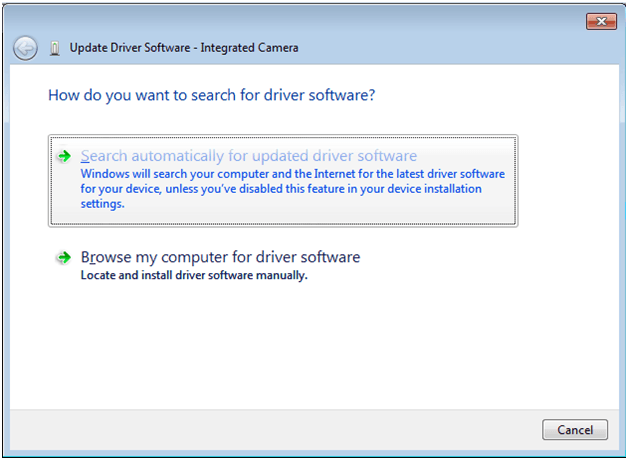
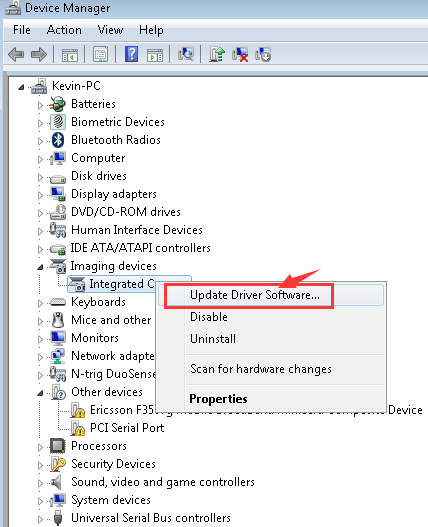
1) Go to Device Manage.
2) You will be able to see the Integrated Camera option under Imaging devices category. Right click it and choose Update Driver Software….
That leaves you one possible cause, outdated camera driver.
Here is a post showing you how you could update your Lenovo integrated camera in three different ways, please choose accordingly.
Ways to Update Lenovo Integrated Camera Driver
1. Windows Update
1) Go to Device Manage.
2) You will be able to see the Integrated Camera option under Imaging devices category. Right click it and choose Update Driver Software….
 4) Wait for a couple of seconds, and you should be able to see the notification telling you that the driver for your integrated camera has been installed.
Please note that not all drivers update could be found in this way, so it is suggested that you use the following method to find the driver that you need.
2. Lenovo Support
Note: Before you do this, you need to know your operating system and your laptop model.
You could find your laptop model in your system information panel. Just type in system information in the Start panel and you will see it.
It is always recommended that you download the drivers from the official website of the manufacturers of your PC or motherboard when you decide to download and install them manually.
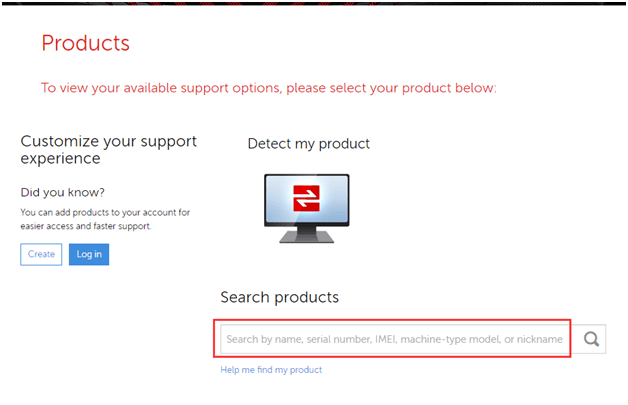
We are going to Lenovo support webpage for the integrated or built-in camera driver for it. Website such as http://support.lenovo.com/us/en, http://www.lenovo.com/sg/en/ and http://www.lenovo.com/ca/en/ should be able to help.
The following is the demonstration done on the US website.
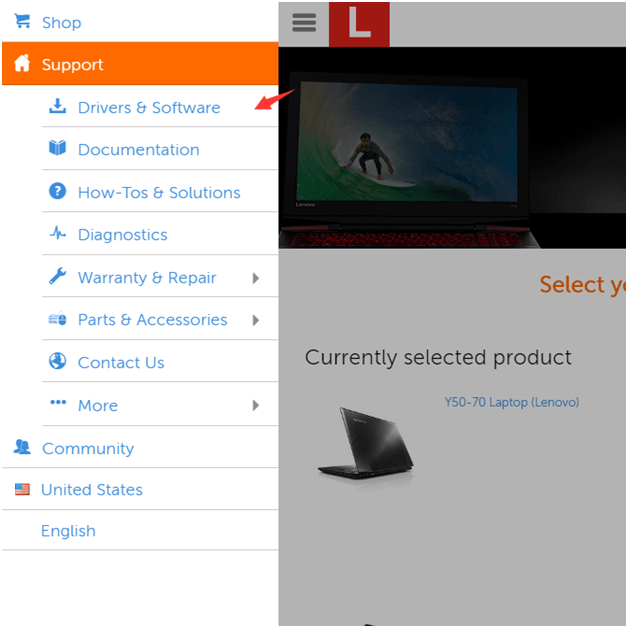
1) Go to Lenove US suport. On the left side of the page, there is an icon with three bars.
Click the icon and you will see the Drivers & Software option. Single click the option.
4) Wait for a couple of seconds, and you should be able to see the notification telling you that the driver for your integrated camera has been installed.
Please note that not all drivers update could be found in this way, so it is suggested that you use the following method to find the driver that you need.
2. Lenovo Support
Note: Before you do this, you need to know your operating system and your laptop model.
You could find your laptop model in your system information panel. Just type in system information in the Start panel and you will see it.
It is always recommended that you download the drivers from the official website of the manufacturers of your PC or motherboard when you decide to download and install them manually.
We are going to Lenovo support webpage for the integrated or built-in camera driver for it. Website such as http://support.lenovo.com/us/en, http://www.lenovo.com/sg/en/ and http://www.lenovo.com/ca/en/ should be able to help.
The following is the demonstration done on the US website.
1) Go to Lenove US suport. On the left side of the page, there is an icon with three bars.
Click the icon and you will see the Drivers & Software option. Single click the option.
 Or let the website do the detection for you.
 Then move on to the next step.
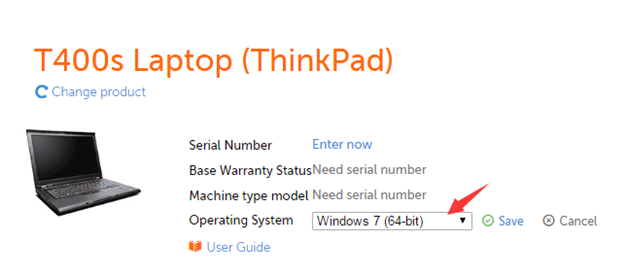
3) We are using a T400s laptop with Windows 7, 64-bit operating system as shown on the screen shot here.
You could choose to set up your operating system here or choose to set it later and roll down to the download section.
Then move on to the next step.
3) We are using a T400s laptop with Windows 7, 64-bit operating system as shown on the screen shot here.
You could choose to set up your operating system here or choose to set it later and roll down to the download section.
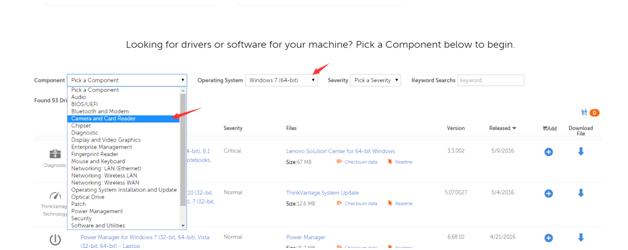
 4) Roll down to the download section on the same webpage. Choose from the searching box on top of the page to save you time to find the driver that you need.
We are going for Camera and Card Reader option under Windows 7(64-bit) operating system.
4) Roll down to the download section on the same webpage. Choose from the searching box on top of the page to save you time to find the driver that you need.
We are going for Camera and Card Reader option under Windows 7(64-bit) operating system.
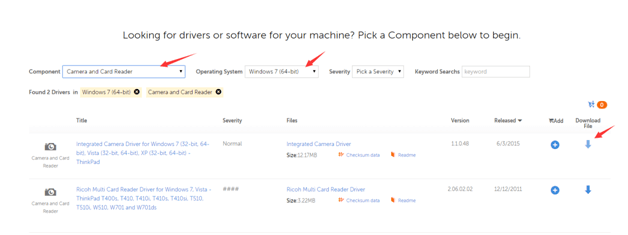
 5) After the setting, click the download link and then the driver will be downloaded.
 6) After the download, install as instructed.
Please remember to reboot your computer after this to make the latest driver work.
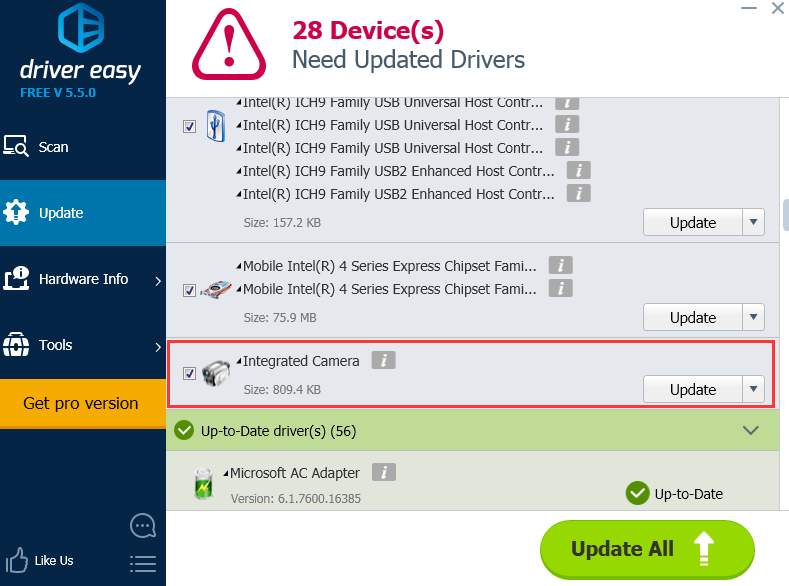
3. Driver Easy
There are only two steps involved:
1) Run the scan in Driver Easy by pressing the Scan Now button.
6) After the download, install as instructed.
Please remember to reboot your computer after this to make the latest driver work.
3. Driver Easy
There are only two steps involved:
1) Run the scan in Driver Easy by pressing the Scan Now button.
You have no clue as to why would this happen since you were Skyping with your friends just a day ago. You have checked the status of your camera and the wiring condition trying to find out the problem, but everything looks fine.
That leaves you one possible cause, outdated camera driver.
Here is a post showing you how you could update your Lenovo integrated camera in three different ways, please choose accordingly.
Ways to Update Lenovo Integrated Camera Driver
1. Windows Update
1) Go to Device Manage.
2) You will be able to see the Integrated Camera option under Imaging devices category. Right click it and choose Update Driver Software….
4) Wait for a couple of seconds, and you should be able to see the notification telling you that the driver for your integrated camera has been installed.
Please note that not all drivers update could be found in this way, so it is suggested that you use the following method to find the driver that you need.
2. Lenovo Support
Note: Before you do this, you need to know your operating system and your laptop model.
You could find your laptop model in your system information panel. Just type in system information in the Start panel and you will see it.
It is always recommended that you download the drivers from the official website of the manufacturers of your PC or motherboard when you decide to download and install them manually.
We are going to Lenovo support webpage for the integrated or built-in camera driver for it. Website such as http://support.lenovo.com/us/en, http://www.lenovo.com/sg/en/ and http://www.lenovo.com/ca/en/ should be able to help.
The following is the demonstration done on the US website.
1) Go to Lenove US suport. On the left side of the page, there is an icon with three bars.
Click the icon and you will see the Drivers & Software option. Single click the option.
Or let the website do the detection for you.
Then move on to the next step.
3) We are using a T400s laptop with Windows 7, 64-bit operating system as shown on the screen shot here.
You could choose to set up your operating system here or choose to set it later and roll down to the download section.
4) Roll down to the download section on the same webpage. Choose from the searching box on top of the page to save you time to find the driver that you need.
We are going for Camera and Card Reader option under Windows 7(64-bit) operating system.
5) After the setting, click the download link and then the driver will be downloaded.
6) After the download, install as instructed.
Please remember to reboot your computer after this to make the latest driver work.
3. Driver Easy
There are only two steps involved:
1) Run the scan in Driver Easy by pressing the Scan Now button.

8
8 people found this helpful
0 Comments
Most Voted