


It’s a bummer when your OBS Studio lags when you’re streaming or recording videos. The reasons why your OBS lags depend on when you’re experiencing the lag.
If you’re experiencing lags when streaming, culprits often boil down to network latency. But if it keeps lagging even if you’re recording, or exporting your videos, it’s mainly caused by your graphics card.
OBS lags when streaming
When you’re streaming with OBS, network latency is no stranger to live streamers. In order to deliver a smoother watching experience, it’s quite necessary to reduce lag spikes while streaming.
- Stop other bandwidth-intensive activities
- Use the “flushdns” command
- Restart modem & router
- Update network adapter drivers
- Swap Wifi to Ethernet connection
1. Stop other bandwidth-intensive activities
Bandwidth hogging applications will slow down your network speed and trigger latency issues. Make sure you shut down all the other resource-hungry programs before streaming with OBS; if it’s your family members or friends who are doing bandwidth-intensive activities, just pick another time to stream or ask them politely to give way to you.
To close other bandwidth-intensive apps, refer to the following procedure:
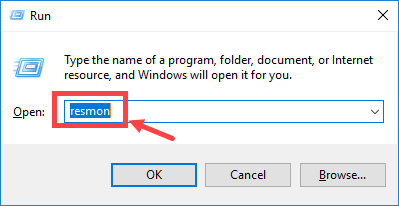
1) On your keyboard, press the Windows logo key and R at the same time to invoke the Run dialog box. Type in resmon and hit Enter.
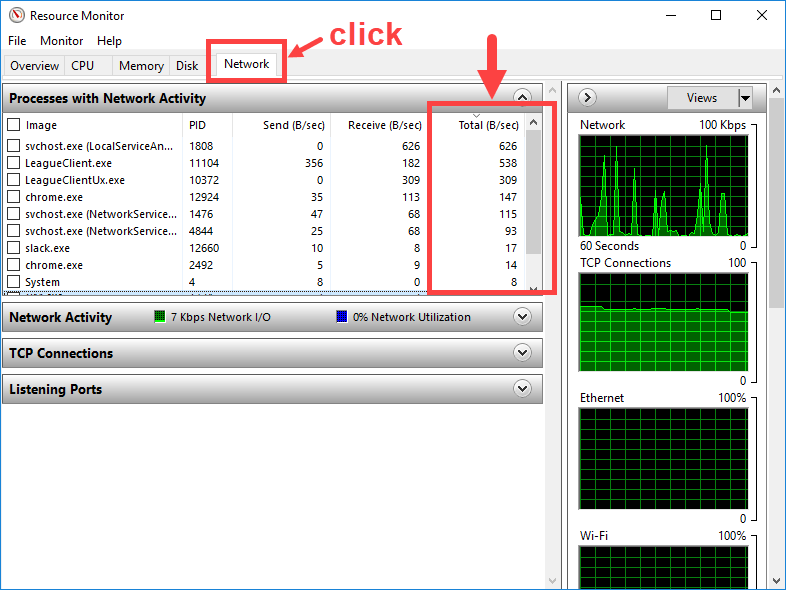
2) In the Resource Monitor window, on the Network tab, take note of the Total (B/sec) column. In this way, you’ll get an intuitive understanding of what process is now using the most of your bandwidth.
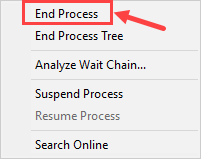
3) Right-click on the application that’s eating up your bandwidth and select End Process.
4) When Windows asks you to confirm, click End process.
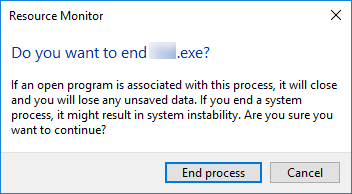
Note: Make sure you know what sort of applications you’re closing. DO NOT stop any programs that you’re not familiar with in case you mistakenly end the crucial ones (often related to your system) such as sychost.exe.
If you find no luck getting closer to the solution, you should proceed to Fix 2.
2. Use “flushdns” command
This command is pretty useful to solve network-related issues. When you’re having major lag spikes in games or just feel that your network connection is unstable/stops working, you should always give this fix a try.
1) On your taskbar, type command into the search box. Then right-click on the Command Prompt result and select Run as administrator.
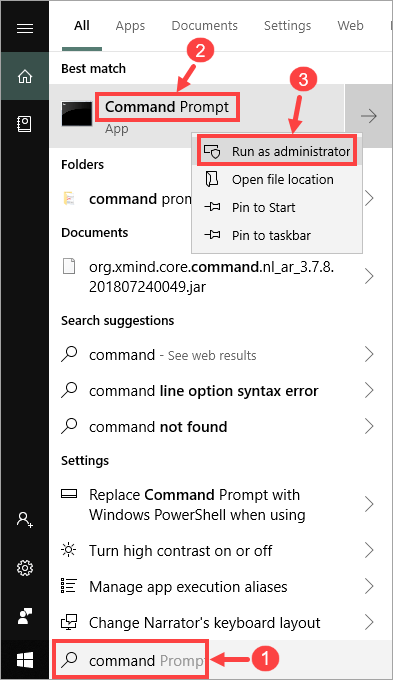
Click Yes if you’re prompted about permission.
2) In your command prompt window, enter the following command:
ipconfig /release
Note that there’s a space between “ipconfig” and “/”.
Press Enter on your keyboard and wait till the release process is complete.
3) Then type the following command:
ipconfig /renew
Note that there’s a space between “ipconfig” and “/”.
Press Enter on your keyboard and wait till the renewal process is complete.
4) This time, enter:
ipconfig /flushdns
Note that there’s a space between “ipconfig” and “/”.
Press Enter on your keyboard and wait till the process is complete.
Exit the Command Prompt window. Now check to see if your OBS is still laggy. If it is, move on to Fix 3.
3. Restart modem & router
You should restart your modem and router especially if they haven’t been switched off for a long time. Just give them some time to cool off and clear up the cache. Here’s how to do it:
1) Unplug both your router and modem.


2) Wait at least 30 seconds to let the two machines cool down a bit.
3) Plug the modem back in and wait until the indicator lights are back to their normal state.
4) Plug the router back in this time. Likewise, wait until the indicator lights are back to their normal state.
5) Now that your routers and modem have been restarted properly, you can launch OBS again to see if it’s still laggy.
In case this fix is to little or no avail, read on and check out the next one.
4. Update network adapter drivers
Your network latency is sometimes caused by an outdated or corrupt driver. If you’re not sure whether your network card driver is up-to-date, you should check.
You can do this in Windows Device Manager, but in most cases, Windows won’t provide you with the latest and even necessary driver. You can also find the correct driver online (say, from the manufacturer’s website), download it and install it step by step. But that’s rather time-consuming and error-prone if you’re not familiar with the procedure to update drivers.
All in all, if you don’t have the time, patience or computer skills to update your device drivers manually, you can do it automatically with Driver Easy.
Driver Easy will automatically recognize your system and find the correct drivers for it. You don’t need to know exactly what system your computer is running, you don’t need to risk downloading and installing the wrong driver, and you don’t need to worry about making a mistake when installing. Driver Easy takes care of everything.
You can update your drivers automatically with either the FREE or the Pro version of Driver Easy. But with the Pro version it takes just 2 clicks (and you get full support and a 30-day money back guarantee):
1) Download and install Driver Easy.
2) Run Driver Easy and click the Scan Now button. Driver Easy will then scan your computer and detect any problem drivers.

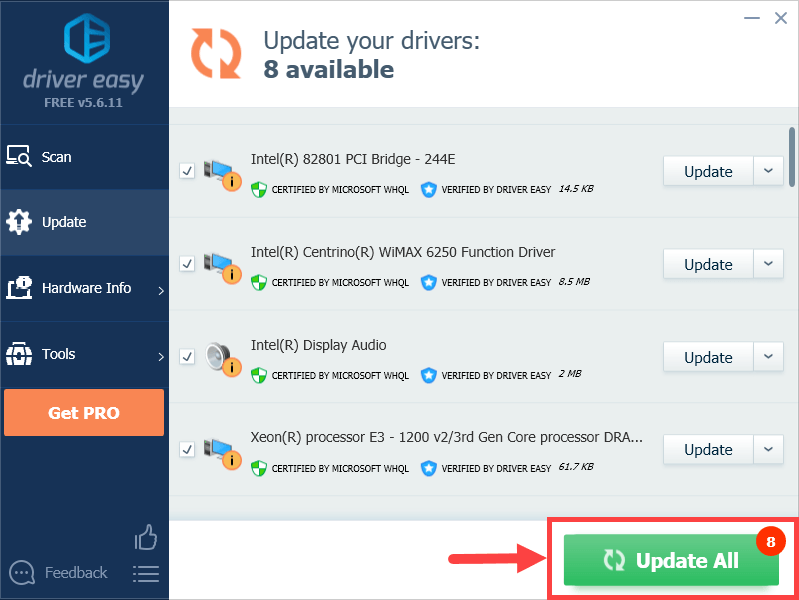
3) Click the Update button next to a flagged driver to automatically download the correct version of that driver, then you can manually install it (you can do this with the FREE version).
Or click Update All to automatically download and install the correct version of all the drivers that are missing or out of date on your system. (This requires the Pro version which comes with full support and a 30-day money back guarantee. You’ll be prompted to upgrade when you click Update All.)
If you have any problems using Driver Easy Pro to update your drivers, please feel free to email us at support@drivereasy.com. We are always here to help.
After updating your drivers, check to see whether the latency issues still remain. If they do, try out the next fix below.
5. Swap Wifi to Ethernet connection
If none of the fixes above work out for you, then maybe you should shift your focus to the Wi-Fi signals around (only if you’re a Wi-Fi user). Admittedly, the wireless network is not as stable as a wired network so you’ll get more interruptions for having your computer connected to Wi-Fi. Say, when you’re streaming videos or playing games far away from your router, the Wi-Fi signals you receive can be rather weak and hence the reason for latency.
To clear up this problem, you should swap Wi-Fi to an Ethernet connection but this is not practical for everyone. Alternatively, you can try using a powerline Ethernet adapter which extends the reach of your home network to places with poor wireless coverage.
Also, you should avoid possible wireless interference that weakens your Wi-Fi signals such as cordless phones and microwave ovens. Place them far away from your router, or simply move your laptop to a new location with stronger Wi-Fi signals.
OBS lags when recording
Overloaded GPU is the main cause reason for the lag issue. Luckily, below you will find some solutions that do work for many OBS users:
- Adjust OBS settings
- Update graphics card drivers
- Shut down unnecessary programs
- Lower in-game graphics settings
1. Adjust OBS settings
There’re quite a few guidelines for how to find out the OBS settings that give you the best streaming/recording performance. You can simply google “obs settings for streaming” and follow the instructions ranking high; also keep in mind that you may need to play around with different settings until you find the ones that work wonders. For example, you could start with the settings below:
Open up the Settings window in OBS, then go to the Output tab.
- Set Output Mode to Simple;
- Set Encoder under Streaming to Software (X264);
- Switch Recording Quality to Indistinguishable Quality;
- Change Recording Format to flv.

Note that settings optimized for different streaming services (Twitch, Youtube, etc.) may vary, and you can probably find the recommended settings on their official websites (e.g., OBS settings for Twitch).
2. Update graphics card drivers
Updating drivers is the solution to various issues, including graphics lag. You can update your GPU driver from either Windows Device Manager or the manufacturer’s website. But if you don’t have the time, skills, and patience to do that, simply use Driver Easy – a reliable and powerful driver updater tool – to help you manage all the driver updates.
If you’re interested in the benefits of Driver Easy, please take a look at Fix 4. The steps to perform driver updates using Driver Easy are exactly the same.
3. Shut down unnecessary programs
If you have too many GPU-intensive programs running in the background, that will definitely slow down the processing speed of your computer and lead to graphics lag. It’s not hard to shut down unnecessary programs, but have you noticed a Windows 10 feature called “Game Bar” that may render poor performance in OBS? If you haven’t, it’s about time you turned it off.
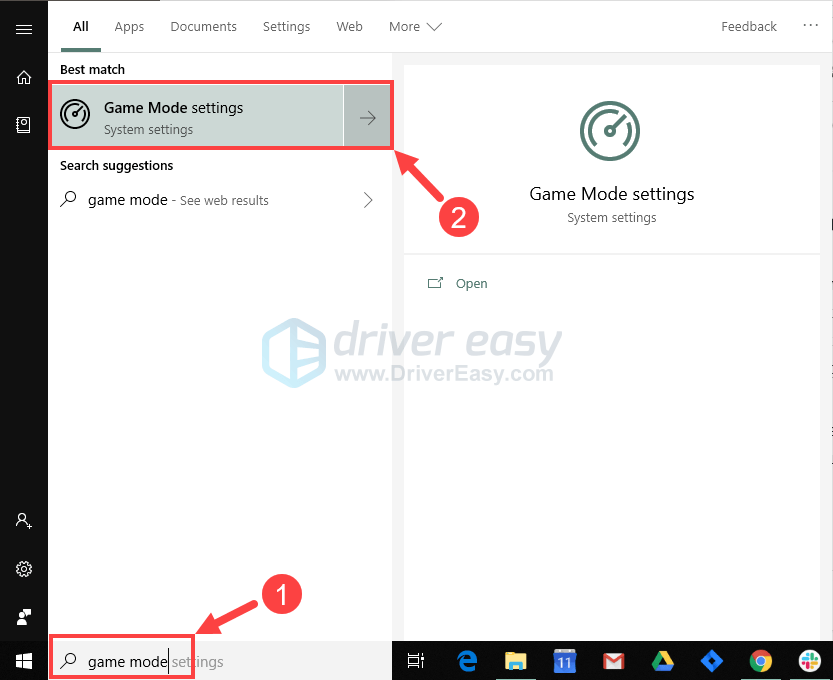
1) On your keyboard, press the Windows logo key and then type game mode in the search box on your taskbar. In the results pane, click Game Mode settings.
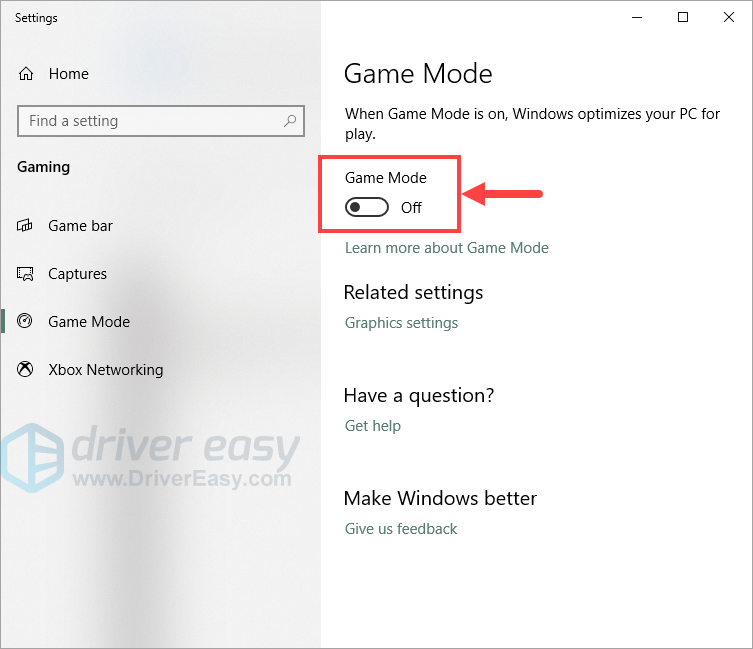
2) In the pop-up window, toggle off Game Mode.
3) Go to the Game bar tab and turn off the toggle button below Record game clips, screenshots, and broadcast using Game bar.

Now check to see whether your lag issue with OBS has been mitigated or resolved.
4. Lower in-game graphics settings
To free up some resources on your GPU, you should turn down the graphics settings of any games running in the meantime. (Surely there’s no need to do that if you’re not streaming a game.) Then, wait to see if you’re still experiencing lag issues with OBS.
There you go – 9 fixes for OBS lagging. Please feel free to leave a comment below if you have any follow-up questions or ideas. Thanks for reading!