


When you’re ready to fight side by side with your mates in Warzone, the last thing you want to know is that your comms won’t work.
Though this might seem tricky, it’s usually not hard to fix at all. In this tutorial, we’ll guide you through several fixes and help you reconnect with your amigos in a jiff.
Try these fixes
You might not need to try all the fixes. Just work your way down until you find the one that scores.
- Check the connection of your device
- Make sure your recording device is set up properly
- Update your audio driver
- Install all Windows updates
- Change in-game settings (PC & Console)
Fix 1: Check the connection of your device
So let’s start with the basics. When your voice chat isn’t working, first you need to check the connection of your device. That means you should check if the cable is broken and is securely plugged into the correct headphone jack. You can also do a simple replug and see how it goes. In addition, if your device comes with a mic switch, make sure it’s turned on.
If there’s nothing suspicious with the connection, you can check out the next fix.
Fix 2: Make sure your recording device is set up properly
For your mic to work in Warzone, you also need to make sure it’s set up properly in your system. To be more specific, you should set your mic as the default recording device on Windows and the Battle.net client.
Here’s how:
Set up your mic correctly on Windows
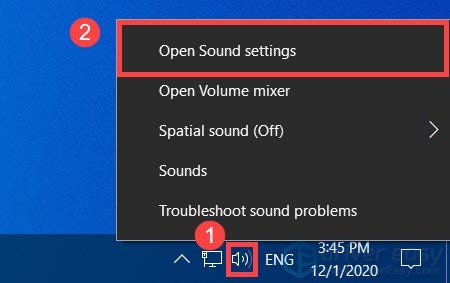
- At the bottom right corner of your screen, right-click the Sound icon and select Open Sound settings.
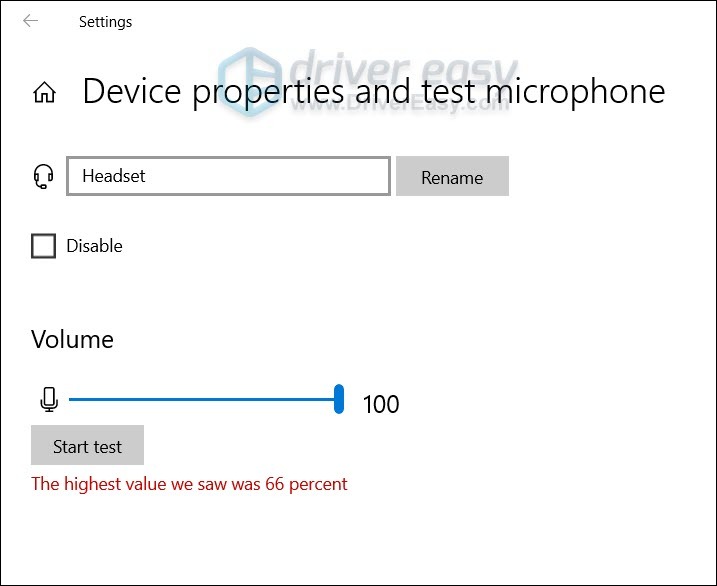
- Under the Input section, make sure your input device is set to your desired one. Then click Device properties and test microphone.

- Uncheck the box next to Disable, and set the slider under Volume to 100.
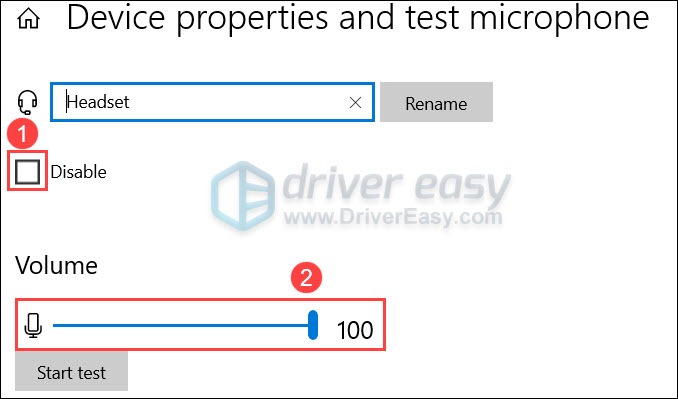
- Click Start test and tap or speak to your microphone. Then click Stop test. If you’re prompted The highest value we saw was xx (xx > 0) percent, it means your microphone is working correctly.
Next you need to enable your mic in the Battle.net client.
Set up your mic correctly in the Battle.net client
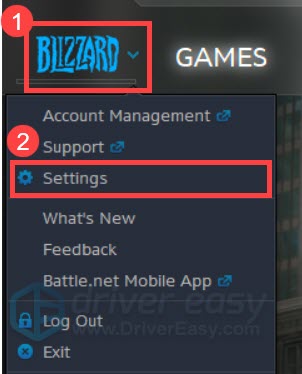
- Open your Battle.net client.
- At the top left corner, click the BLIZZARD icon and select Settings from the drop-down menu.
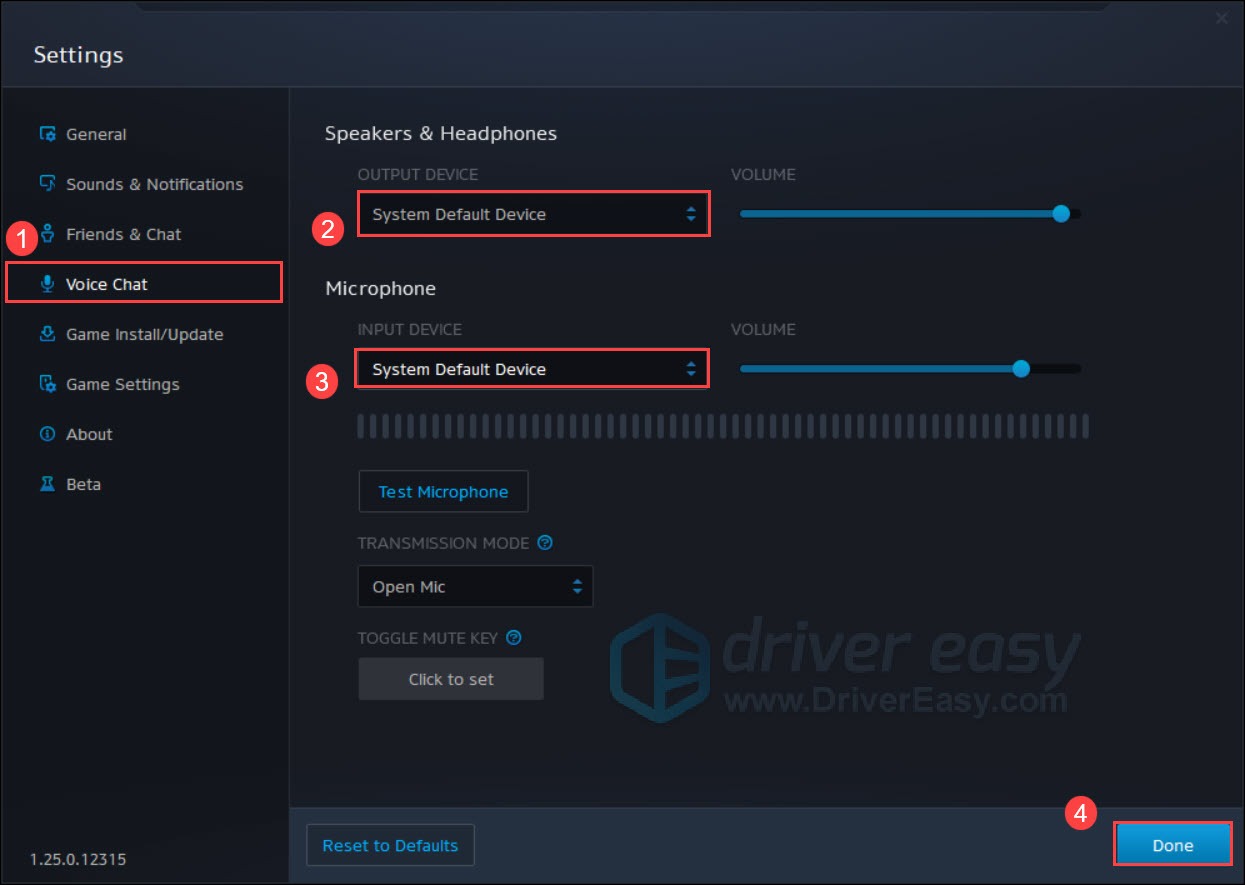
- On the menu to your left, select Voice Chat. Set OUTPUT DEVICE and INPUT DEVICE to System Default Device. Then click Done.
Now you can launch Warzone and test the game chat.
If this fix doesn’t solve the problem, you can continue to the next one.
Fix 3: Update your audio driver
In some cases, the voice chat issue can be driver-related. It could indicate that you’re using a faulty or outdated audio driver. If the last time you updated the audio driver feels like ages ago, definitely do it now as it might save your day.
And if you’re gaming on a high-end setup, you might need additional drivers to unlock some hidden features.
There’re mainly 2 ways you can update your audio driver: manually or automatically.
Option 1: Update your audio driver manually
This might require a certain level of computer knowledge. If you’re familiar with computer hardware, you can spend some time updating your audio driver manually.
First visit your device manufacturer’s website and search for your model. Next you need to download the latest correct driver installer that’s compatible with your operating system. Finally, open the installer and follow the on-screen instructions to update.
Option 2: Update your audio driver automatically (Recommended)
If you don’t have the time, patience or computer skills to update your audio driver manually, you can, instead, do it automatically with Driver Easy. Driver Easy will automatically recognize your system and find the correct drivers for your exact device, and your Windows version, and it will download and install them correctly:
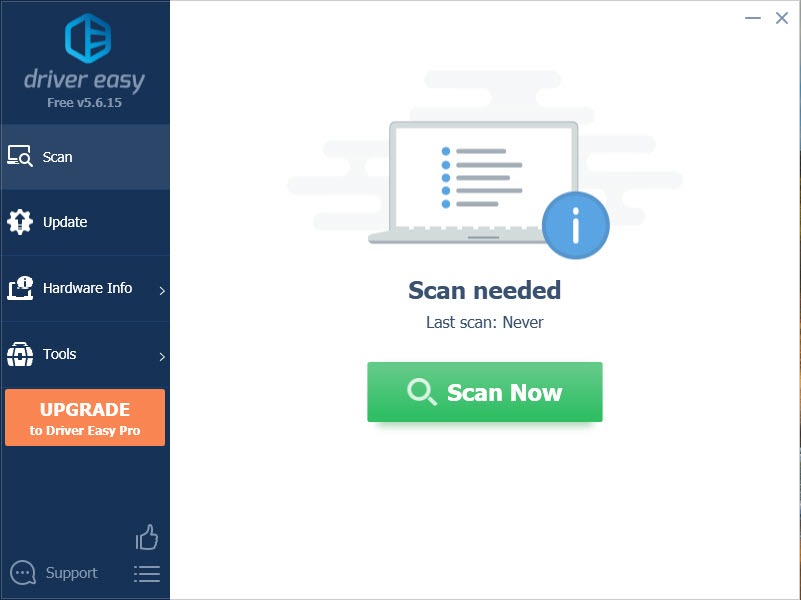
- Download and install Driver Easy.
- Run Driver Easy and click the Scan Now button. Driver Easy will then scan your computer and detect any problem drivers.
- Click Update All to automatically download and install the correct version of all the drivers that are missing or out of date on your system.
(This requires the Pro version – you’ll be prompted to upgrade when you click Update All. If you don’t want to pay for the Pro version, you can still download and install all the drivers you need with the free version; you just have to download them one at a time, and manually install them, the normal Windows way.)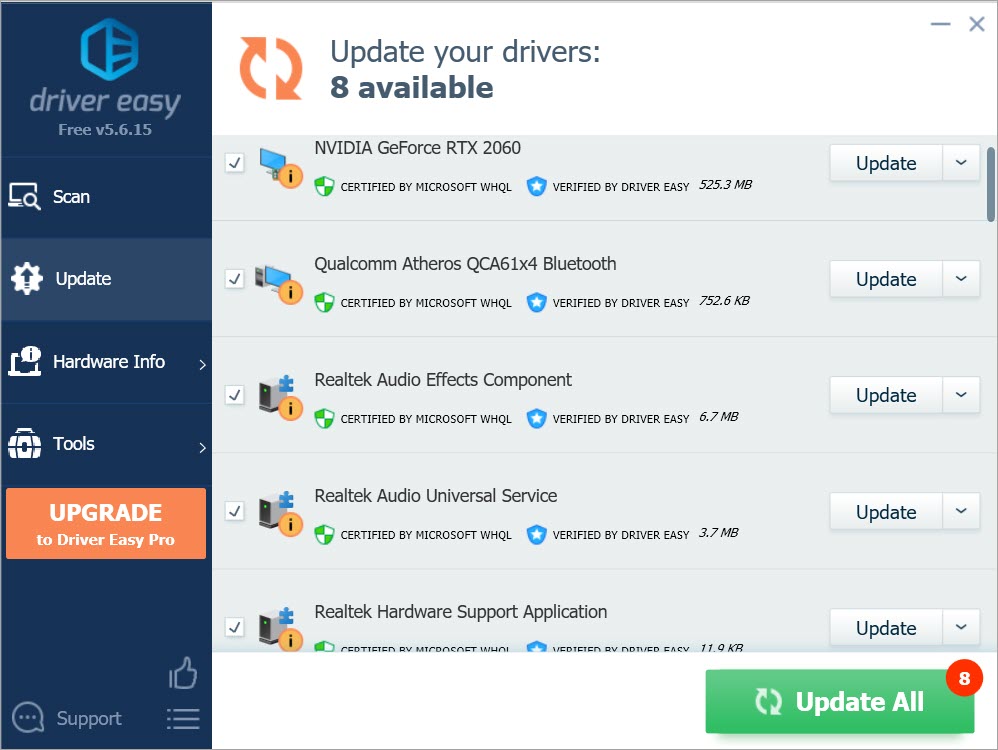
Once you’ve updated your audio driver, restart your PC and see if the voice chat is working in Warzone.
If updating the audio driver doesn’t work for you, simply continue to the next fix.
Fix 4: Install all Windows updates
System updates are as important as driver updates. Updates in Windows 10 include security patches and sometimes a performance booster. And they can to some extend fix some compatibility issues.
So here’s a simple guide:
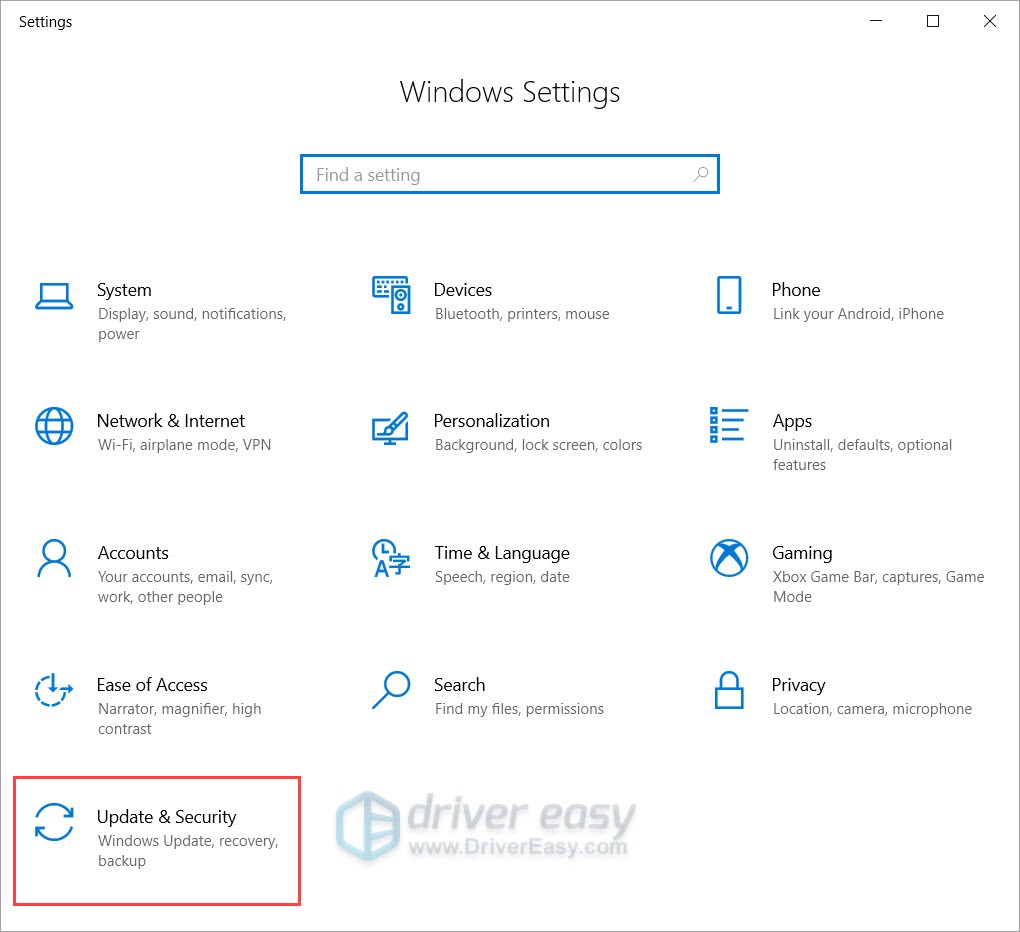
- On your keyboard, press Win+I (the Windows logo key and the i key) to open the Windows Settings app. Click Update & Security.
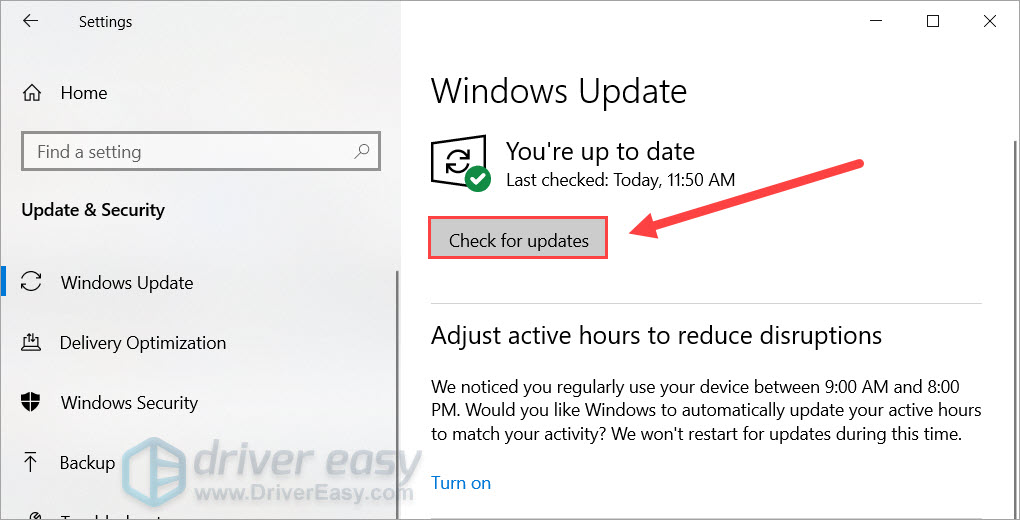
- Click Check for updates. Windows will automatically download and install the available updates. Wait for the process to complete.
After installing all the system updates, do a reboot and check if you can talk in Warzone now.
If the voice chat still won’t work, simply try the next fix below.
Fix 5: Change in-game settings (PC & Console)
If your mic works everywhere except in Warzone, then maybe there’s something wrong with your in-game settings.
You can follow these steps to check:
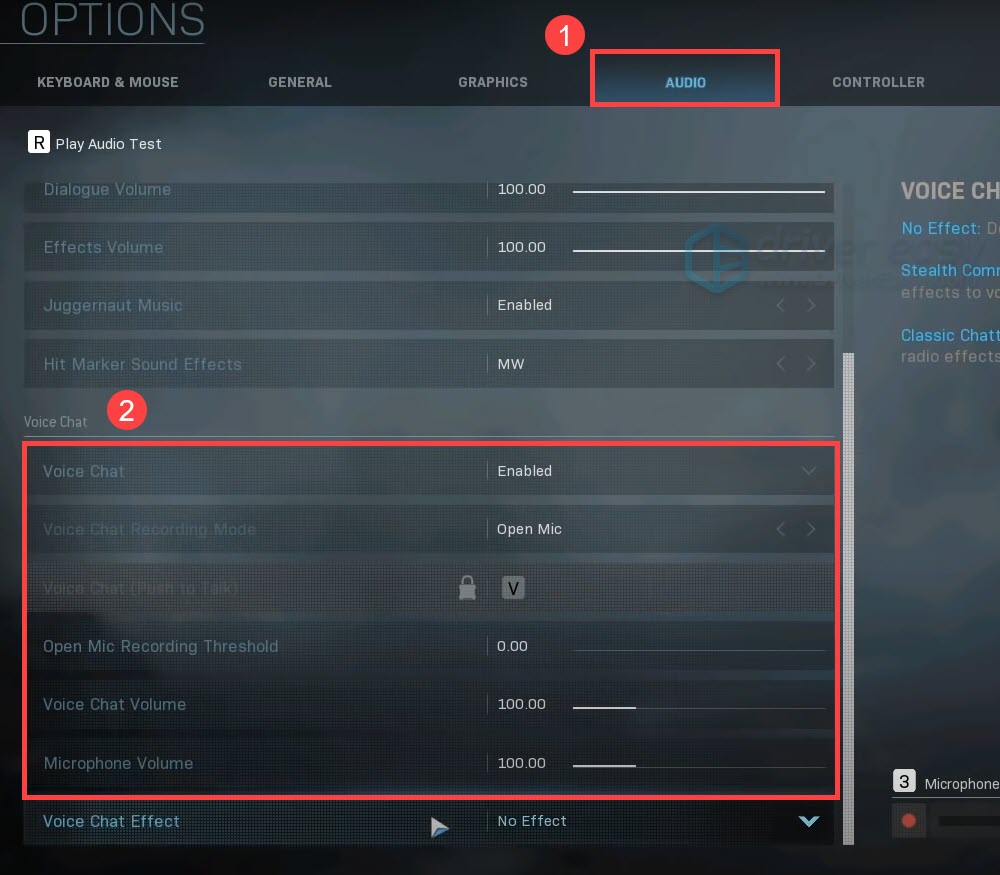
- Launch Warzone and go to Options.
- Navigate to the AUDIO tab. Under the Voice Chat section, set Voice Chat to Enabled, Voice Chat Recording Mode to Open Mic, Open Mic Recording Threshold to 0.00, Voice Chat Volume and Microphone Volume to a moderate value (at least over 100.00).
- Navigate to the ACCOUNT tab. Under the Online section, set Crossplay to Enabled. If you can see an option named Crossplay Communication, make sure it’s set to Enabled. (If your friend isn’t gaming on PC, make sure he or she has enabled this feature as well.)

Now restart Warzone and check if you can chat with your friends now.
So these are the tips proven working for many veterans. Hopefully, you’ve fixed the game chat issue and can sweep the battlefield with your friends. And if you have any questions or ideas, simply jot them down and we’ll get back to you.