


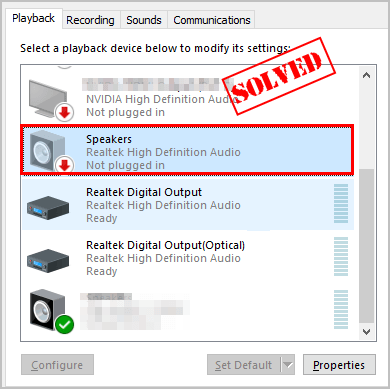
Your Realtek High Definition Audio speaker shows Not plugged in on your computer? Don’t worry. You’re not alone. The good news is, you can fix the Realtek High Definition Audio Not plugged in issue quite easily.
Try these fixes
- Run the audio device troubleshooter
- Try the generic audio driver
- Update your audio driver
- Disable front panel jack detection
- Run System File Checker
- Consider a system reset
Method 1: Run the audio device troubleshooter
When Windows shows Realtek High Definition Audio Not plugged and you have already plugged in your device, you can run the Windows built-in audio device troubleshooter which helps you detect and fix any hardware issue.
To do so, follow these steps:
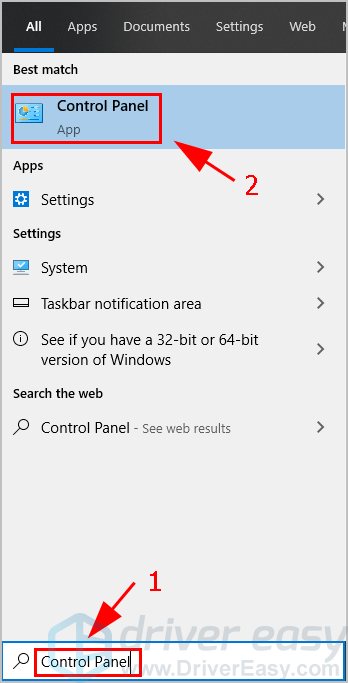
- Type Control Panel in the search bar on your desktop, and click Control Panel to open it.
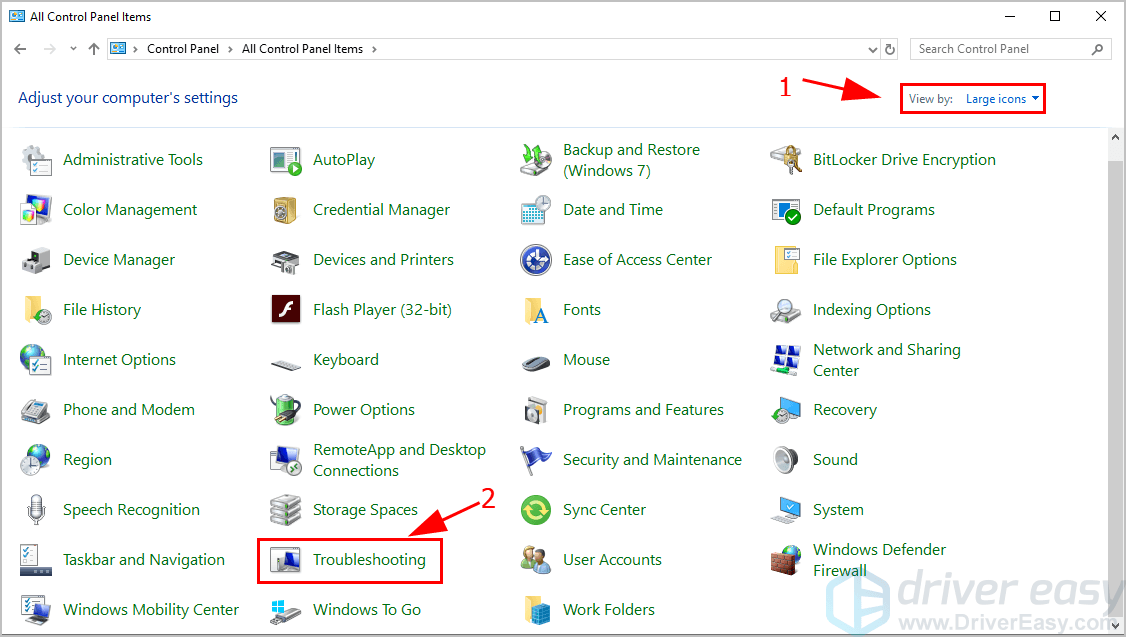
- Ensure to choose View by Large icons or View by Small icons, and click Troubleshooting.
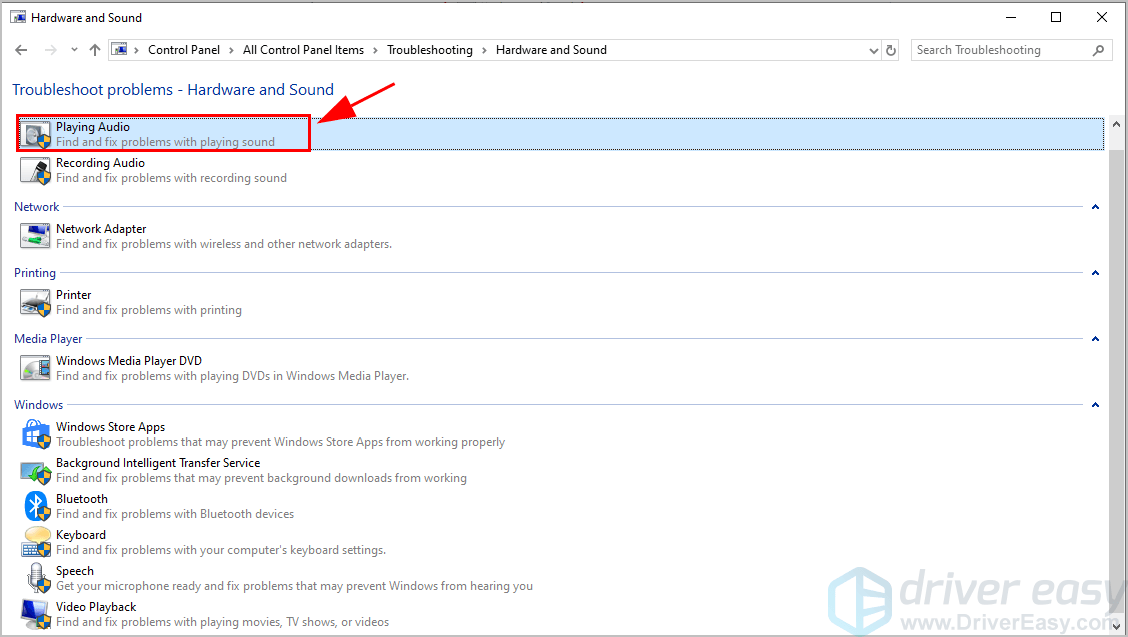
- Click Hardware and Sound.

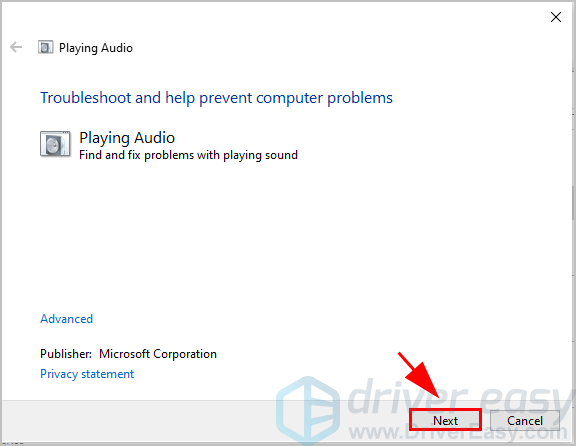
- Click Playing Audio to find and fix problems with playing sound.
- Click Next.
- Follow the on-screen instructions to finish the process.
- Windows will detect and fix your problem if it finds any.
Now restart your computer and see if Realtek High Definition Audio is plugged in.
Method 2: Try the generic audio driver
When your Realtek High Definition Audio says not plugged in, you can try the generic Windows audio driver to see if the problem is with the current audio driver. To do so:
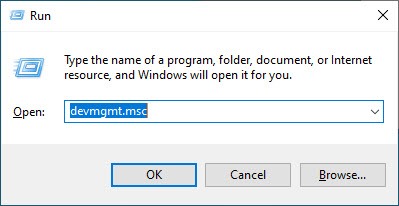
- On your keyboard, press the Windows logo key and R key at the same time. Type devmgmt.msc and hit Enter.
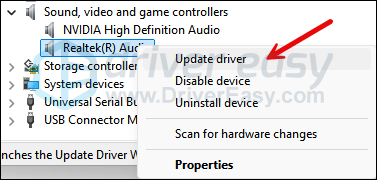
- In Device Manager, expand the category Sound, video and game controllers. Right-click your Realtek sound card (the device name you have may be different from mine, but it should be the one with “Realtek”) and click Update driver.
- Click on Browse my computer for driver software.
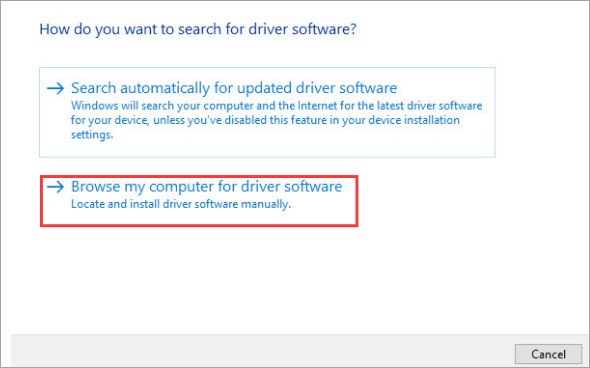
- Click on Let me pick from a list of device drivers on my computer.
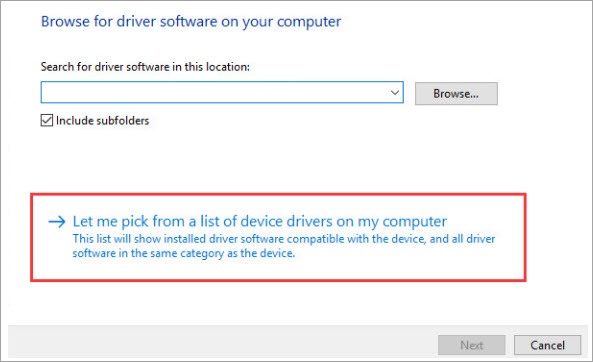
- Select High Definition Audio Device (not another Realtek High Definition driver) and click the Next button. A warning message might pop up, just click the Yes button. Then the driver will be installed successfully.

This solution should fix the problem. If not, proceed to the next fix.
Method 3: Update your audio driver
The missing or corrupted audio driver may cause your Realtek audio device not plugged in. To rule it out as the cause of your problem, you can update your audio device driver to the latest version.
There are two ways to update your audio driver: manually and automatically.
Manual driver update – You can go to the website of your audio device manufacturer, find the latest correct driver for your device, and then download and install it on your computer. This requires time and computer skills.
OR
Automatic driver update – If you don’t have time or patience, you can do it automatically with Driver Easy.
Driver Easy will automatically recognize your system and find the correct drivers for it. You don’t need to know exactly what system your computer is running, you don’t need to risk downloading and installing the wrong driver, and you don’t need to worry about making a mistake when installing.
You can update your drivers automatically with either the 7 days free trial or the Pro version of Driver Easy. It takes just 2 clicks, and you get full support and a 30-day money-back guarantee with the Pro version:
- Download and install Driver Easy.
- Run Driver Easy and click the Scan Now button. Driver Easy will then scan your computer and detect any problem drivers.

- Click the Activate & Update button next to the flagged device to automatically download and install the correct version of this driver.
Or click Update All to automatically download and install the correct version of all the drivers that are missing or out of date on your system (You’ll need the Pro version for this – when you select Update All, you’ll get a prompt to upgrade. If you’re not prepared to purchase the Pro version yet, Driver Easy provides a 7-day trial at no cost, granting access to all Pro features like fast downloads and easy installation. No charges will occur until after your 7-day trial period ends.)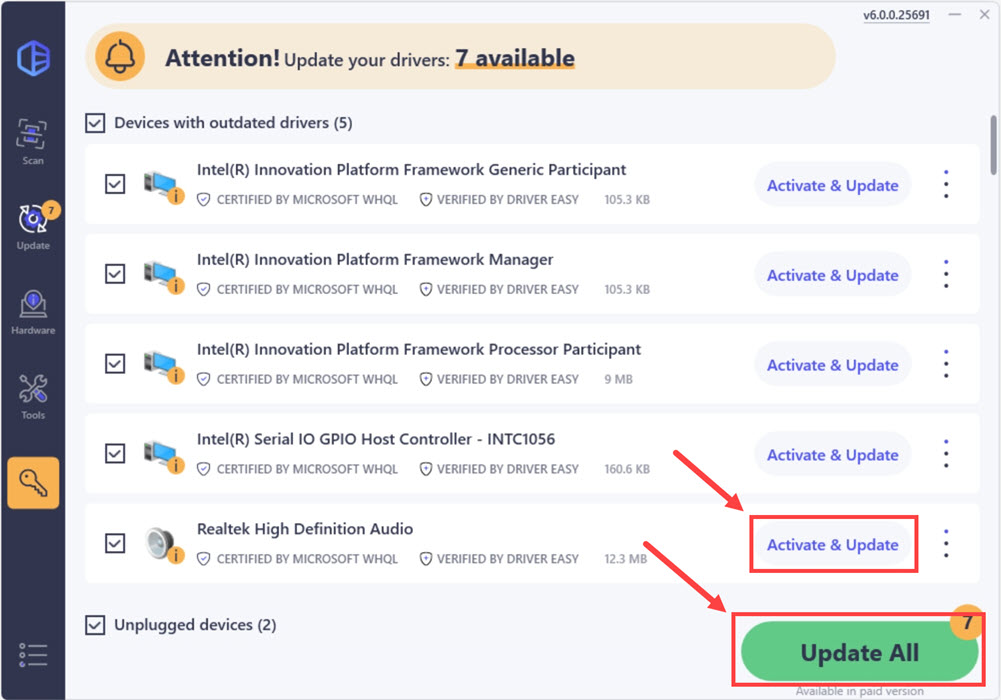
- After updating, restart your computer to take effect.
Re-plug your audio device and see if it works properly.
Still, Realtek High Definition Audio is not plugged in? Don’t worry. There are other fixes.
Method 4: Disable front panel jack detection
Realtek HD Audio Manager allows you to configure sound settings for your Realtek High Definition device. So if you find Realtek High Definition Audio is not plugged in, modifying settings in Realtek HD Audio Manager can help.
- Type Realtek Audio HD Manager in the search bar on your desktop, and click Realtek Audio HD Manager to open it.
Or you can click Realtek Audio HD Manager in the Control Panel to open it.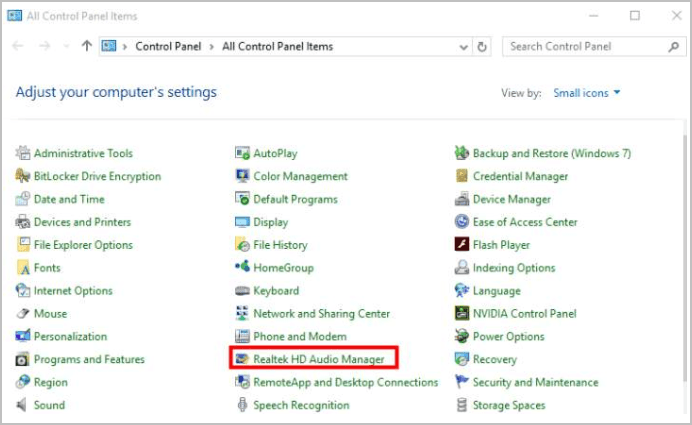
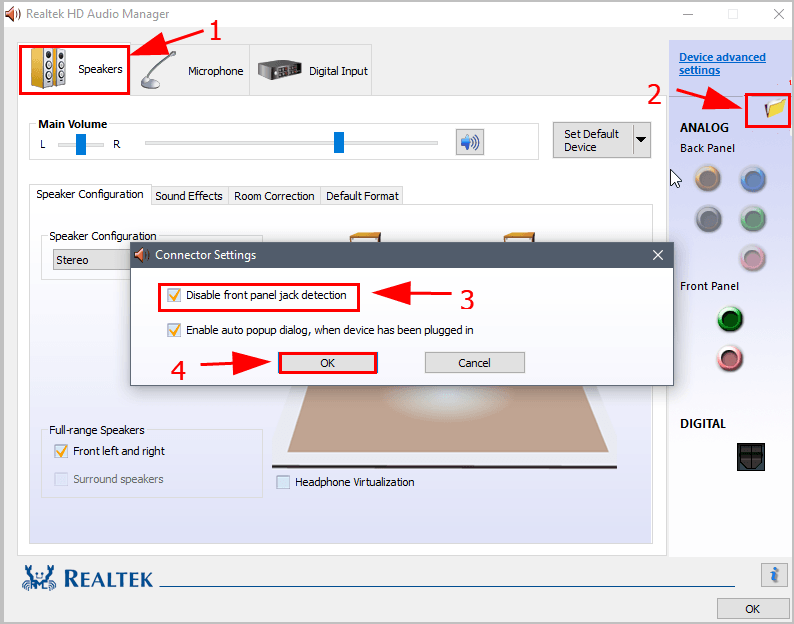
- Click the Speakers tab, and click the folder icon under Device advanced settings. Check the box next to Disable front panel jack detection. Then click OK.
- Save your settings and close Realtek Audio HD Manager.
- Restart your computer and play sound to see if it works.
Still no luck? Don’t give up hope.
Method 5: Run System File Checker
Corrupted system files can cause your hardware not working as expected, including your Realtek High Definition Audio device. In this case, you can run System File Checker (SFC) to fix any problematic system files and your problem can be resolved.
Here is what to do:
- On your keyboard, press the Windows logo key + R key at the same time to invoke the Run box.
- Type “cmd” and press Shift+Ctrl+Enter together to open Command Prompt in the administrator mode.
Note: Do NOT click OK or just press the Enter key as that won’t allow you to open Command Prompt in the administrator mode.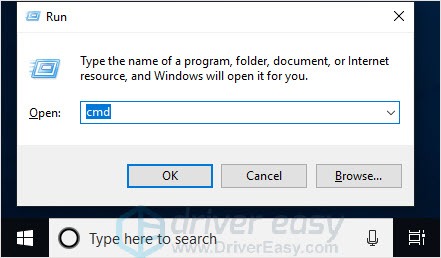
- Type “sfc /scannow” in the window and press Enter. Then wait for the verification is 100% complete.
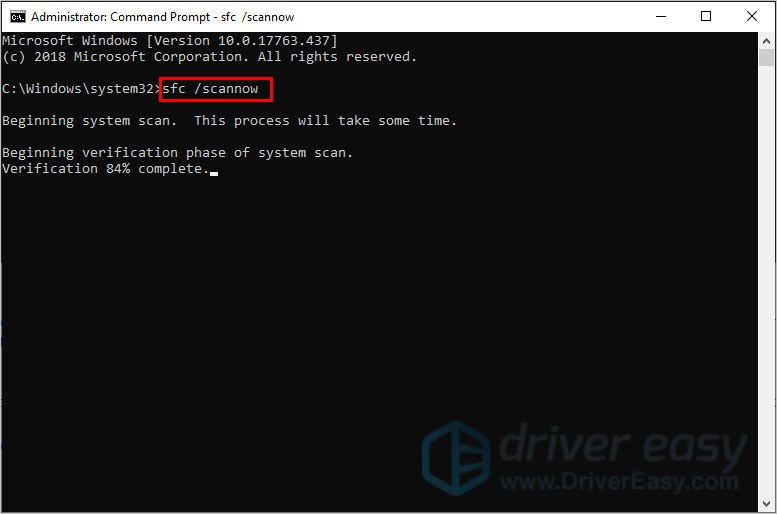
- Restart your computer.
Now plug your audio device and see if it’s plugged in successfully.
Method 6: Consider a system reset
If none of the above helps to fix the Realtek High Definition Audio not plugged in issue, then as a last resort, you may need to consider a Windows reset: it wipes out all software incompatibilities and problems, it’s also the rule of thumb in telling a software problem from a hardware one: if the problem remains even after a system reset, then it’s definitely a hardware problem.
Microsoft has actually made the system reset process much easier: you can choose to keep all your files and install them back after the system reinstall, without having to lose them over to the reinstallation.
To reinstall or reset your computer, here’s a post for your reference: Reinstall/Reset Windows 10 [Step By Step]
If the not plugged-in problem remains even after a reset, the problem could be with your Realtek sound card itself. In that case, you may need to reach out to a hardware technician to get a repair, or consider an external USB sound card instead if your computer is out of warranty.
There you have it – the 6 methods to fix Realtek High Definition Audio Not plugged in.