


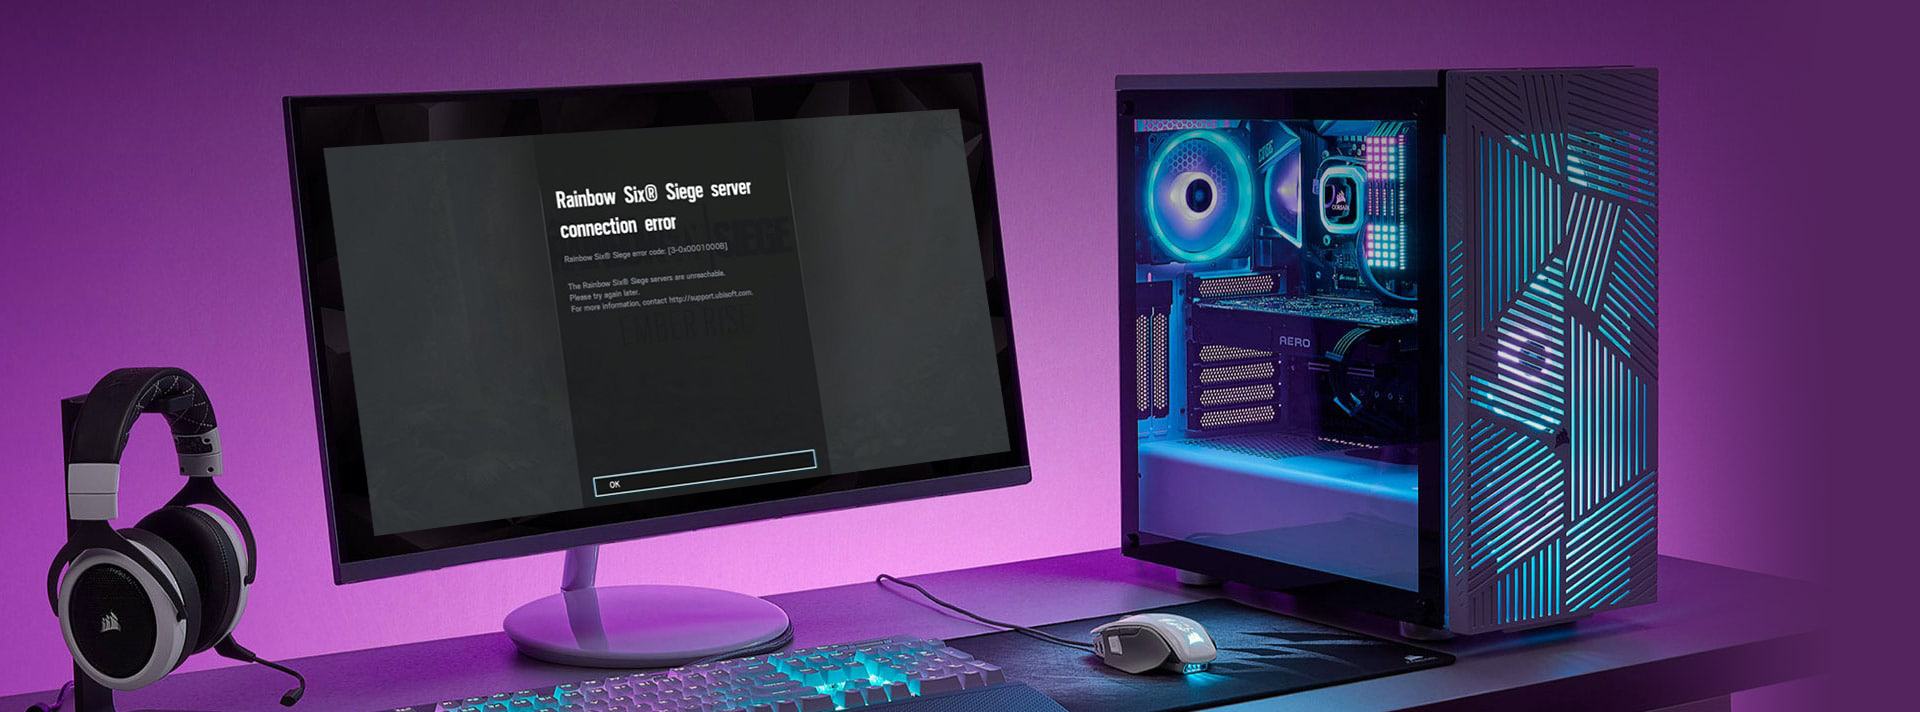
Can’t connect to Rainbow Six Siege servers? You’re not alone. Whether it’s error code 3-0x0001000B or other connection issues, we’ve got you covered. Here in this article, we will show you 9 reliable fixes to help you fix the Rainbow Six Siege Server Connection error and get back online. Read on…
Why you’re getting a server connection error
Whether you’re getting random connection errors or specific error codes like 3-0x0001000B, the server issues are on Ubisoft in most cases. But there’s also a small chance that your home connection is causing this server connection error.
First, you can check Rainbow Six Seige’s live service status. If the servers look fine, but you’re getting this connection error, you can try the following fixes to solve the problem by yourself.
Try these fixes
You don’t need to try them all; just work your way down the list until you find the one that solves the problem.
- Update your network driver
- Verify the integrity of game files
- Reset your network
- Allow your game through Windows Firewall
- Flush DNS and renew your IP
- Change the DNS server
- Enable UPnP
- Forward ports
- Perform a clean boot
Fix 1: Update your network driver
Outdated or faulty network drivers are a common cause of server connection errors in Rainbow Six Siege. Many players have found that even when their internet works fine for other activities, an outdated network driver can prevent Siege from establishing a stable connection to Ubisoft’s servers, hence the server connection error. So you should update your network driver to see if it’s the culprit.
There are two ways for you to update the driver:
Manually – You can manually update your network adapter driver by going to the manufacturer’s official website to download and install the correct network driver for your system.
Automatically – If you don’t have the time, patience or computer skills to update your network driver manually, you can, instead, do it automatically with Driver Easy.
Driver Easy will automatically recognize your system and find the exact correct network drivers corresponding with your Windows version, and it will download and install them correctly:
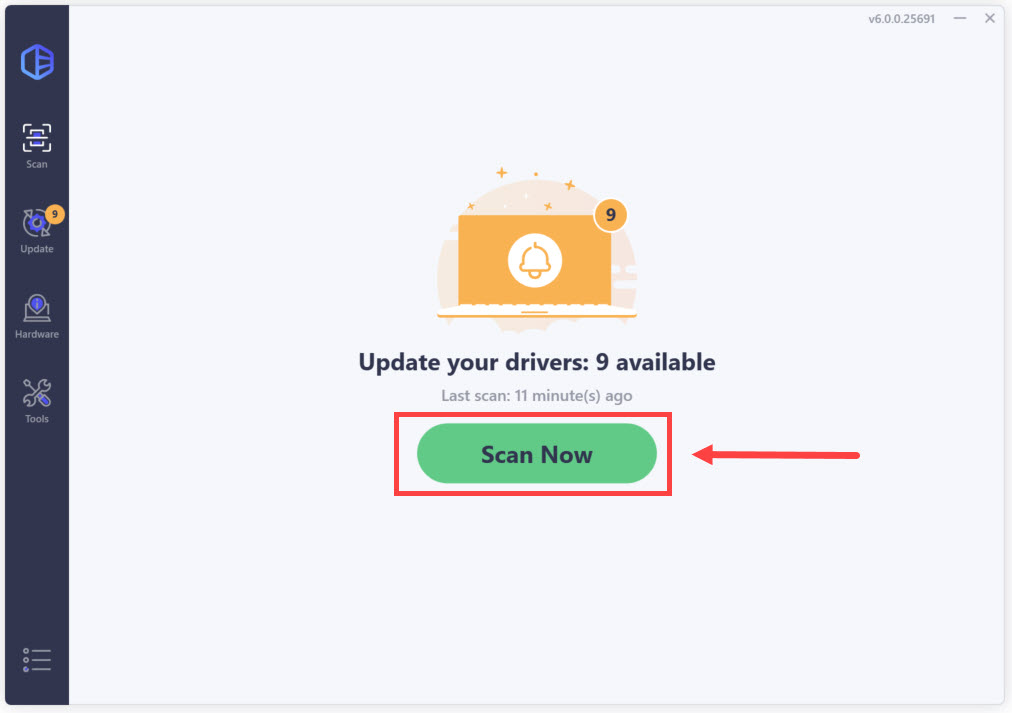
- Download and install Driver Easy.
- Run Driver Easy and click the Scan Now button. Driver Easy will then scan your computer and detect any problem drivers.
- Click Update All to automatically download and install the correct version of all the drivers that are missing or out of date on your system.
(This requires the Pro version which comes with full support and a 30-day money-back guarantee. You’ll be prompted to upgrade when you click Update All. If you’re not ready to buy the Pro version, Driver Easy offers a 7-day free trial which includes access to all the Pro features such as high-speed download and one-click install. You won’t be charged anything until your 7-day trial has ended.)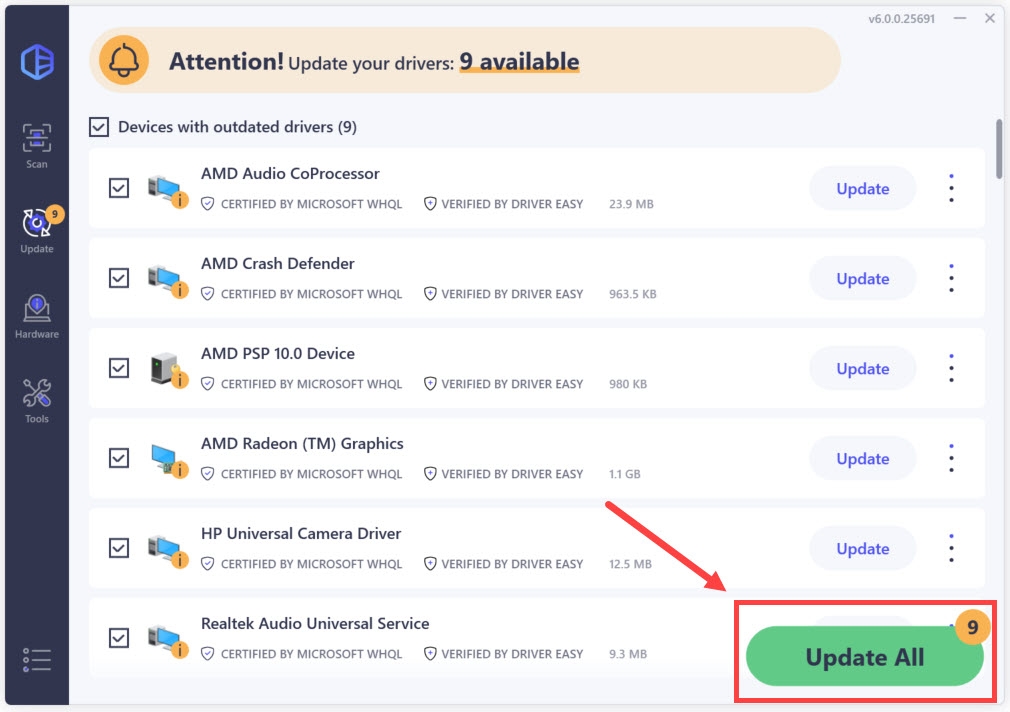
- Restart your computer for the changes to take effect.
- Launch ainbow Six Siege and see if the network error has been resolved. If yes, then congrats! If it still persists, please move on to Fix 2, below.
Fix 2: Verify the integrity of game files
Corrupted game files can cause many connection issues, especially after a game update. This may not happen very often, but be sure to do this basic troubleshooting and run the game and your game launcher as an administrator before you head on to other fixes.
Verify game integrity in Steam
- Go to the Library, right-click Rainbow Six Siege, and select Properties from the menu.
- Select the Installed Files tab and click the Verify integrity of game files button.
- Steam will verify the game’s files – this process may take several minutes.
Verify game integrity in Uplay
- In Uplay, click on the Games tab at the top of the window.
- On the next screen, hover over the Rainbow Six Siege‘s game tile. This will make a little arrow appear at the bottom right of the tile.
- Click on this arrow to make a drop-down menu appear, then click on Verify files.
Fix 3: Reset your network
If the game is installed correctly but you still experience server connection errors when launching Rainbow Six Seige, you can try resetting your router or modem. Here’s how:
- Shut down all computers or consoles connected to your modem or router.
- Unplug the modem or router.
- Wait for 60 seconds.
- Plugin the modem or router. You’ll notice the lights are blinking. It may take 2 to 3 minutes for your modem or router to fully boot up.
- Turn on your computer or console again, and play the game to test the issue.
Fix 4: Allow your game through Windows Firewall
The server connection error in Rain Six Seige might be associated with your Windows Firewall. To see if the firewall is blocking your game, please follow these steps:
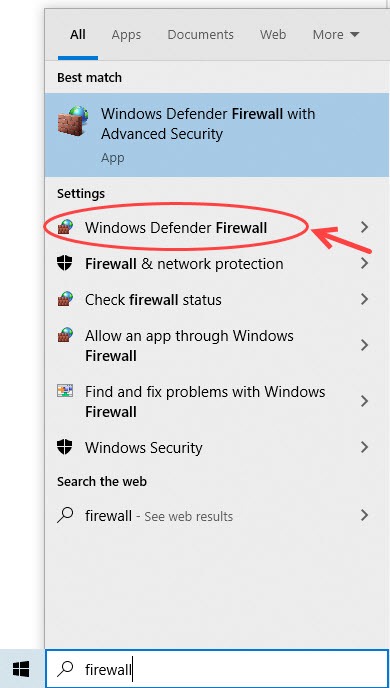
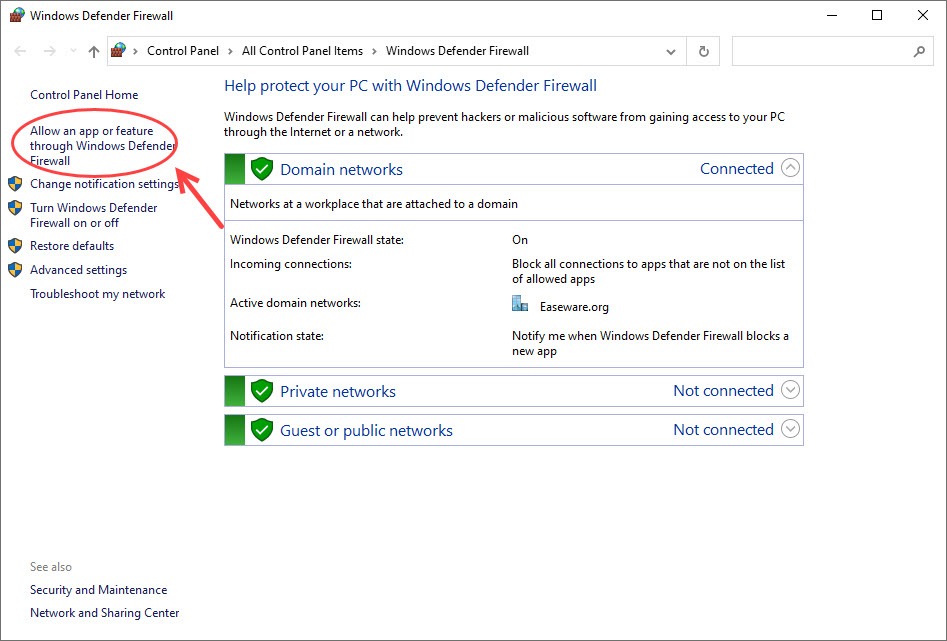
- On your keyboard, press the Windows logo key + S key to invoke the Search box.
- Type firewall and select Windows Defender Firewall.
- On the left pane, click Allow an app or feature through Windows Defender Firewall.
- Make sure your Rainbow Six Seige is on the list, and also make sure it’s ticked for Private.
- If you don’t find Rainbow Six Seige, click Change settings.

- Click Allow another app…
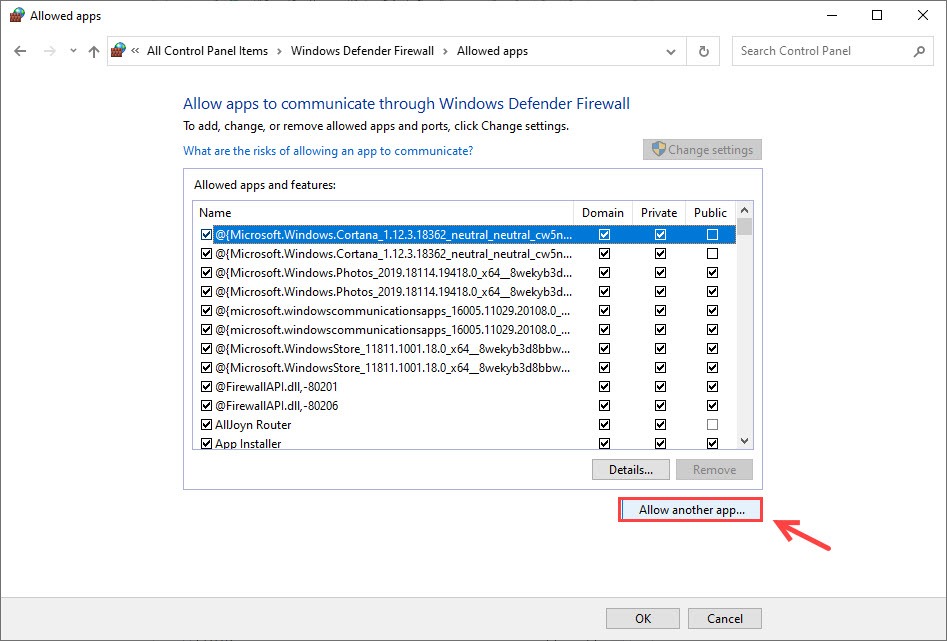
- Add Rainbow Six Seige executable file and click OK to apply the changes.
- Launch your game again and see if the error has been resolved by now.
Fix 5: Flush DNS and renew your IP
Another possible cause of your Rainbow Six Seige server connection errors is the stored DNS cache on your PC. Some players managed to fix the connection issue by flushing the DNS cache:
- Right-click the Start menu (the Windows logo) in the lower-left corner, and select Windows PowerShell (Admin). If you’re on Windows 11, it will be Terminal (Admin).

- Type the command line
ipconfig /flushdnsand press Enter on your keyboard.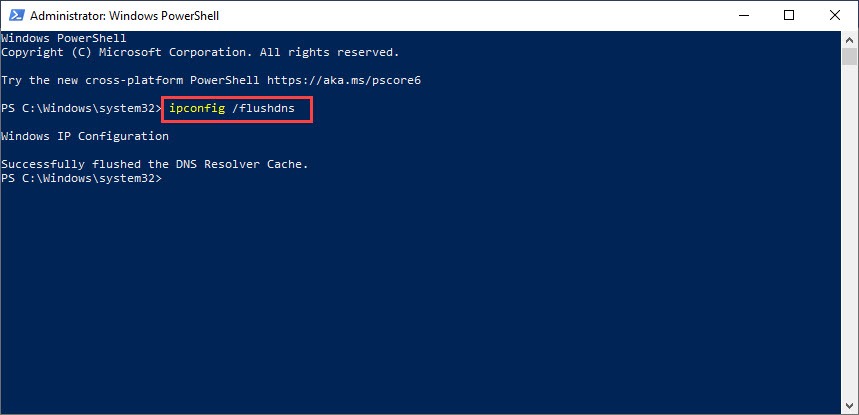
- To renew your IP, please type the following two command lines separately and press Enter.
Command-line 1: ipconfig /release
Command-line 2:ipconfig /renew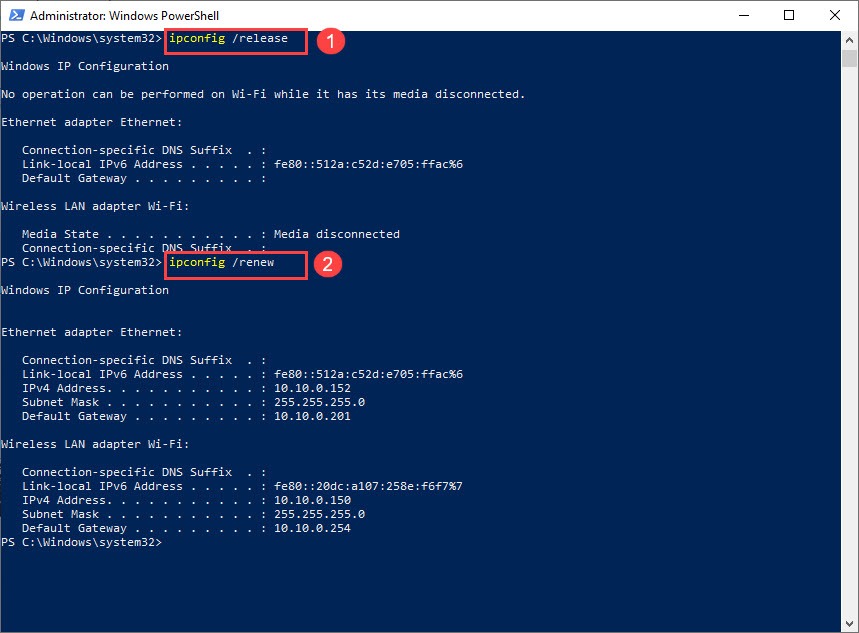
- Now launch your game and see if your Rainbow Six Seige can communicate with the web servers correctly.
Fix 6: Change the DNS server
The chances are that you’re using the default DNS servers assigned by your ISP. For the most time, this won’t cause any problems, but it might be the cause of your server connection issues. Try changing the DNS server to the Goggle Public DNS addresses to see if this helps:
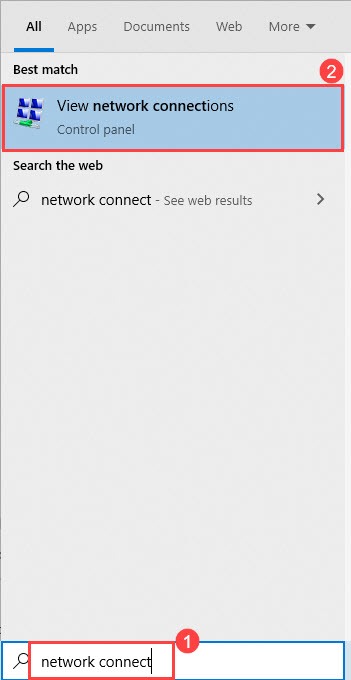
- On your keyboard, press the Windows logo key and S at the same time to open the Search box.
- Type network connections in the field and select View network connections.
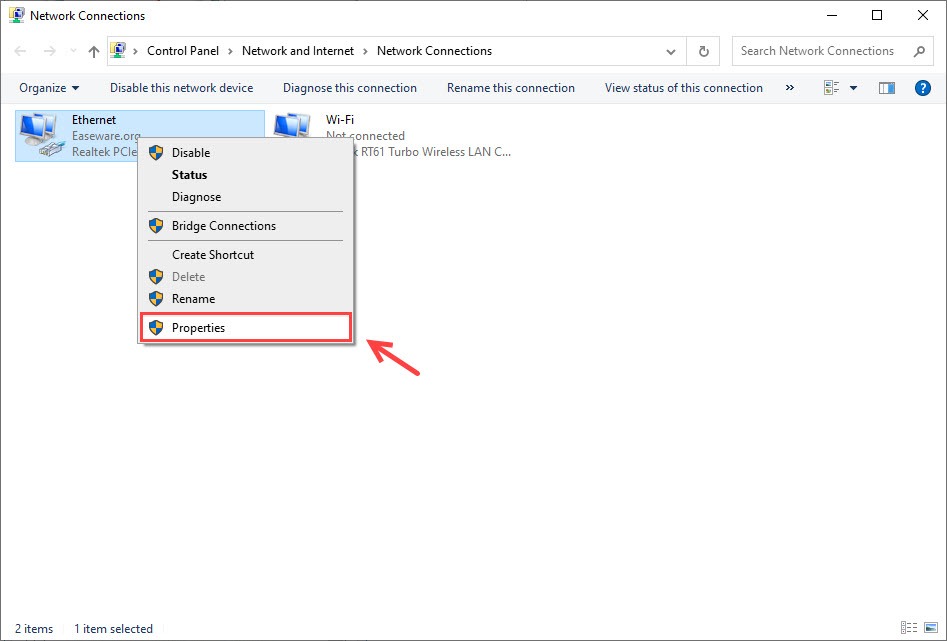
- Right-click your current network and click Properties.
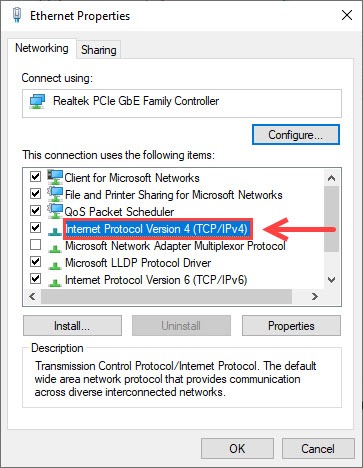
- Double-click Internet Protocol Version 4 (TCP/IPv4) to view its properties.
- Make sure you check the option Obtain an IP address automatically (the default setting).
- Select Use the following DNS server addresses, and enter the following addresses:
Preferred DNS server: 8.8.8.8
Alternative DNS server: 8.8.4.4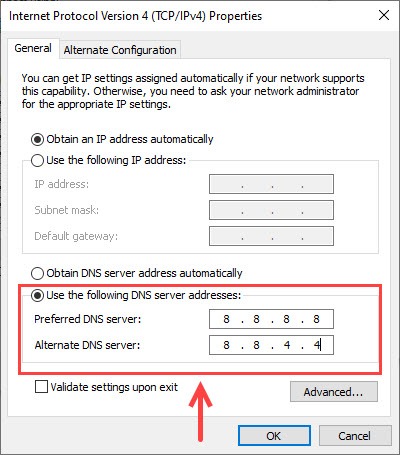
(You can press the Spacebar to move to the next number, and press Tab to move to the next line.) - Click OK to apply the changes.
- Launch your game to see if this issue has been resolved.
Fix 7: Enable UPnP
Some players find enabling UPnP (Universal Plug and Play), a feature that allows applications to automatically open ports for communication, helped them solve this connection error.
You can turn this feature on if you are a heavy user of applications that need port forwardings, such as peer-to-peer applications, game servers, and many VoIP programs.
If your router supports UPnP, you’ll find an option to enable it in its web interface.
Once UPnP has been enabled on your computer, try launching your game again to test the issue.
Fix 8: Forward ports
Your router comes preconfigured with a few ports open to let you access the Internet, but some ports are closed tight. To run a game server, you will need to open another port, which is called Port Forwarding. Here’s how:
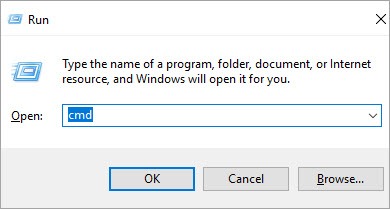
- On your keyboard, press the Windows logo key and R to open the Run box.
- Type cmd in the field and press Enter.
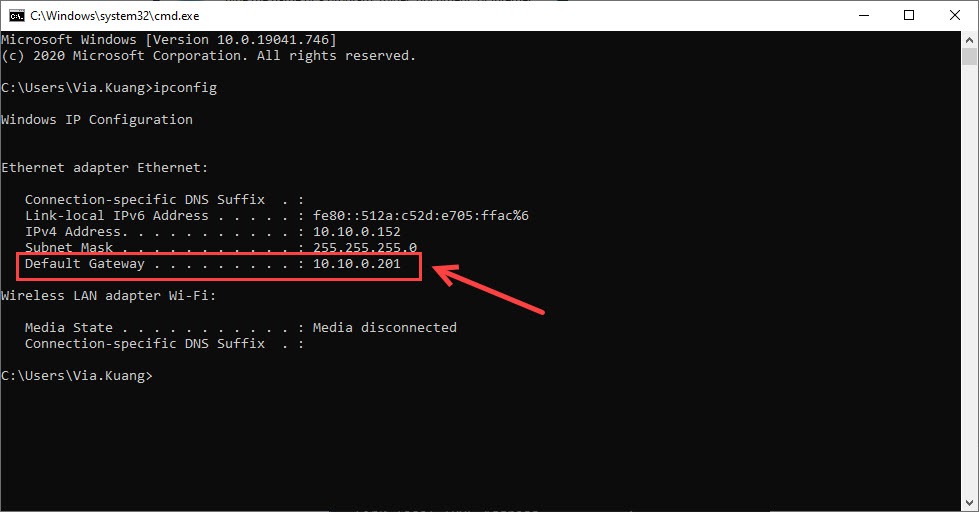
- Type in ipconfig and press Enter. Select the Default Gateway address and press Ctrl + C to copy (10.10.0.201 in my case). Also, don’t close the window, since you will need the IPv4 Address later.
- Login to your router via the default gateway address (paste the address in the browser URL search bar).
- Enter your router credentials into the login page.
This requires you to sign in with the default settings (check the bottom of your router or its manual for a default username and password) or the custom username and password you previously set up. You can check the most common credentials below: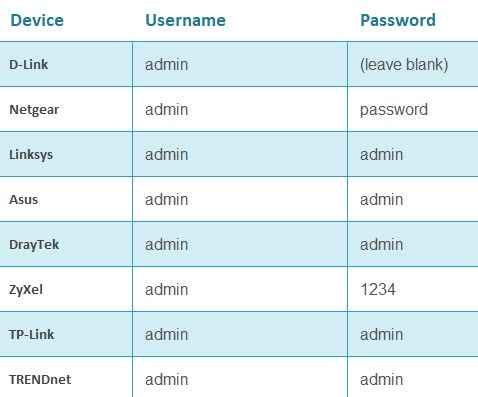
Note: Some routers cannot be accessed via a browser but require a dedicated router app. - Locate the port forwarding settings. Typically this will be under Advanced and then Port Forwarding or Virtual Server.
- For the Protocol fields, you will need to select or input UDP, TCP, or Both.
These are the ports you need for Rainbow Six Siege:- Uplay PC:
TCP: 80, 443, 13000, 13005, 13200, 14000, 14001, 14008, 14020, 14021, 14022, 14023 and 14024 - Game Ports:
TCP: 80, 443
UDP: 10000-10099, 3074, 6015
- Uplay PC:
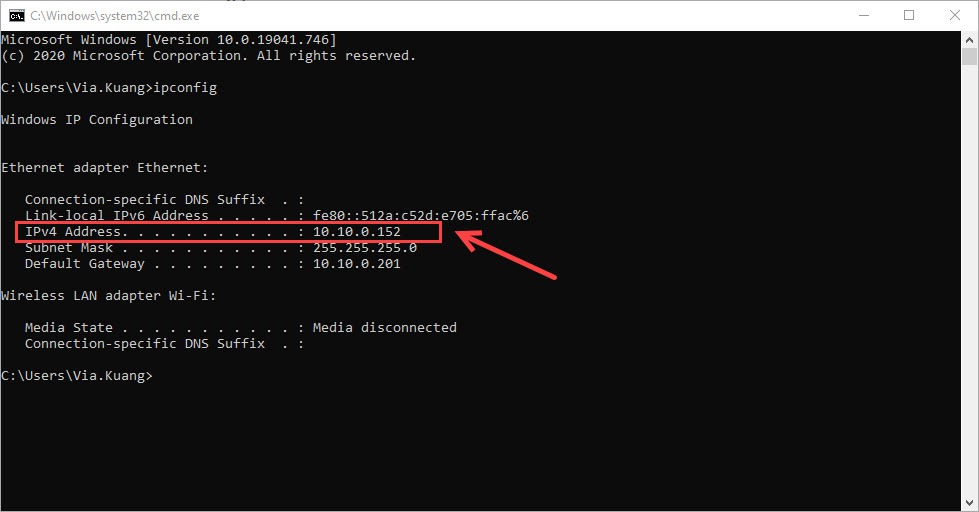
- For the Local IP fields, you will need to input the IPv4 address that you obtained earlier.
- After adding all of your desired ports, you can Save or Apply the changes that you have made.
Fix 9: Perform a clean boot
A clean boot allows you to start Windows without running non-Microsoft services. It would help you troubleshoot and determine what application or program is interfering with your Rainbow Six Seige.
To know how to perform a clean boot, check this post for more details: How to Perform a Clean Boot in Windows 10
After rebooting, enable the disabled devices one at a time to find out which is the service that causes Rainbow Six Seige server connection errors.
Hopefully, the fixes above can be of some help. If you have any questions, ideas, or suggestions, please feel free to leave your comments.