


Objectively, external webcams such as Logitech webcams offer better video quality, plus a range of features. But there are some situations where you may run into issues like the built-in microphone (it could be your C920 webcame) not working all of a sudden. Instead of investing in another expensive webcam, there are several things you can do to reclaim your own voice.
Try these fixes:
You may not need to try them all; simply work your way down the list until you find the one that works.
- Install all Windows updates
- Update your webcam driver
- Allow access to your webcam built-in microphone
- Make sure your mic isn’t disabled
- Set your device as default
1. Install all Windows updates
Windows updates are used to keep Microsoft Windows and several other Microsoft programs updated. They often include feature enhancements and security updates to protect Windows from the malware and malicious attacks which would probably lead to your programs malfunctioning. Therefore, before trying the solutions listed below, you need to download and install the latest Windows updates.
Here’s how you can do this:
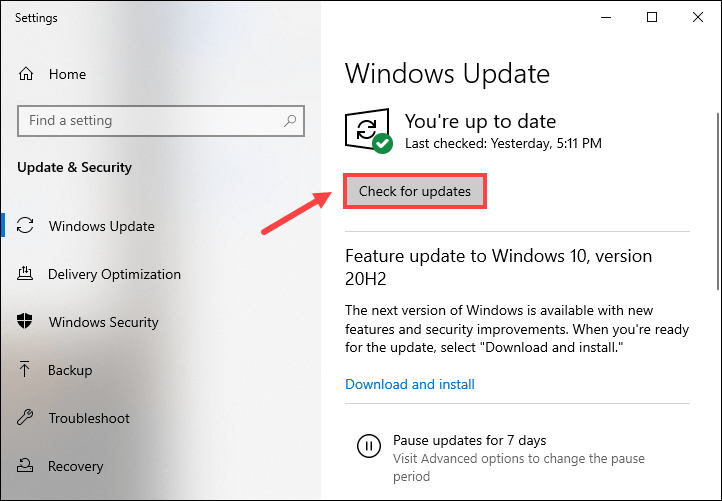
1) In the Search box, type in check for updates. Click Check for updates from results.

2) Click on the Check for updates tab. If there are any updates available, it’ll automatically start to download and install it. Simply wait for it to complete and you should be asked to restart your computer.
Once you’ve installed the latest Windows updates, try to use the microphone to check if it’s working now. If not, try the next fix below.
2. Update your webcam driver
The built-in microphone won’t be functioning properly if you’re using a corrupted or outdated webcam driver. It would stop you from getting the most out of your device and you may be lacking a new feature required for the microphone to work as expected. Therefore, to troubleshoot the issue you’re having, you need to update your webcam driver.
You can download and install the latest driver from the support page.
OR
You can update your drivers with Driver Easy. It’s a useful tool that automatically detects any outdated drivers, then downloads, and installs the latest drivers for your system.
Here’s how to update your drivers with Driver Easy:
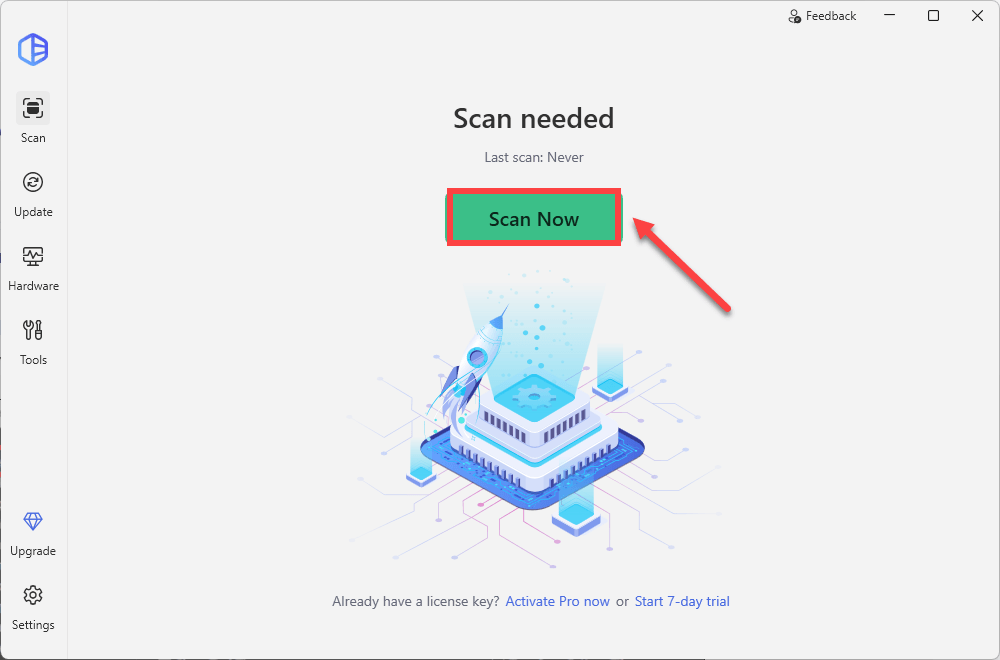
1) Download and install Driver Easy.
2) Run Driver Easy and click the Scan Now button. Driver Easy will then scan your computer and detect any outdated drivers.
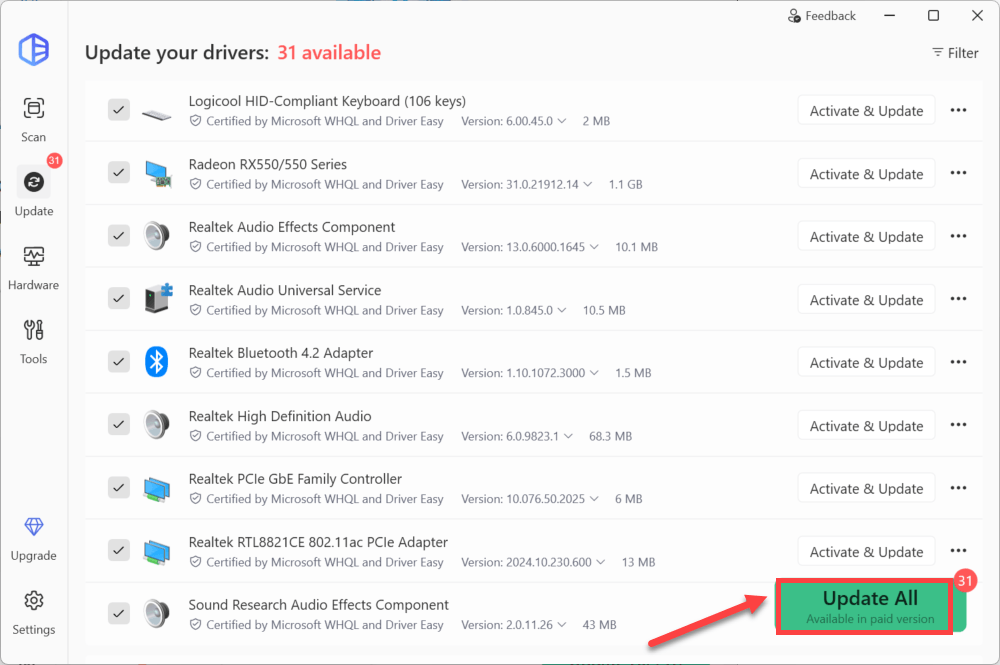
3) Click the Activate & Update button next to any flagged device or click Update All to update all the outdated drivers. You can sign up for the free trial to update drivers with no upfront cost.
After updating your drivers, restart your computer and do a mic test to check if the problem is solved. If not, then continue trying the fixes below.
3. Allow access to your webcam built-in microphone
On Windows, you can decide whether your system and apps can access the microphone. In case you’ve disabled the access for some reasons, you should check the settings and grant the permission for the access by following the instructions below:
on Windows 10
1) Press the Windows logo key + I at the same time to open Settings.
2) Click Privacy.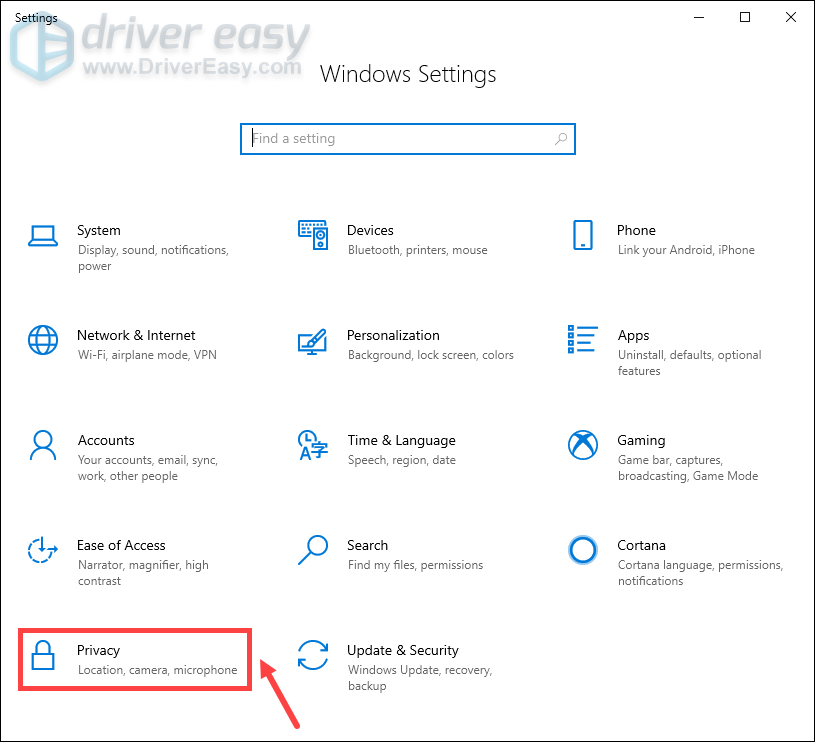
3) Click Microphone on the left pane. Then click on the Change button and make sure Microphone access for this device is turned on.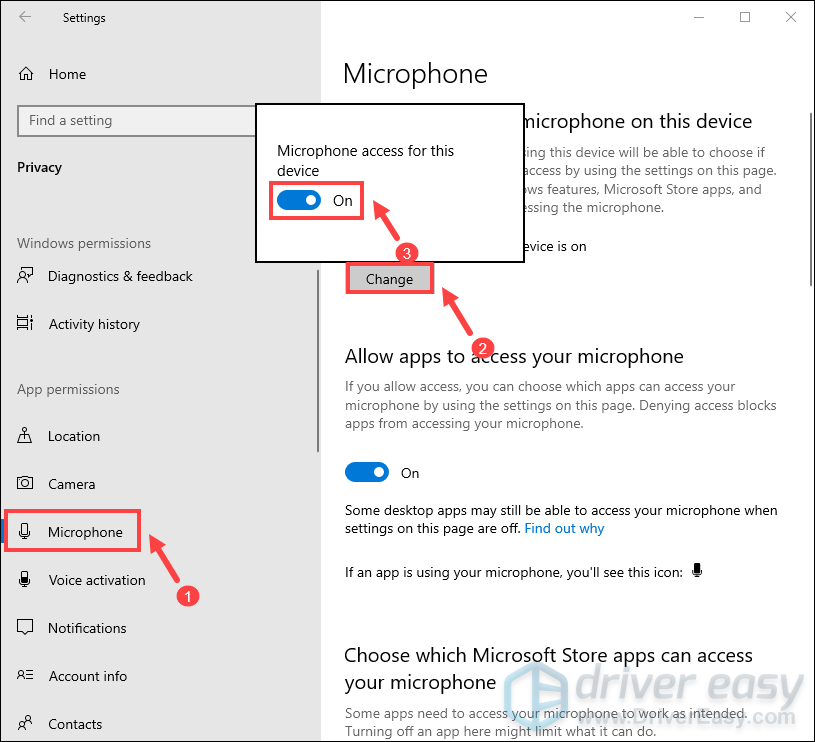
4) Under the Allow apps to access your microphone section, make sure it’s turned On.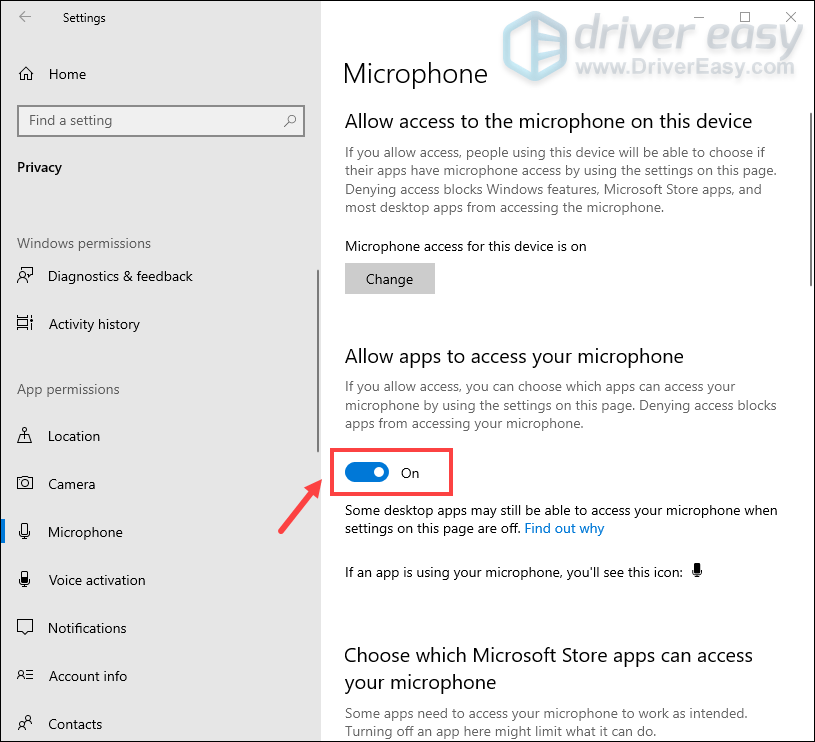
5) Once you’ve allowed the microphone to access your apps, you can change the settings for each app. Simply head to the Choose which Microsoft apps can access your microphone, and turn on apps you want to use with it. For desktop apps, make sure that Allow desktop apps to access your microphone is turned On.
on Windows 11
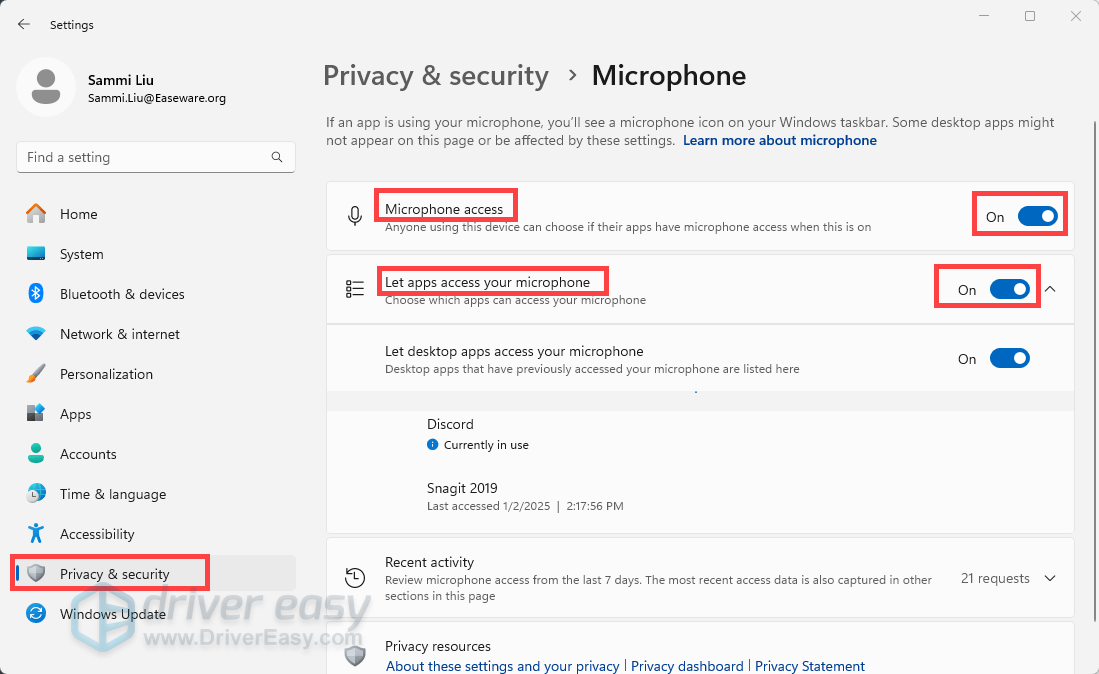
1) On your keyboard, press the Windows logo + I keys simultaneously to open Settings.
2) Select Privacy & security, make sure you toggle on Microphone access and Let apps access your microphone.
After you’ve done all of these, try to use your webcam microphone and check if it’s working properly. If the issue persists, try the next fix below.
4. Make sure your mic isn’t disabled
Sometimes you may not notice that your microphone has accidentally been disabled. To check if that’s your case, take these steps:
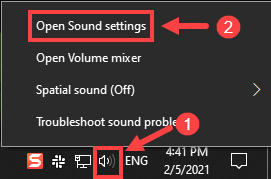
1) Right-click on the Speaker icon on the bottom-right corner of your screen. Then select Open Sound settings.
2) Under the Input section, make sure that your device is showing. Then click Device Properties.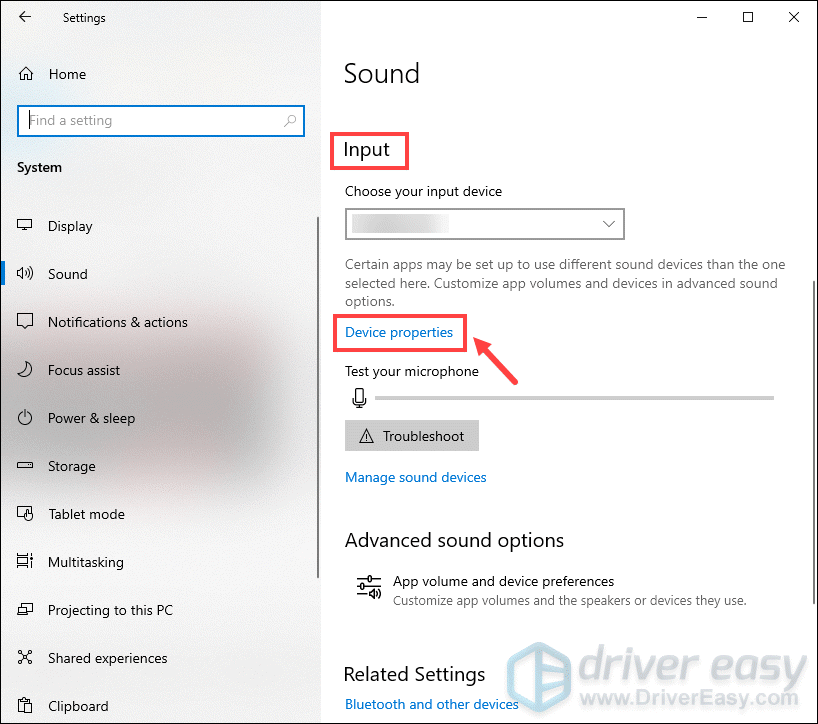
3) Make sure the box next to Disable is unchecked. 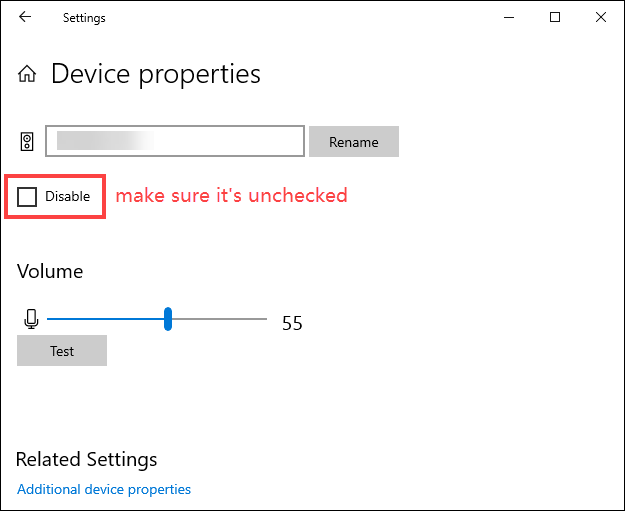
After you’ve confirmed that the microphone is enabled, try to speak something to see if it’s now back to the normal state. If the microphone is still not working, try the next fix below.
5. Set your device as default
When you’re using an external camera, you might need to set that device as the audio device in order to access the built-in microphone. Normally, when your microphone is connected, Windows can automatically detect it and set it as the default input device. But sometimes it just fails to do that and you have to set it manually:
1) Right-click on the Speaker icon on the bottom-right corner of your screen. Then select Open Sound settings.
2) Scroll down to the section of Related Settings and click Sound Control Panel.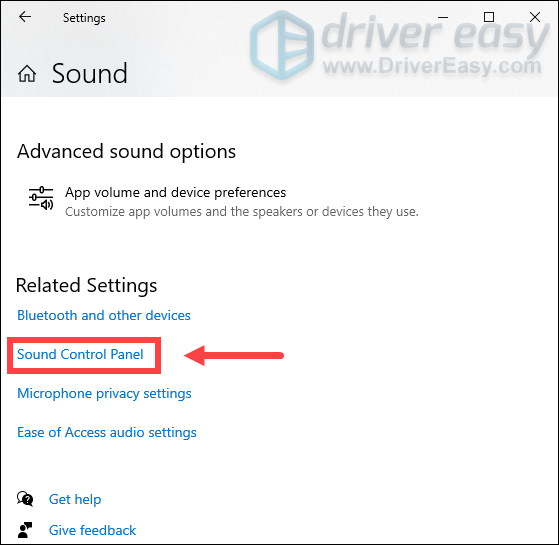
3) Select the Recording tab. Select your microphone and then click Set Default > OK.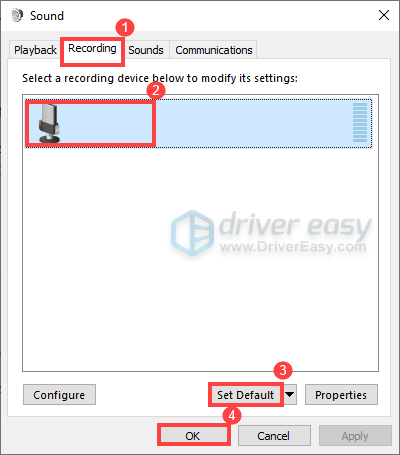
After applying changes, do a mic test to check if this method did the trick. If the microphone is still not working, you need to check the input sensitivity of your mic to ensure it is not too low or too high which could cause issues. Here’s how you can do this:
1) In the Sound window (shown as the picture above), right-click the microphone and select Properties.
2) Go to the Levels tab. Then, drag the slider to adjust the volume. While performing this step, you need to do a mic test at the same time.
Hopefully, this post helps. If you have any suggestions or questions, feel free to leave us a comment below.